-
cPicture 4.10
cPicture is updated to version 4.10
- added new JPEG10 Lossless Exposure & Contrast Adjustment
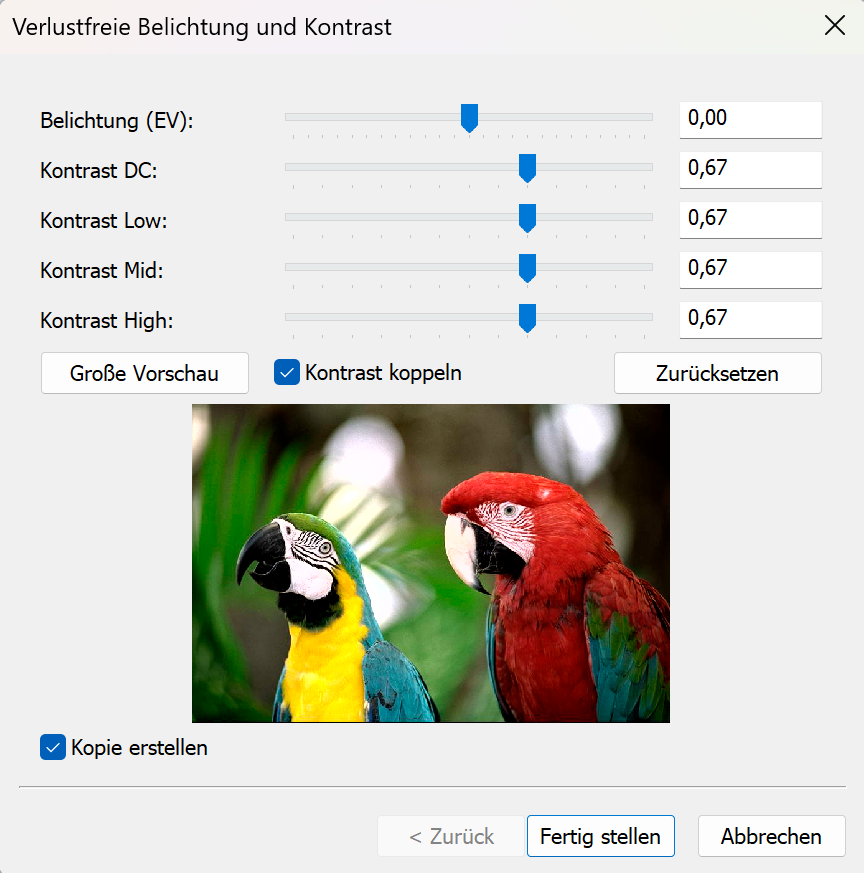
Exposure compensation from -2EV to +2EV:
Contrast from -1CV to +1CV:
See this blog entry
- Updated format plugin version to 4.10
- Maintenance update and minor changes
cPicture is a portable application consisting of a single .exe file and optional plugin files.
Download the MSI file to copy the app to a folder or use the 'Check for updates' button in the 'Other' category.
Download German 64bit Installer MSI
Download English 64bit Installer MSI
More languages are available from the cPicture site.
Alternative download from githubSee the Download Instructions for more details.
For questions, please mail to: cpicture
- added new JPEG10 Lossless Exposure & Contrast Adjustment
-
Lossless Exposure & Contrast Adjustment in JPEG10
Lossless Tonal Adjustments in JPEG's DCT Domain: Exposure Compensation and Multi-Band Contrast
Most JPEG workflows treat exposure (brightness) and contrast as inherently "lossy": decode pixels, apply curves, then re-encode. That approach works, but it always introduces an additional step of quantization error.
In this github fork of the IJG JPEG-10 code, I added two options to
jpegtranthat operate directly on quantized DCT coefficients:-exposure-comp EV-contrast DC LOW MID HIGH
Both are applied during transcoding, so they combine naturally with existing
jpegtranoperations such as rotation, flipping, cropping, marker copying, and progressive conversion.https://github.com/jurgen178/jpeg10
Download Windows x64 binary: jpegtran.zip
Quick Usage
jpegtran [standard options] [-exposure-comp EV] [-contrast DC LOW MID HIGH] input.jpg output.jpgExamples:
# Brighten by 1 stop
jpegtran -copy all -exposure-comp 1 input.jpg output.jpg

# Darken by 0.5 stops
jpegtran -copy all -exposure-comp -0.5 input.jpg output.jpg

# Contrast (uniform: DC=LOW=MID=HIGH)
jpegtran -copy all -contrast -1   -1   -1   -1   input.jpg out-contrast-u-1.jpg
jpegtran -copy all -contrast -0.5 -0.5 -0.5 -0.5 input.jpg out-contrast-u-0.5.jpg
jpegtran -copy all -contrast  0.5  0.5  0.5  0.5 input.jpg out-contrast-u+0.5.jpg
jpegtran -copy all -contrast  1    1    1    1   input.jpg out-contrast-u+1.jpg

# Contrast (band-specific examples)
jpegtran -copy all -contrast 0 0 0.6 0   input.jpg out-contrast-mid+0.6.jpg
jpegtran -copy all -contrast 0 0 0 0.4   input.jpg out-contrast-high+0.4.jpg
jpegtran -copy all -contrast 0 0.4 0 0   input.jpg out-contrast-low+0.4.jpg

# Combine: rotate 90°, brighten 0.5 EV, and add uniform contrast +0.5
jpegtran -copy all -rot 90 -exposure-comp 0.5 -contrast 0.5 0.5 0.5 0.5 input.jpg output.jpg
Both switches accept fractional values. Practical ranges:
Option Practical range Neutral -exposure-comp EV-3 … +3 0 -contrast DC LOW MID HIGH-2 … +2 0 Integrated into cPicture with live preview:
Background: DCT Coefficient Basics
A JPEG image is encoded as a grid of DCT blocks (with 8×8 Elements in size). Each block has one DC coefficient and 63 AC coefficients. But each MCU might have more than one block depending on the color subsampling.
-
DC[0] represents the (level-shifted) average sample value of the block. The relationship to pixel mean is:
$$\mu = \frac{DC_\text{unquant}}{N} + \text{center}$$
where $N$ is the DCT block size of 8 and $\text{center} = 2^{\text{precision}-1}$ (e.g. 128 for 8‑bit).
-
AC[1..N²−1] represent spatial frequency components (texture, edges, contrast).
Both DC and AC are stored quantized: the actual stored integer is $\text{round}(\text{value} / Q_k)$, where $Q_k$ is the quantization step for coefficient $k$.
-exposure-comp EV— Exposure CompensationExposure compensation from -2EV to +2EV:
Concept
A photographic EV step corresponds to doubling (or halving) the amount of light. Applied in linear light:
$$\text{gain} = 2^{EV}$$
Because JPEG samples are gamma-coded (sRGB), pixel values cannot be multiplied directly. Instead:
- Estimate a representative level from the DC blocks.
- Compute the equivalent additive pixel-domain offset by applying the gain in linear light at that reference level.
- Translate the offset into a quantized DC delta.
- Add the delta to every DC coefficient.
Only DC is modified. AC coefficients are not modified, so local contrast and texture are preserved.
Reference Level — Log-Average
A geometric mean (log-average) of all block mean levels is used as the exposure reference:
$$\bar{L} = \exp\!\left(\frac{1}{B}\sum_{i=1}^{B} \ln(L_i + 1)\right) - 1$$
where $L_i$ is the intensity mean of block $i$ (clamped to $[0, \text{MAX}]$) and $B$ is the total number of blocks.
sRGB Linearisation
The gain is applied in linear light:
$$u_\text{ref} = \frac{\bar{L}}{\text{MAX}}$$
$$u_\text{ref,lin} = f_\text{lin}(u_\text{ref})$$
$$u_\text{new,lin} = \min(u_\text{ref,lin} \cdot \text{gain},\; 1.0)$$
$$u_\text{new} = f_\text{sRGB}(u_\text{new,lin})$$
The sRGB transfer functions used:
$$f_\text{lin}(u) = \begin{cases} u / 12.92 & u \le 0.04045 \\ \left(\dfrac{u + 0.055}{1.055}\right)^{2.4} & u > 0.04045 \end{cases}$$
$$f_\text{sRGB}(u) = \begin{cases} 12.92\,u & u \le 0.0031308 \\ 1.055\,u^{1/2.4} - 0.055 & u > 0.0031308 \end{cases}$$
Pixel-Domain Offset → Quantized DC Delta
$$\Delta_\text{samples} = (u_\text{new} - u_\text{ref}) \cdot \text{MAX}$$
Clamped to available headroom/shadow room to limit clipping, then converted to a quantized DC delta:
$$\Delta_{DC} = \text{round}\!\left(\frac{\Delta_\text{samples} \cdot N}{Q_0}\right)$$
where $N$ is the DCT block size and $Q_0$ is the DC quantization step.
Component Policy
Color space Components adjusted YCbCr, BG_YCC, YCCK Luma only (component 0) RGB/BG_RGB + subtract-green transform Green/base only (component 1) CMYK, all others All components For CMYK and YCCK the delta is computed in an inverted intensity domain ($I = \text{MAX} - \text{sample}$) so that +EV brightens and −EV darkens.
-contrast DC LOW MID HIGH— Contrast AdjustmentContrast from -1CV to +1CV:
Concept
This option provides four separate controls (all in stops):
DCcontrols the DC coefficient (block mean)LOW,MID,HIGHcontrol the AC coefficients in frequency order
All controls are interpreted as log2 gains (stops). For a value $x$, the gain is:
$$g(x) = 2^{x}$$
So +1 doubles, -1 halves.
DC
DC is scaled by:
$$g_\mathrm{DC} = 2^{DC}$$
and applied as:
$$DC' = \mathrm{clamp}(\mathrm{round}(g_\mathrm{DC} \cdot DC))$$
AC (low/mid/high weighting)
AC coefficients are processed in zigzag order (the JPEG natural order). Let $z$ be the AC position with $z = 1 \ldots A$, where $A$ is the number of AC coefficients.
Define a normalized position:
$$t = \begin{cases} \dfrac{z-1}{A-1} & A > 1 \\ 0 & A = 1 \end{cases}$$
Triangular weights:
- low weight fades out from low frequencies
$$w_\mathrm{low} = \max(0, 1 - 2t)$$
- mid weight peaks in the middle
$$w_\mathrm{mid} = 1 - |2t - 1|$$
- high weight fades in toward high frequencies
$$w_\mathrm{high} = \max(0, 2t - 1)$$
Per-coefficient exponent and gain:
$$v(z) = LOW\cdot w_\mathrm{low} + MID\cdot w_\mathrm{mid} + HIGH\cdot w_\mathrm{high}$$
$$g(z) = 2^{v(z)}$$
Applied to each AC coefficient:
$$AC'[z] = \mathrm{clamp}(\mathrm{round}(g(z)\cdot AC[z]))$$
If
DC = LOW = MID = HIGH = X, then all coefficients are scaled by the same gain $2^X$ (uniform contrast adjustment).Component Policy
Same as
-exposure-comp:- YCbCr/BG_YCC/YCCK: luma only
- RGB subtract-green: base/green only
- otherwise: all components
Ordering and Composition
Both
-exposure-compand-contrastare applied as a post step after any geometric transform (-rot,-flip,-crop, …). The tonal operations work on the final output coefficient arrays, so the order of switches on the command line does not matter.
Implementation notes
- Core implementation:
transupp.c:do_exposure_comp()anddo_contrast()transupp.h: adds new fields tojpeg_transform_info
- CLI parsing:
jpegtran.c
- Feature flags and parameters are stored in
jpeg_transform_infointransupp.h
Summary
-exposure-comp EVshifts brightness by changing only DC coefficients, with EV evaluated in linear light (sRGB transfer) at a log-average reference.-contrast DC LOW MID HIGHscales DC and AC coefficients, with AC gains varying smoothly over frequency order using low/mid/high controls.- Both run in the DCT domain and integrate naturally into the lossless-transformation workflow of
jpegtran.
Example pictures
-
Script plugin (.bat, .ps1, .py)
The script plugins for batch files and powershell files are consolidated into one script plugin, which also adds python script files.
The new plugin is available from the plugins option in cPicture.
Note: The old plugins are still valid, but should be removed as they cause duplicate entries (delete cpp_bat_script.dll and cpp_ps1_script.dll in the plugins folder).Example batch script
@echo OFF

echo file=%1
echo name=%2
echo dir=%3
echo width=%4
echo height=%5
echo sequence number=%6
echo number of files=%7

REM wait for user to close the console
pause
Example PowerShell script
<#
.DESCRIPTION
    Example PowerShell script to print the picture data

.NOTES
    This example is using the default cPicture custom data template
    for the $picture_data.cdata value.
    This value can be changed in the Settings (F9).
    The .DESCRIPTION text is used for the menu tooltip.
#>

# plugin variables
# Do not remove the leading # of the variable #[...]:

# console=true (default) displays a console, use this option for scripts with text output.
#[console=true]

# noexit=true keeps the console open, set to 'false' (default) to have the console closed when processing is done. This variable is only used when #[console=true].
#[noexit=false]

param
(
    [Parameter(Mandatory=$true)]
    [string]$picture_data_json
)

# Get the picture data.
$picture_data_set = ConvertFrom-Json -InputObject $picture_data_json

# Print the number of pictures.
[int]$size = $picture_data_set.length
Write-Host "$size picture(s):" -ForegroundColor White
Write-Host ("-" * 15)
Write-Host

# Print the picture data.
[int]$i = 1
foreach ($picture_data in $picture_data_set) {
    # Example:
    # $picture_data.file   : c:\Bilder\bild1.jpg
    # $picture_data.name   : bild1.jpg
    # $picture_data.dir    : c:\Bilder\
    # $picture_data.width  : 3712
    # $picture_data.height : 5568

    # $picture_data.audio        : false
    # $picture_data.video        : false
    # $picture_data.colorprofile : false
    # $picture_data.gps          : N 47° 37' 0,872498" W 122° 19' 32,021484"
    # $picture_data.aperture     : 5.6   # f/5.6
    # $picture_data.shutterspeed : 1250  # 1/1250s
    # $picture_data.iso          : 100
    # $picture_data.exifdate     : 133553225690000000
    # $picture_data.exifdate_str : 19.03.2024 11:49:29
    # $picture_data.model        : NIKON Z 30
    # $picture_data.lens         : 16-50mm f/3,5-6,3 VR f=44mm/66mm
    # $picture_data.cdata        :  # Configurable with F9
    # name               : Pike-Place-Market-Kreuzung-360x180.jpg
    # dir                : C:\Bilder\
    # size               : 1624x812 Bildpunkte
    # model              : [NIKON Z 30]
    # settings           : 1/1250s ISO 100/21°
    # contains           : Kommentar, XMP, Farbprofil,
    # gps                : N 47° 37' 0,872498" W 122° 19' 32,021484"
    # file_size          : 835 KB (855189 Bytes)
    # file_create_date   : Dienstag, 19. März 2024 um 11:49:29 Uhr
    # file_modified_date : Dienstag, 19. März 2024 um 11:49:29 Uhr
    # exif_date          : Dienstag, 19. März 2024 um 11:49:29 Uhr

    [int]$MP = $picture_data.width * $picture_data.height / 1000000
    "Picture '{0}' ({4} of {5}) with {1}x{2} pixel ({3}MP)" -f $picture_data.file, $picture_data.width, $picture_data.height, $MP, $i, $size
    "  name='$($picture_data.name)', dir='$($picture_data.dir)'`n"

    # Enumerate all data fields.
    foreach ($data in $picture_data.PSObject.Properties) {
        Write-Host "  $($data.Name)" -ForegroundColor Green -NoNewline
        Write-Host ": " -NoNewline
        Write-Host "$($data.Value)" -ForegroundColor Blue
    }

    <#
        Use ConvertFrom-Json when cdata is a json array to access the data elements.
        Otherwise cdata is arbitrary text and use $picture_data.cdata as a string, for example: Write-Host $picture_data.cdata
    #>

    # The default setting for the data is a JSON array matching the tooltip data in cPicture.
    $cdata = ConvertFrom-Json -InputObject $picture_data.cdata

    # Example usage:

    # Use specific data field.
    Write-Host $cdata.model -ForegroundColor Yellow

    # Enumerate all data fields.
    Write-Host "$($cdata.psobject.properties.Value.Count) elements in `$picture_data.cdata:"
    foreach ($data in $cdata.psobject.properties) {
        Write-Host "  $($data.Name)" -ForegroundColor Green -NoNewline
        Write-Host ": " -NoNewline
        Write-Host "$($data.Value)" -ForegroundColor Blue
    }

    "-" * 70

    $i++
}

# Use this to pause the console when using the #[console=true] option.
# Do not use when #[console=false] as the console is not displayed.
Write-Host "Press any key to continue ..."
[void]$host.UI.RawUI.ReadKey("NoEcho,IncludeKeyDown")
Example Python script
"""
Description: Example python script to print the picture data
"""

# plugin variables
# Do not remove the leading # of the variable #[...]:

# console=true (default) displays a console, use this option for scripts with text output.
#[console=true]

# noexit=true keeps the console open, set to 'false' (default) to have the console closed when processing is done. This variable is only used when #[console=true].
#[noexit=true]

import json
import sys
import base64

COLORS = {
    "red": "\033[31m",
    "green": "\033[32m",
    "yellow": "\033[33m",
    "blue": "\033[34m",
    "magenta": "\033[35m",
    "cyan": "\033[36m",
    "white": "\033[37m",
    "reset": "\033[0m"
}

def colored_text(text, color):
    return f"{COLORS.get(color, COLORS['reset'])}{text}{COLORS['reset']}"

# Get the picture data.
def picture_data(base64_string):

    # Decode base64 string
    json_string = base64.b64decode(base64_string).decode('utf-8').rstrip('\0')

    # Parse JSON string
    data = json.loads(json_string)

    # Print the number of pictures.
    print(f"{len(data)} picture(s): {"-" * 15}")
    print()

    # Print the picture data for each selected picture.
    for i, item in enumerate(data):

        # Example:
        # item["file"]   : c:\Bilder\bild1.jpg
        # item["name"]   : bild1.jpg
        # item["dir"]    : c:\Bilder\
        # item["width"]  : 3712
        # item["height"] : 5568

        # item["audio"]        : false
        # item["video"]        : false
        # item["colorprofile"] : false
        # item["gps"]          : N 47° 37' 0,872498" W 122° 19' 32,021484"
        # item["aperture"]     : 5.6   # f/5.6
        # item["shutterspeed"] : 1250  # 1/1250s
        # item["iso"]          : 100
        # item["exifdate"]     : 133553225690000000
        # item["exifdate_str"] : 19.03.2024 11:49:29
        # item["model"]        : NIKON Z 30
        # item["lens"]         : 16-50mm f/3,5-6,3 VR f=44mm/66mm
        # item["cdata"]        :  # Configurable with F9

        print(colored_text(f"Picture {i+1}:", "yellow"))

        mp = int(item["width"] * item["height"] / 1000000)
        print(f"Picture '{item["file"]}' ({i+1} of {len(data)}) with {item["width"]}x{item["height"]} pixel ({mp}MP)")
        print(f"  name='{item["name"]}', dir='{item["dir"]}'")
        print()

        for key, value in item.items():
            print(colored_text(f"  {key}", "green"), end="")
            print(": ", end="")
            print(colored_text(f"{value}", "cyan"))
        print()

        # Use specific cdata field.
        element_name = "Modell"
        if 'cdata' in item and len(item['cdata']) > 0:
            element_value = item['cdata'][0].get(element_name, None)
            print(f"Value of cdata element '{element_name}': {element_value}")
        else:
            print(f"cdata element '{element_name}' not found.")

        # Print cdata elements if they exist.
        if 'cdata' in item:
            print(f"{len(item['cdata'][0])} elements in cdata")
            for i, cdata_item in enumerate(item['cdata']):
                for key, value in cdata_item.items():
                    print(colored_text(f"  {key}", "green"), end="")
                    print(": ", end="")
                    print(colored_text(f"{value}", "cyan"))

        print("-" * 70)

if __name__ == "__main__":
    if len(sys.argv) == 2:
        picture_data(sys.argv[1])
Download the plugin from
Function plug-insmenu and selectManagein cPicture.
See the plugin overview -
JPEG9 features in cPicture4
The new JPEG9 features:
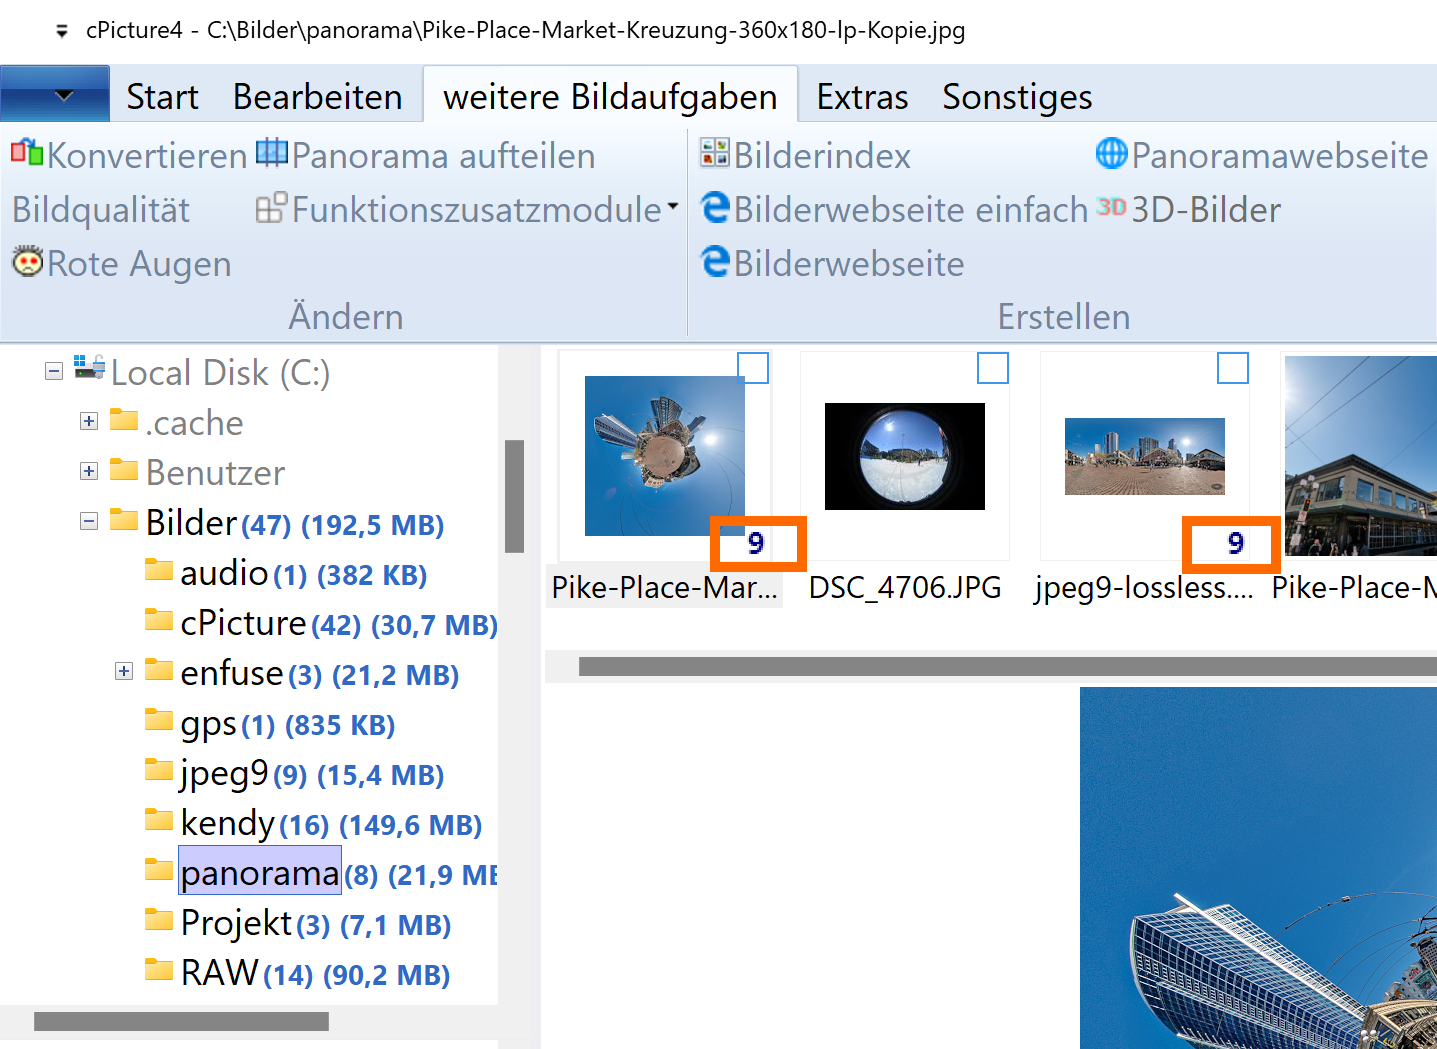
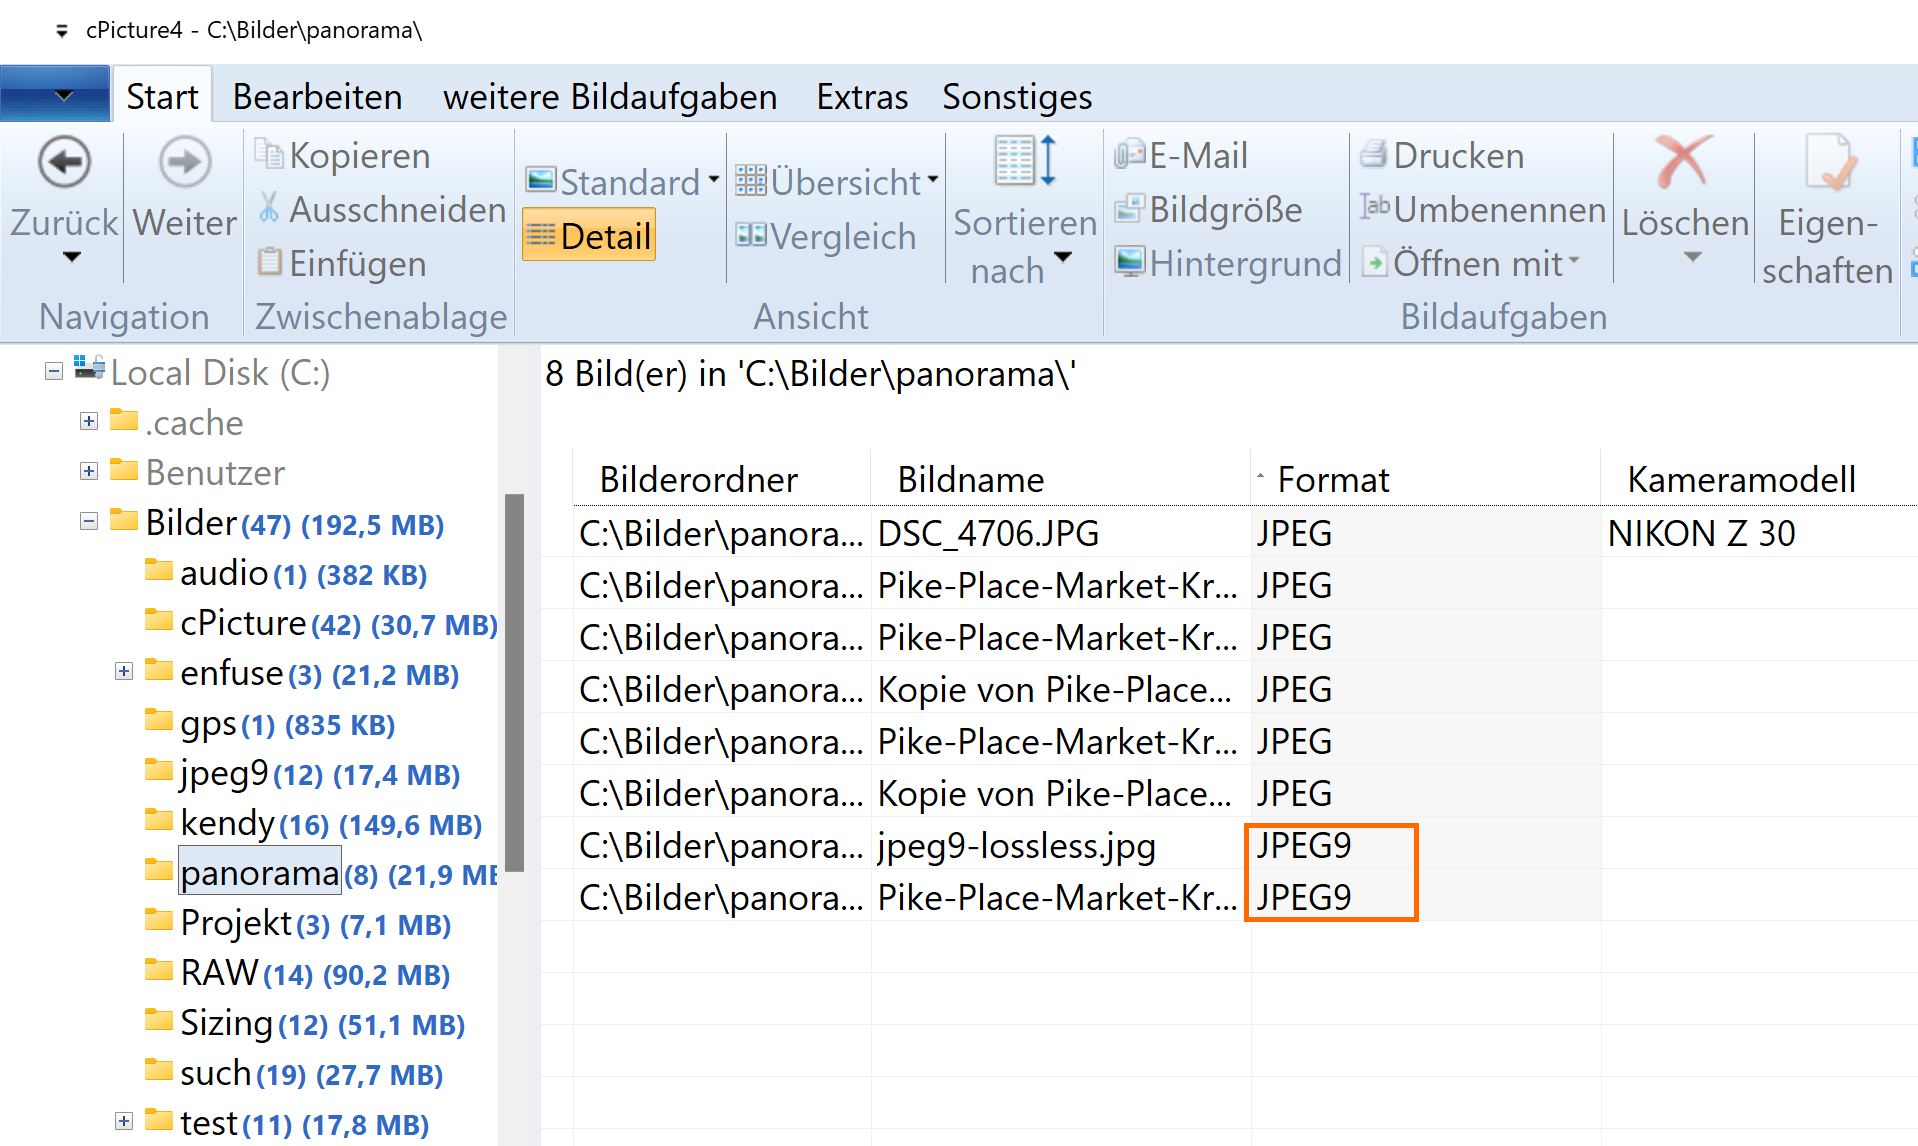
Lossless compressed JPEGs
All lossless compressed JPEGs are displayed with an icon:
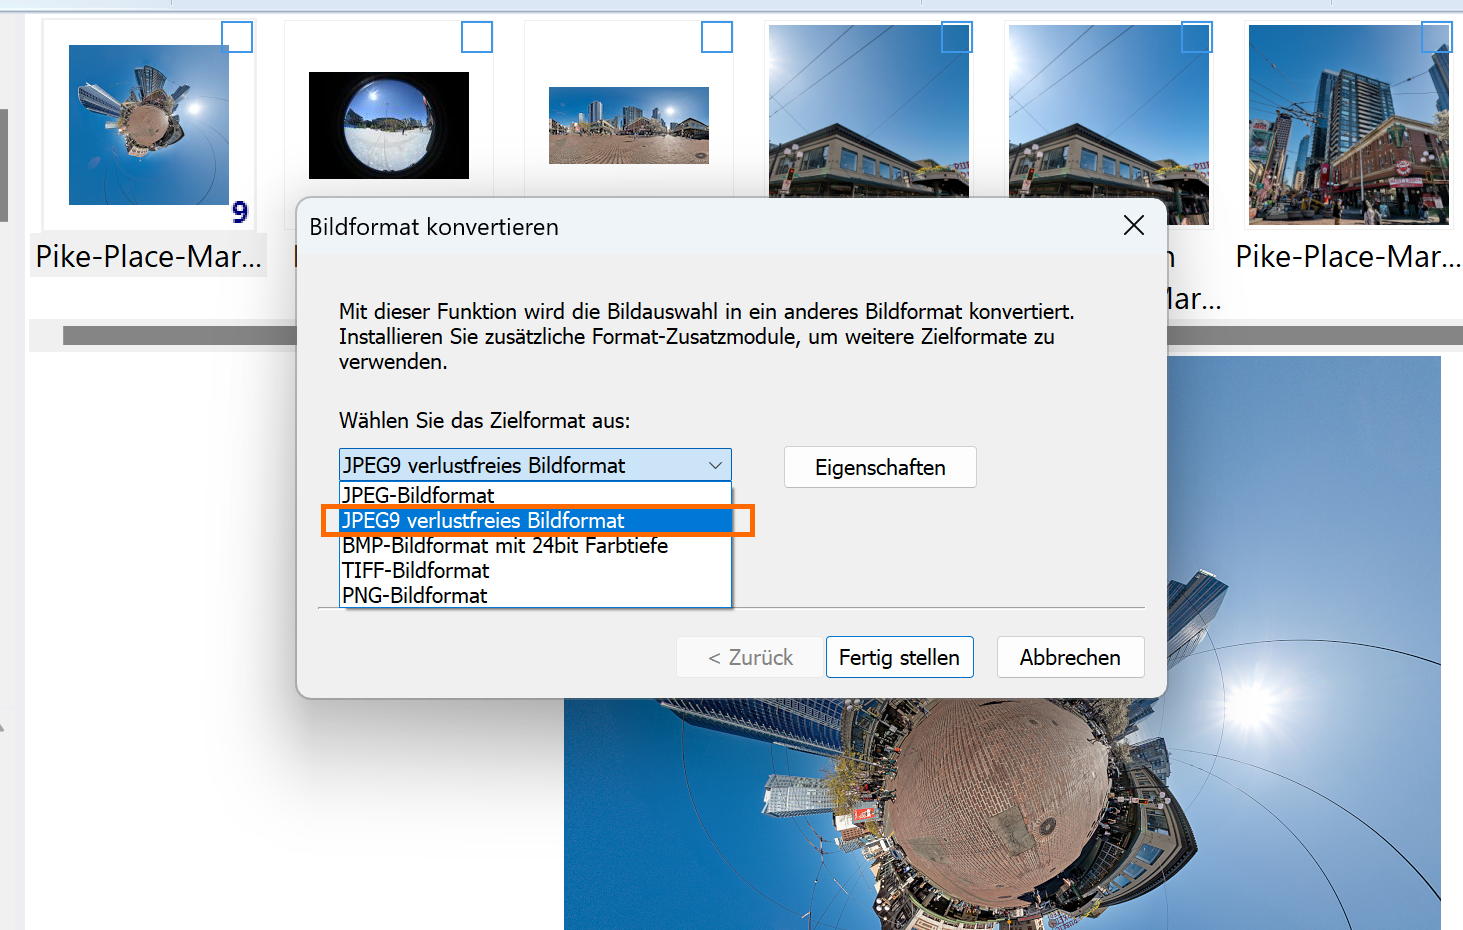
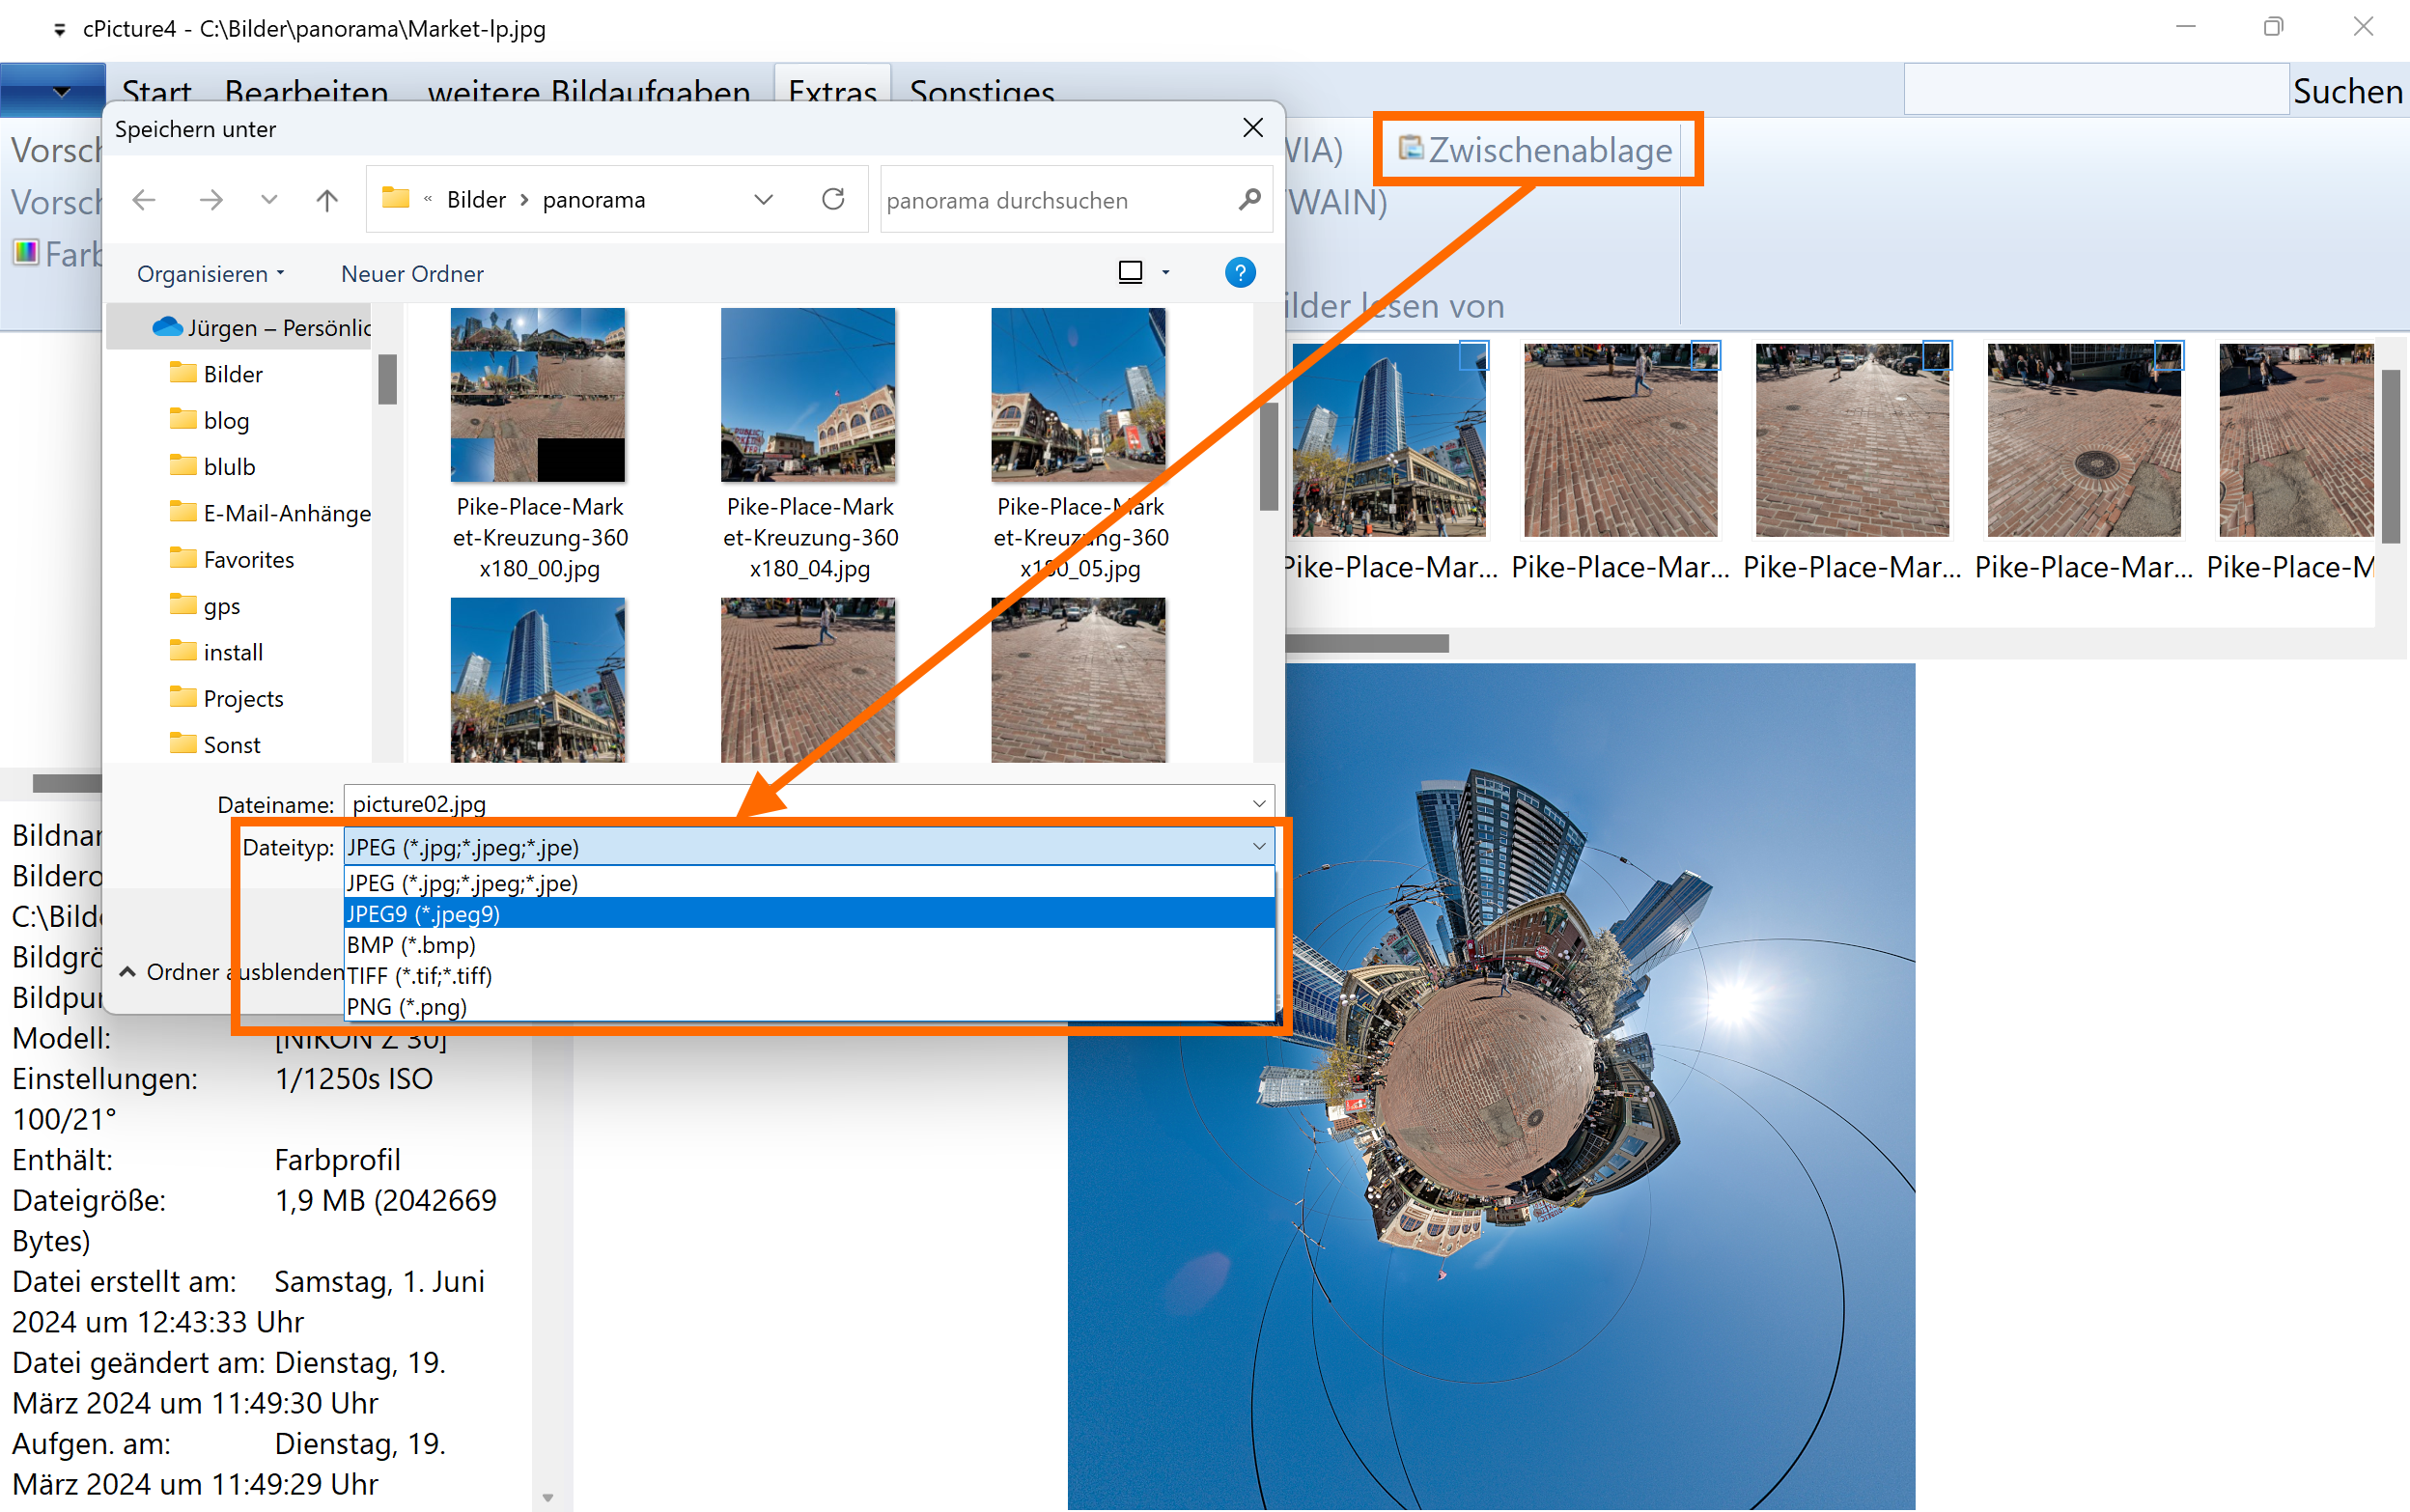
Any supported file format can be saved as a JPEG9 with lossless compression:
JPEG lossless compressed pictures can be easily sorted:
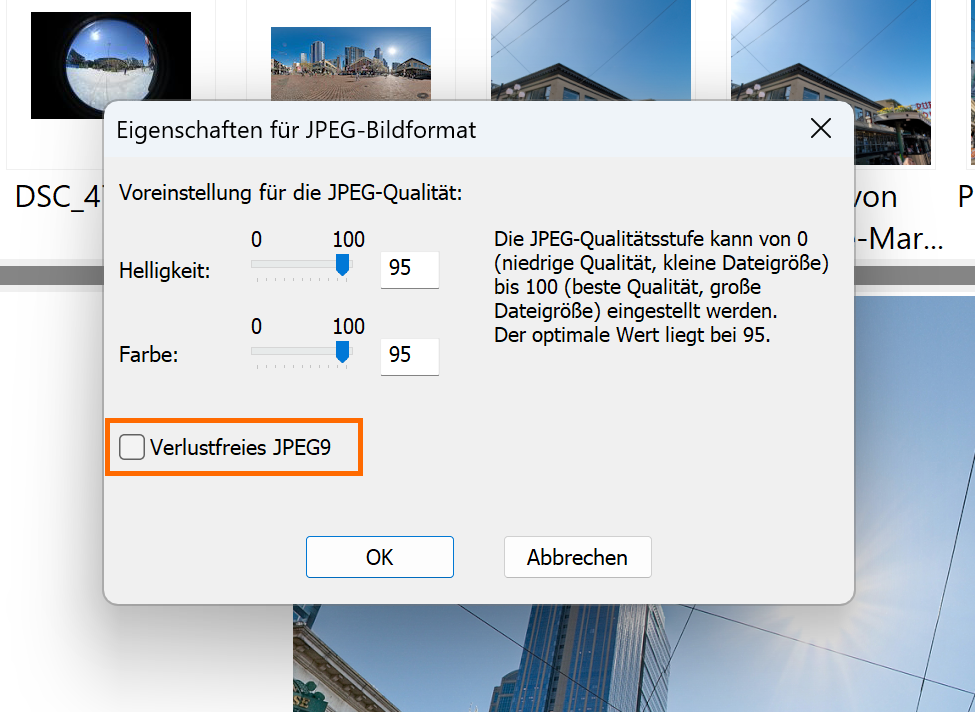
The lossless compression is an additional property of the standard JPEG format. With this setting, any standard JPEG can be saved as lossless compressed JPEG9:
Copy&Paste Bitmaps in the clip board as JPEG9:
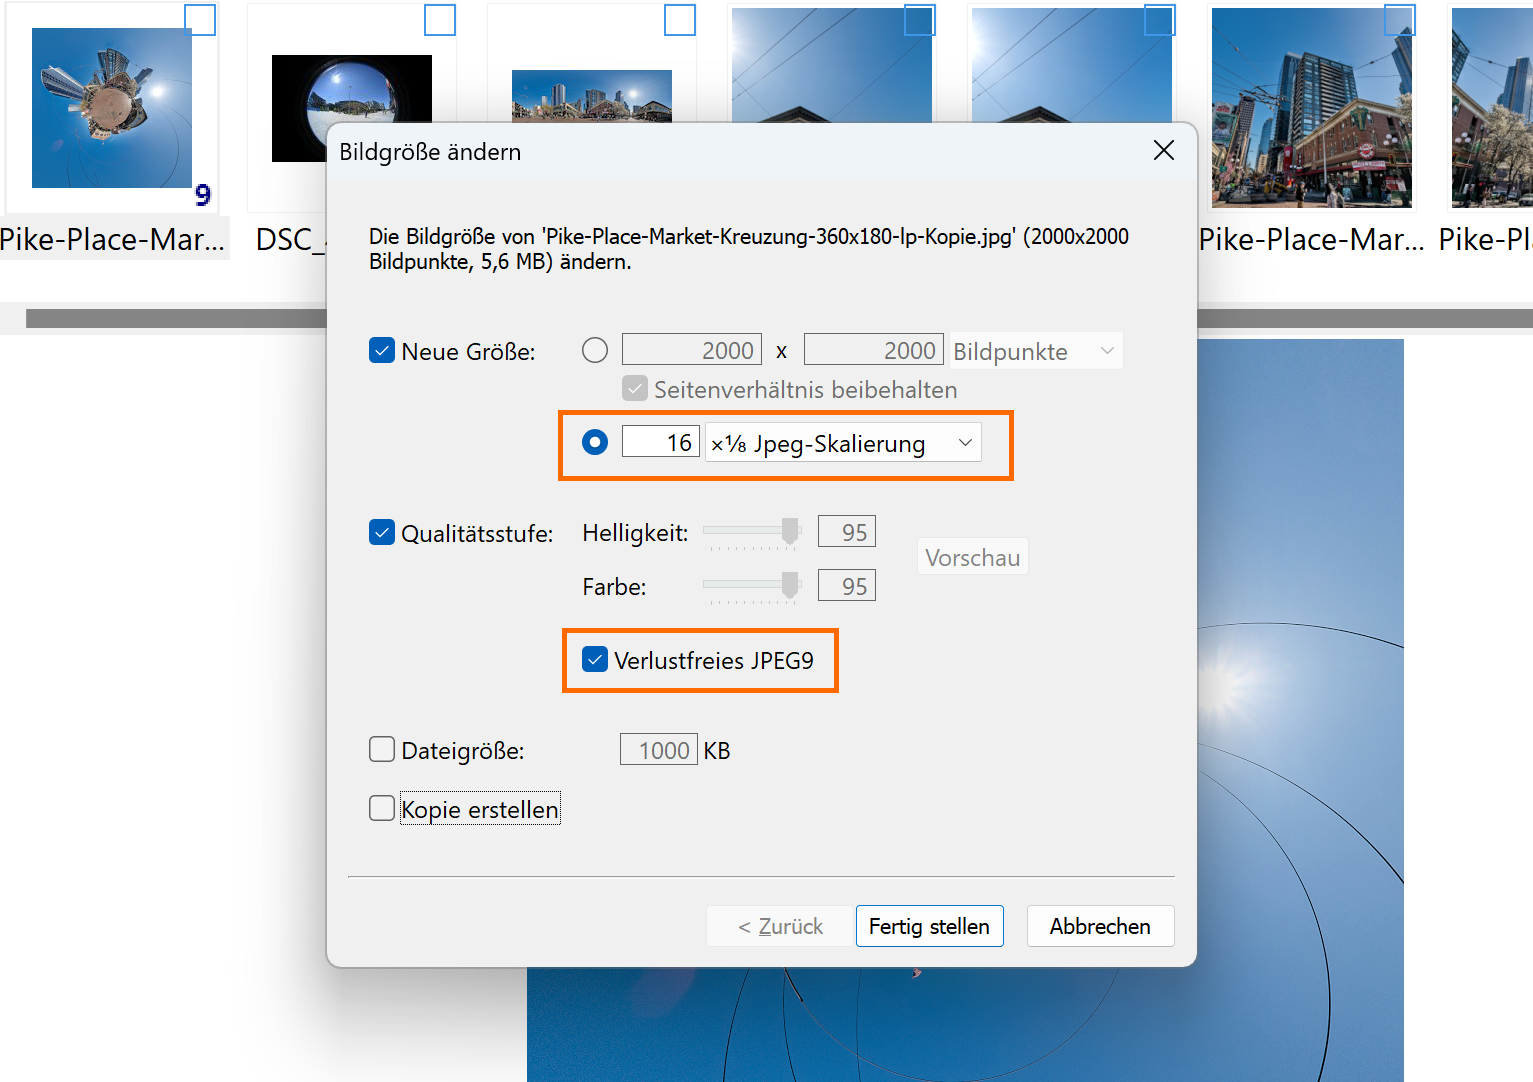
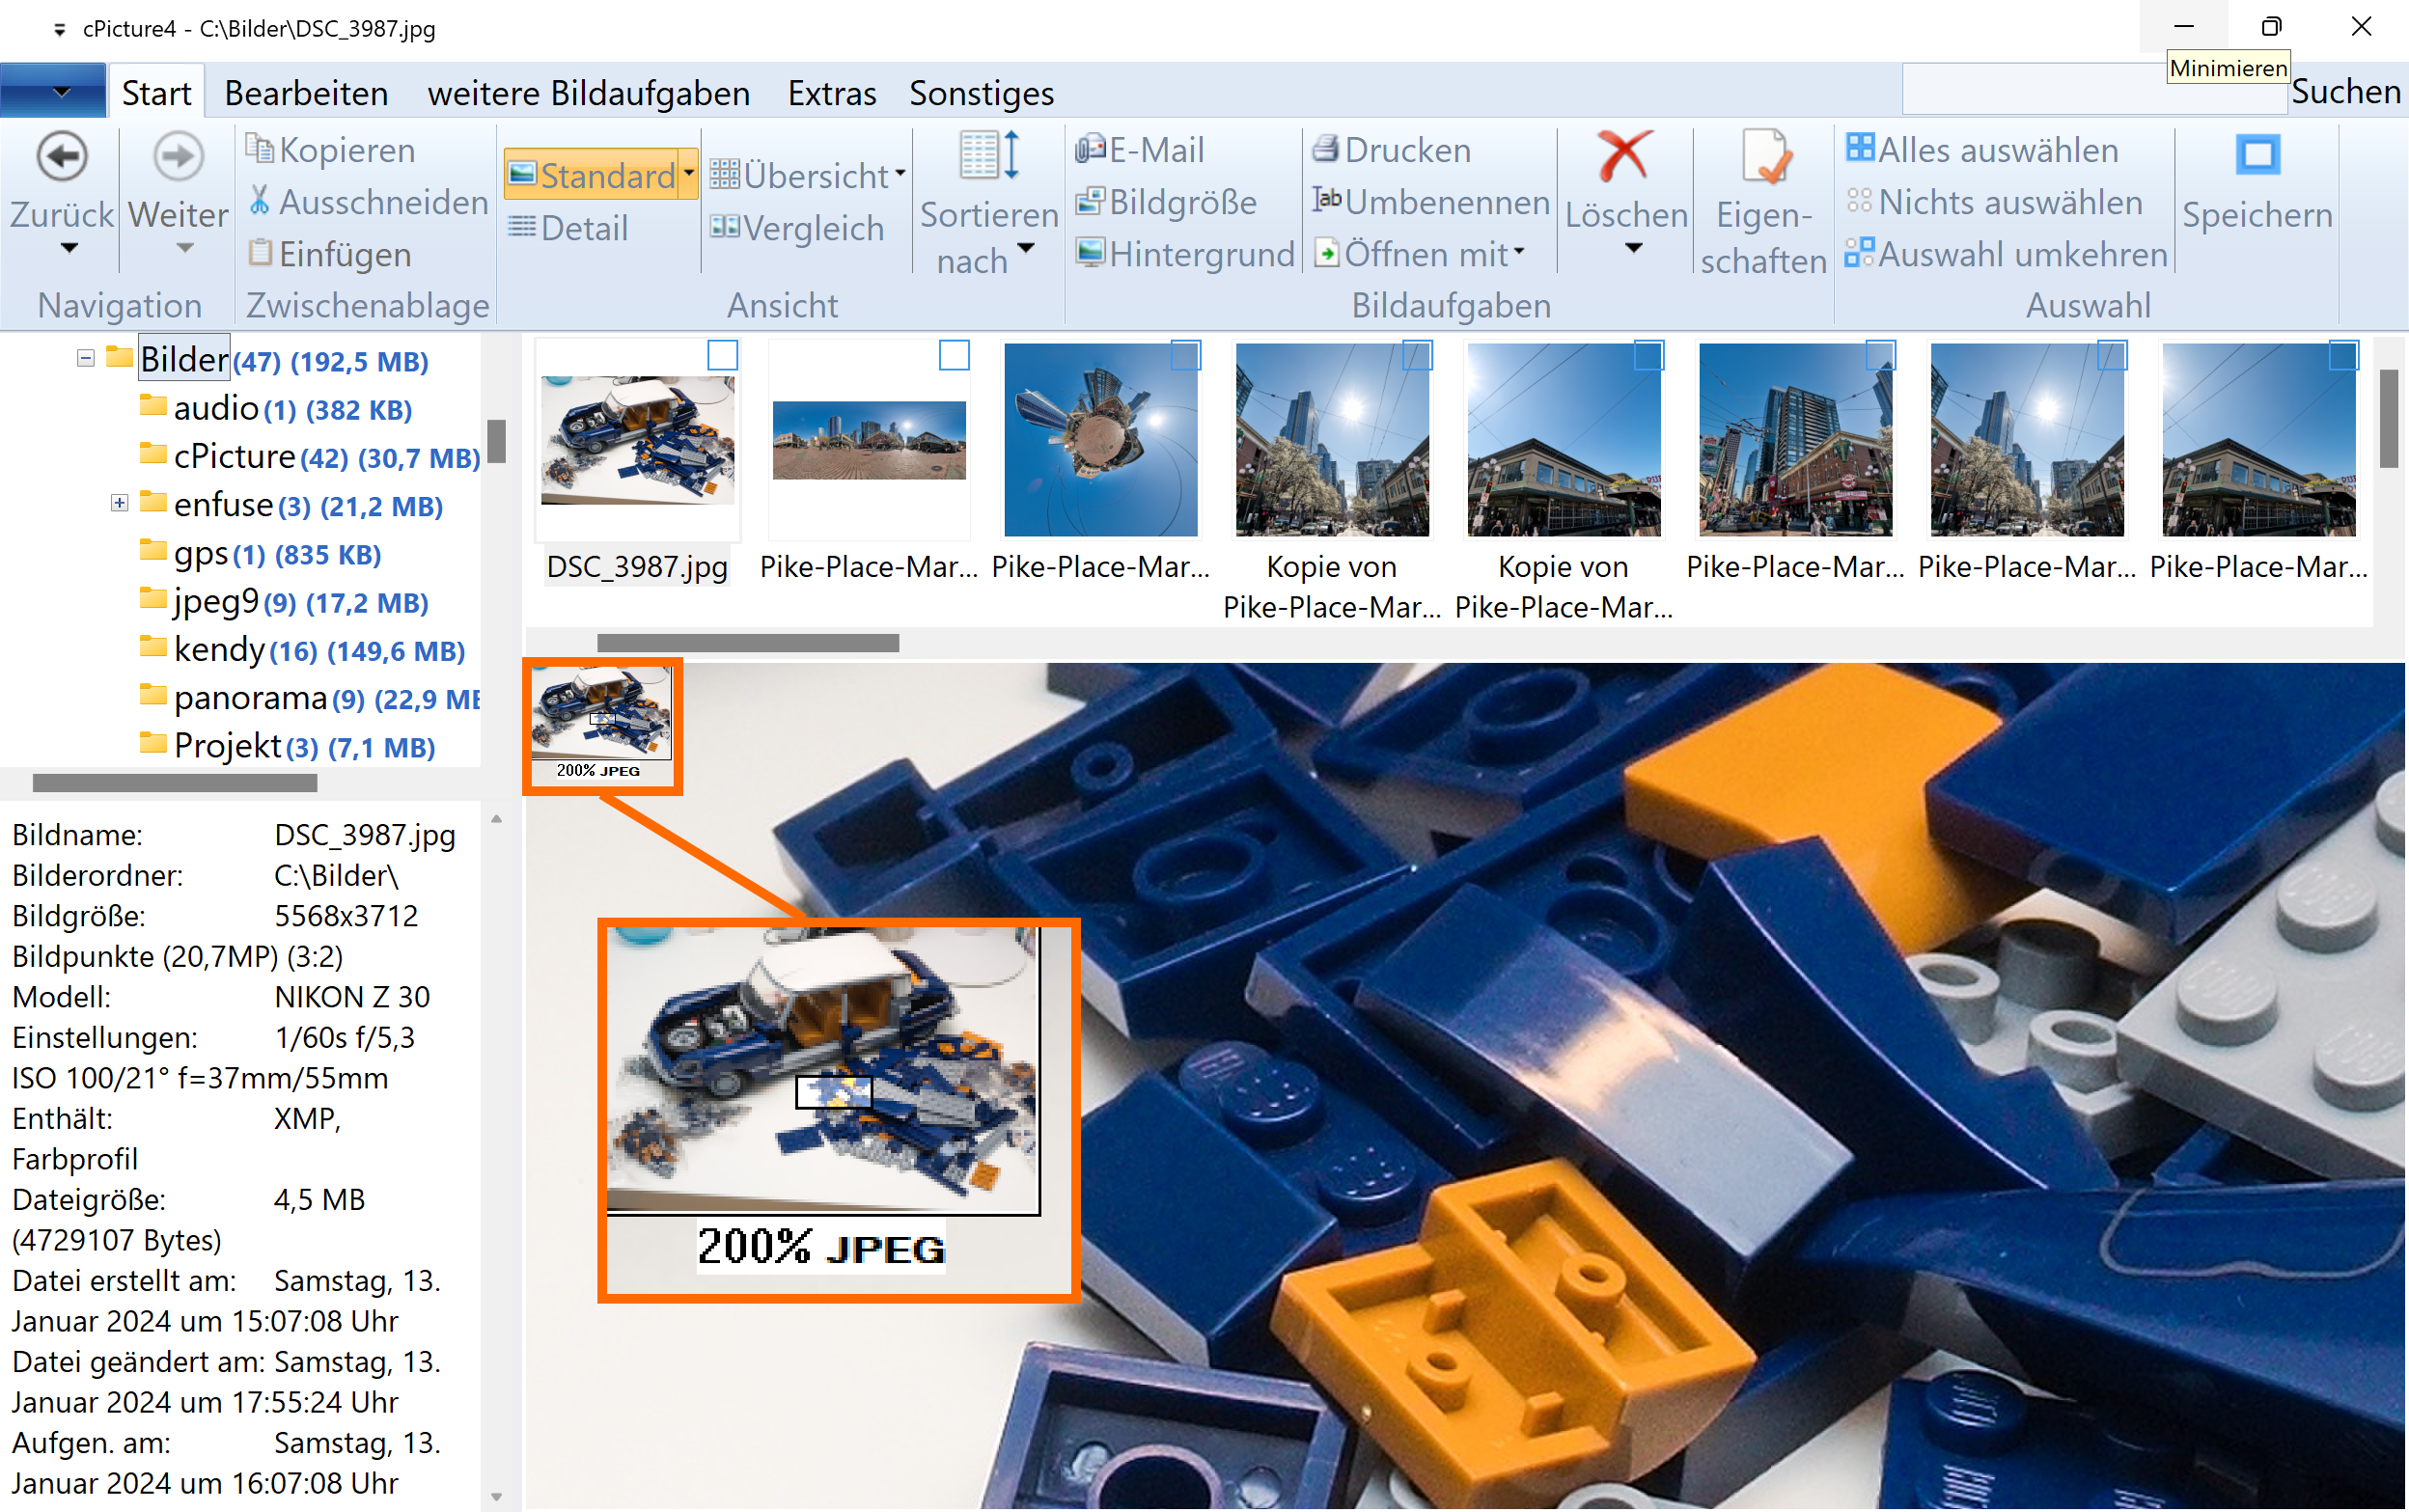
Block scaling
Resizing supports high quality JPEG block scaling from 12.5% to 200%:
The zoomed image is a block scaled JPEG indicated by a 'JPEG' icon:
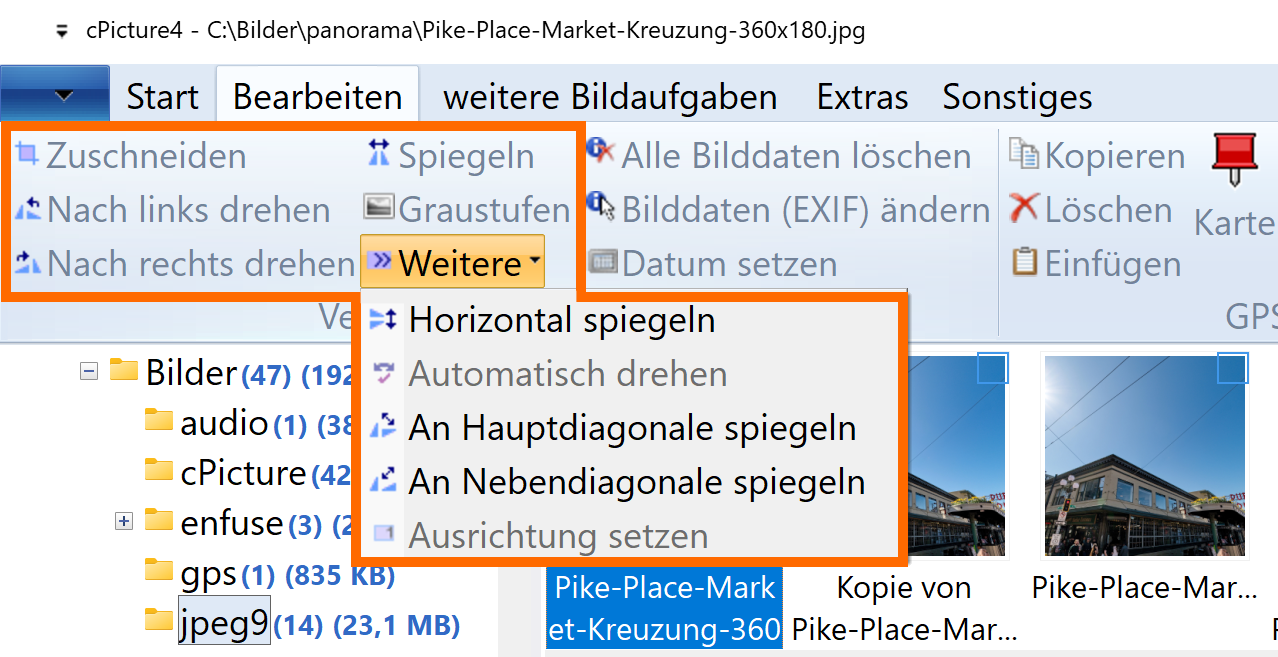
Crop&Rotate
Lossless crop with automatic alignment to the block gird:
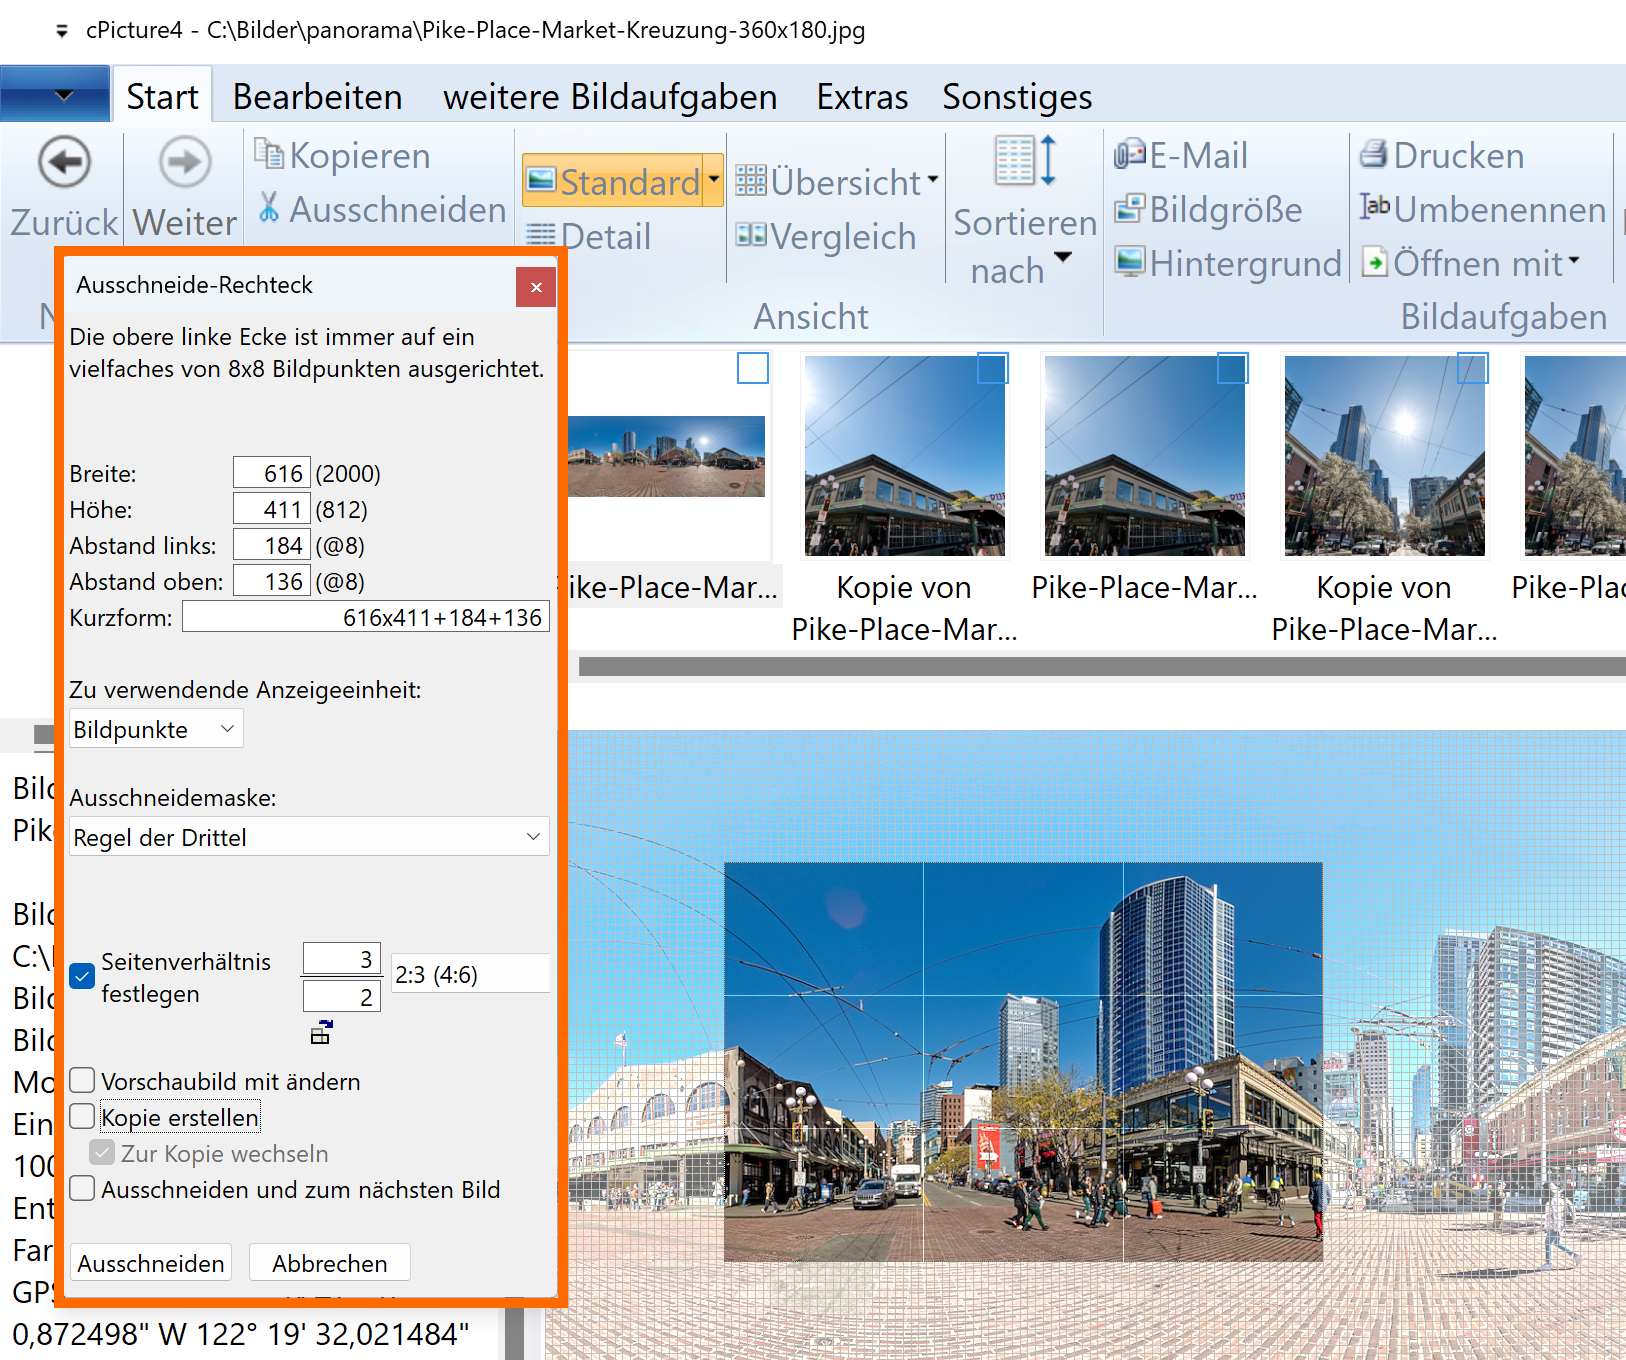
Lossless crop for panoramic pictures or any other segmentation:

Lossless Rotate, Mirror and Transverse//Transpose (mirror on the diagonal):
-
Perfect resizing using gamma correction
What is this feature? Since the early days of image processing, pictures get scaled. They get resized to send as EMail, resized to get ready for print or resized to make a nice background image on the desktop. But most Software make a wrong assumtion about the luminosity of the pixel data. With the data interpolation you get egdes that are too dark between areas of different colors.
You picture will look more natural when resized with the gamma correction applied. cPicture has it.
Resize this image to 50% with your Software:

Do you get this?

Then your software doesn't scale correctly.
With cPicture, you get the correct scaling using 32bit/color-channel with gamma correction: