-
ExifTools - change exif date
To make adjustments for all exif fields in your pictures, you can use the script plugin in cPicture to run the ExifTools on your picture selection. Assume the camera date/time is wrong by accident and all pictures are stamped with one week in advance.
This example sets all exif date fields back 7 days.
Create a text file, copy the following content and name it to ExifDate.ps1 and save it in the cPicture.exe folder:# plugin variables # console=true displays a console, use this option for scripts with text output #[console=true] # noexit=true keeps the console open, set to 'false' to have the console closed when processing is done #[noexit=false] param ( [string]$name, [string]$dir, [string]$file, [int]$width, [int]$height, [int]$i, [int]$n ) <# -name name -file file -dir dir -width PictureWidth -height PictureHeight -i sequence number -n number of files Example: -name c:\picture_folder\picture.jpg -file picture.jpg -dir c:\picture_folder\ -width 1024 -height 768 -i 1 -n 4 #> # exiftool in cPicture installation folder # "Year:Month:Day Hour:Minute:Second" C:\cPicture\exiftool.exe -AllDates-="0:0:7 0:0:0" $nameStart cpicture, select your pictures you want to change, select the function module selection and select the script you just created:

Hint: If you use any of the exif functions in cPicture, ExifTools gets automatically installed for you.
-
cPicture auf giga.de
Das Programm cPicture ist ein kostenloser Bildverwalter und Bildbetrachter mit Ribbon-Menüs, die man von Office 2007 und Windows 8 kennt. Das Tool cPicture zeigt und bearbeitet Bilder inklusive ihrer EXIF-Informationen, sucht ähnliche und doppelte Bilder und prüft sie auf Wunsch auch auf Fehler.
Die Freeware cPicture gibt es als 32-Bit- und als 64-Bit-Version und liegt als Portable Variante vor. Ihr braucht das Tool also nicht extra zu installieren, sondern nur die ZIP-Datei entpacken. Ihr startet das Programm mit einem Doppelklick auf die Datei cPicture.exe.
cPicture ist Bildbetrachter und Bildbearbeiter in einem. cPicture ist Bildbetrachter und Bildbearbeiter in einem.
cPicture: Bilder und EXIF-Informationen anzeigen und bearbeiten
Ihr öffnet Bilder mit cPicture, indem ihr sie entweder per Drag & Drop ins Programm zieht oder über den linken Verzeichnisbaum zu den jeweiligen Bilderordnern navigiert. Das Tool zeigt euch die Bilder des Ordners oben an. Mit einem Doppelklick auf die Bildvorschau öffnet es im Vollbildmodus. Dabei zeigt cPicture die EXIF-Informationen des Bildes standardmäßig unten links unter dem Verzeichnisbaum und oben links im Bild an. Unter dem Menü Bearbeiten könnt ihr auch die Bilddaten (EXIF) ändern oder löschen.
Bilder bearbeiten mit cPicture
Mit cPicture lassen sich die Bilder auch zuschneiden oder ohne Qualitätsverlust drehen. Im Menü Bearbeiten stehen für die Bildbearbeitung unter anderem folgende Werkzeuge zur Verfügung: •Zuschneiden •Nach links drehen •Nach rechts drehen •Automatisch drehen •Ausrichtung setzen •Spiegeln •Graustufen •Datum setzen
Bei der Bildbearbeitung bleiben alle aufgezeichneten EXIF-Bildinformationen wie Blenden- und Aufnahme-Informationen erhalten. Falls ihr Bilder im Quer- oder Hochformat aufgenommen habt: cPicture stellt die Bilder immer richtig da. Auch kann cPicture eure Panoramabilder automatisch verlustfrei in druckbare Einzelbilder aufteilen oder einen Index eurer Bilder mit Thumbnails erstellen. Zudem spielt die Software auch aufgenommene Filme ab.
-
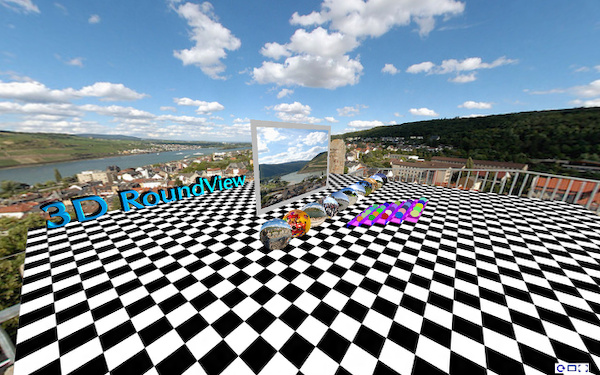
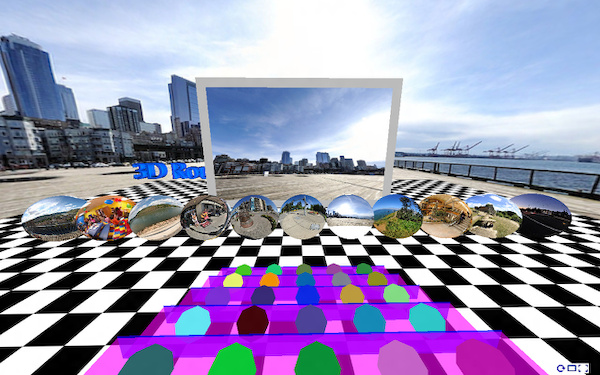
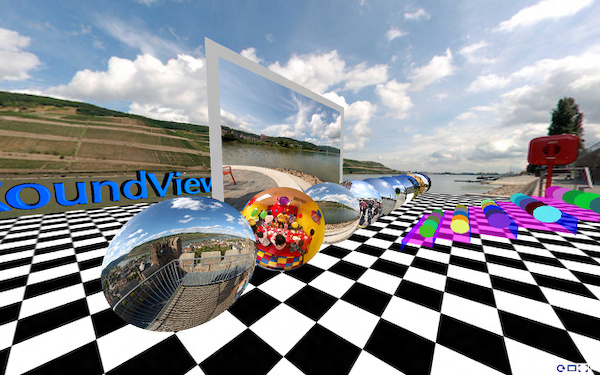
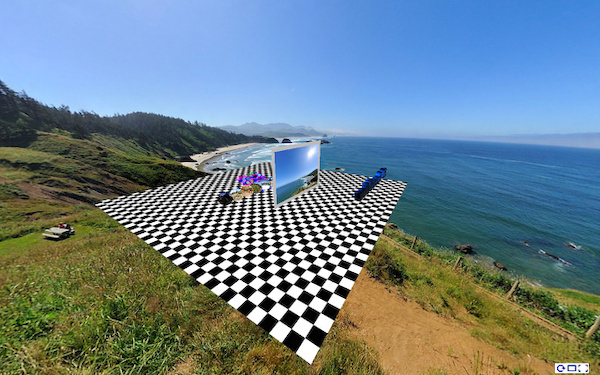
3D RoundView
3D RoundView is a panoramic viewer for a modern Browser.
Click and drag to move the view, click inside the screen to drag the current selection or click one of the preview spheres to change the current view for the 25 cats on the bleachers. Double click for the single view.

To get started:
Add the following scripts
<script type="text/javascript" src="https://bitfabrik.io/3DRoundView/js/three.min.js"></script>
<script type="text/javascript" src="https://bitfabrik.io/3DRoundView/js/KeyboardState.js"></script>
<script type="text/javascript" src="https://bitfabrik.io/3DRoundView/js/CSS3DRenderer.js"></script>
<script type="text/javascript" src="https://bitfabrik.io/3DRoundView/js/font.js"></script>
Add the panorama div tag that will contain the panorama:
<div id="panorama">
    <div id="reset">
        <img alt="Reset" title="Reset (R)" src="https://bitfabrik.io/3DRoundView/img/reset.png" /></div>
    <div id="vollbild">
        <img alt="Fullscreen" title="Fullscreen" src="https://bitfabrik.io/3DRoundView/img/vollbild.png" /></div>
    <div id="singleView">
        <img alt="Single View" title="Single View (S)" src="https://bitfabrik.io/3DRoundView/img/singleView.png" /></div>
</div>
Set the panorama list:
<script type="text/javascript">
    var panoramaFiles = ['myPanorama1.jpg',
                         'myPanorama2.jpg'];

    var floorTextureImg = 'floorTexture.jpg';
    var movieScreenClr = 0xbbbbbb;
</script>
followed by the 3D-RoundView script
<script type="text/javascript" src="https://bitfabrik.io/3DRoundView/js/3dRoundView.js"></script>For a more simplified step:
Download cPicture for your language, select your panorama pictures and use the function to create a panorama website. This will add all the project files to a selected folder which can be copied to your webserver to publish the panorama.


Examples:

-
ComputerBild.de adds cPicture
CopmuterBild is Europe’s larges computer magazine and features top software every month on the accompanied DVD.
This month, cPicture was selected to be part of the DVD! http://www.computerbild.de/download/cPicture-11513403.html.
-
cPicture review
With todays content replication on download websites to increase traffic, reviews might be outdated or not accurate, but this one is different. The editor actually run the app instead of copy&paste content from previous pages.
Nicely done.
http://www.softpedia.com/get/Multimedia/Graphic/Digital-Photo-Tools/cPicture.shtml