-
MCP Resources: The Quiet Half of the Protocol
Most MCP examples start with tools.
That makes sense. Tools are easy to demonstrate: the model asks, the server does something, and a result comes back.
Resources are quieter. They do not run an action. They expose named read access to state.
That distinction is the point.
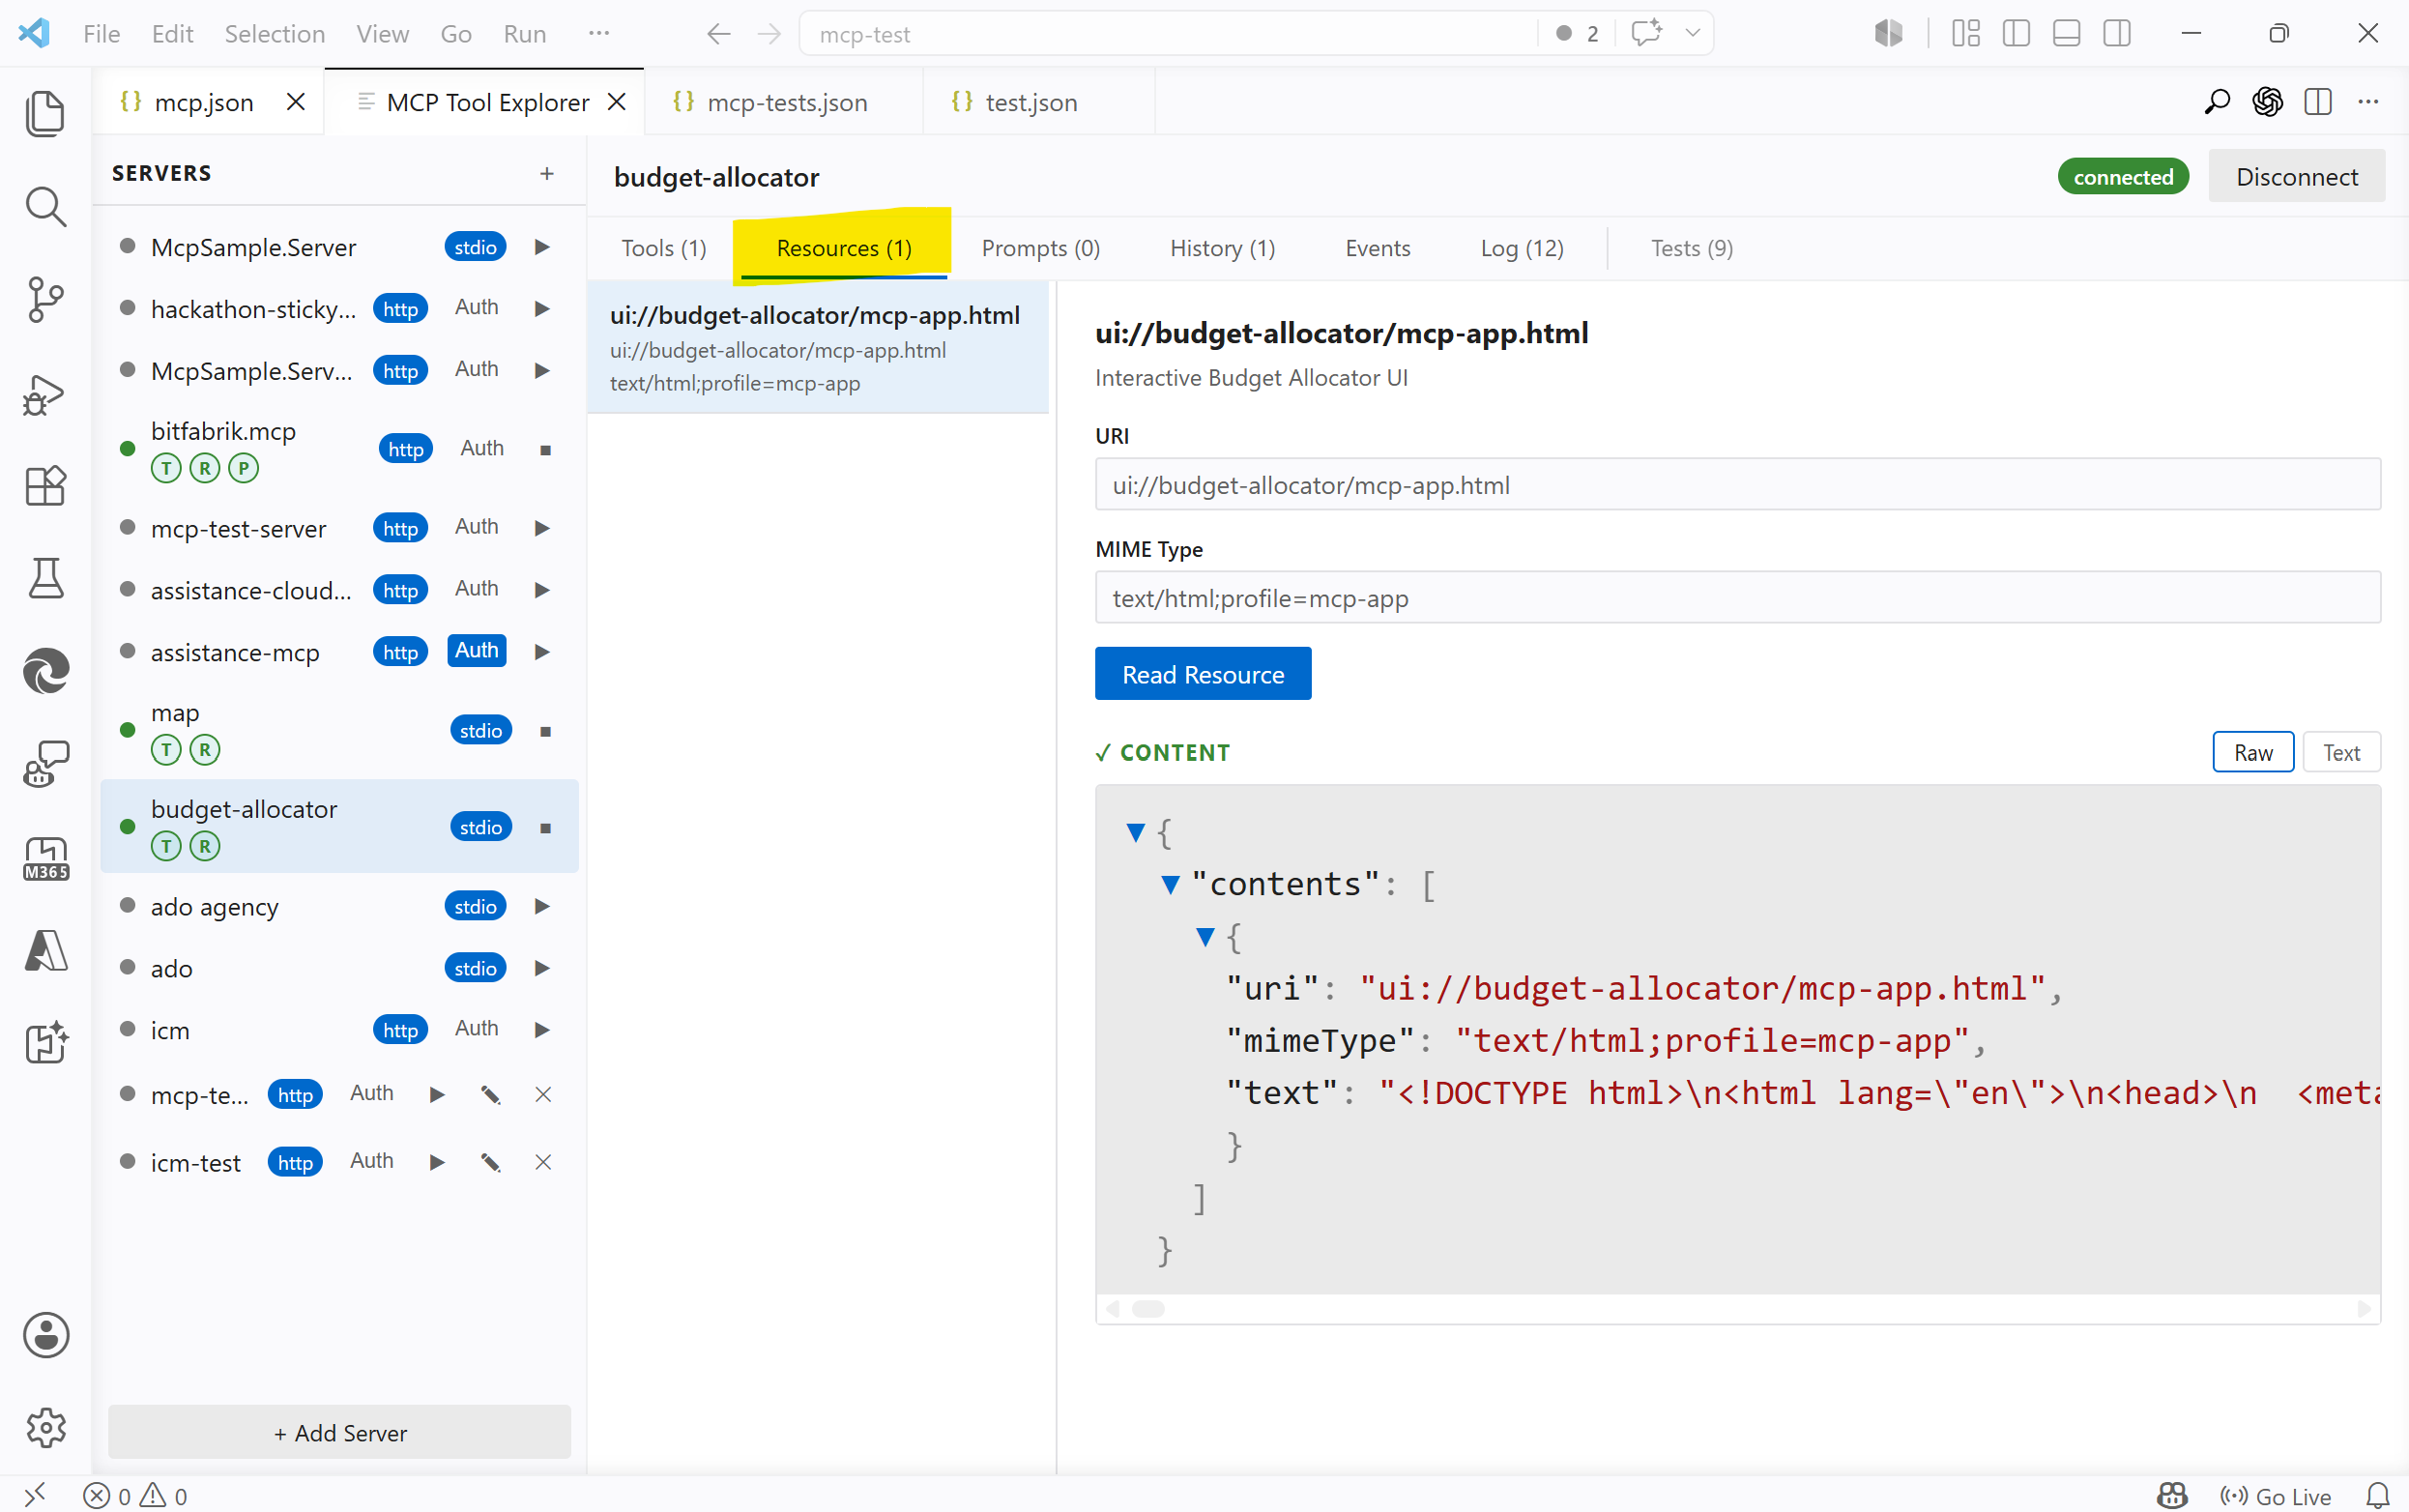
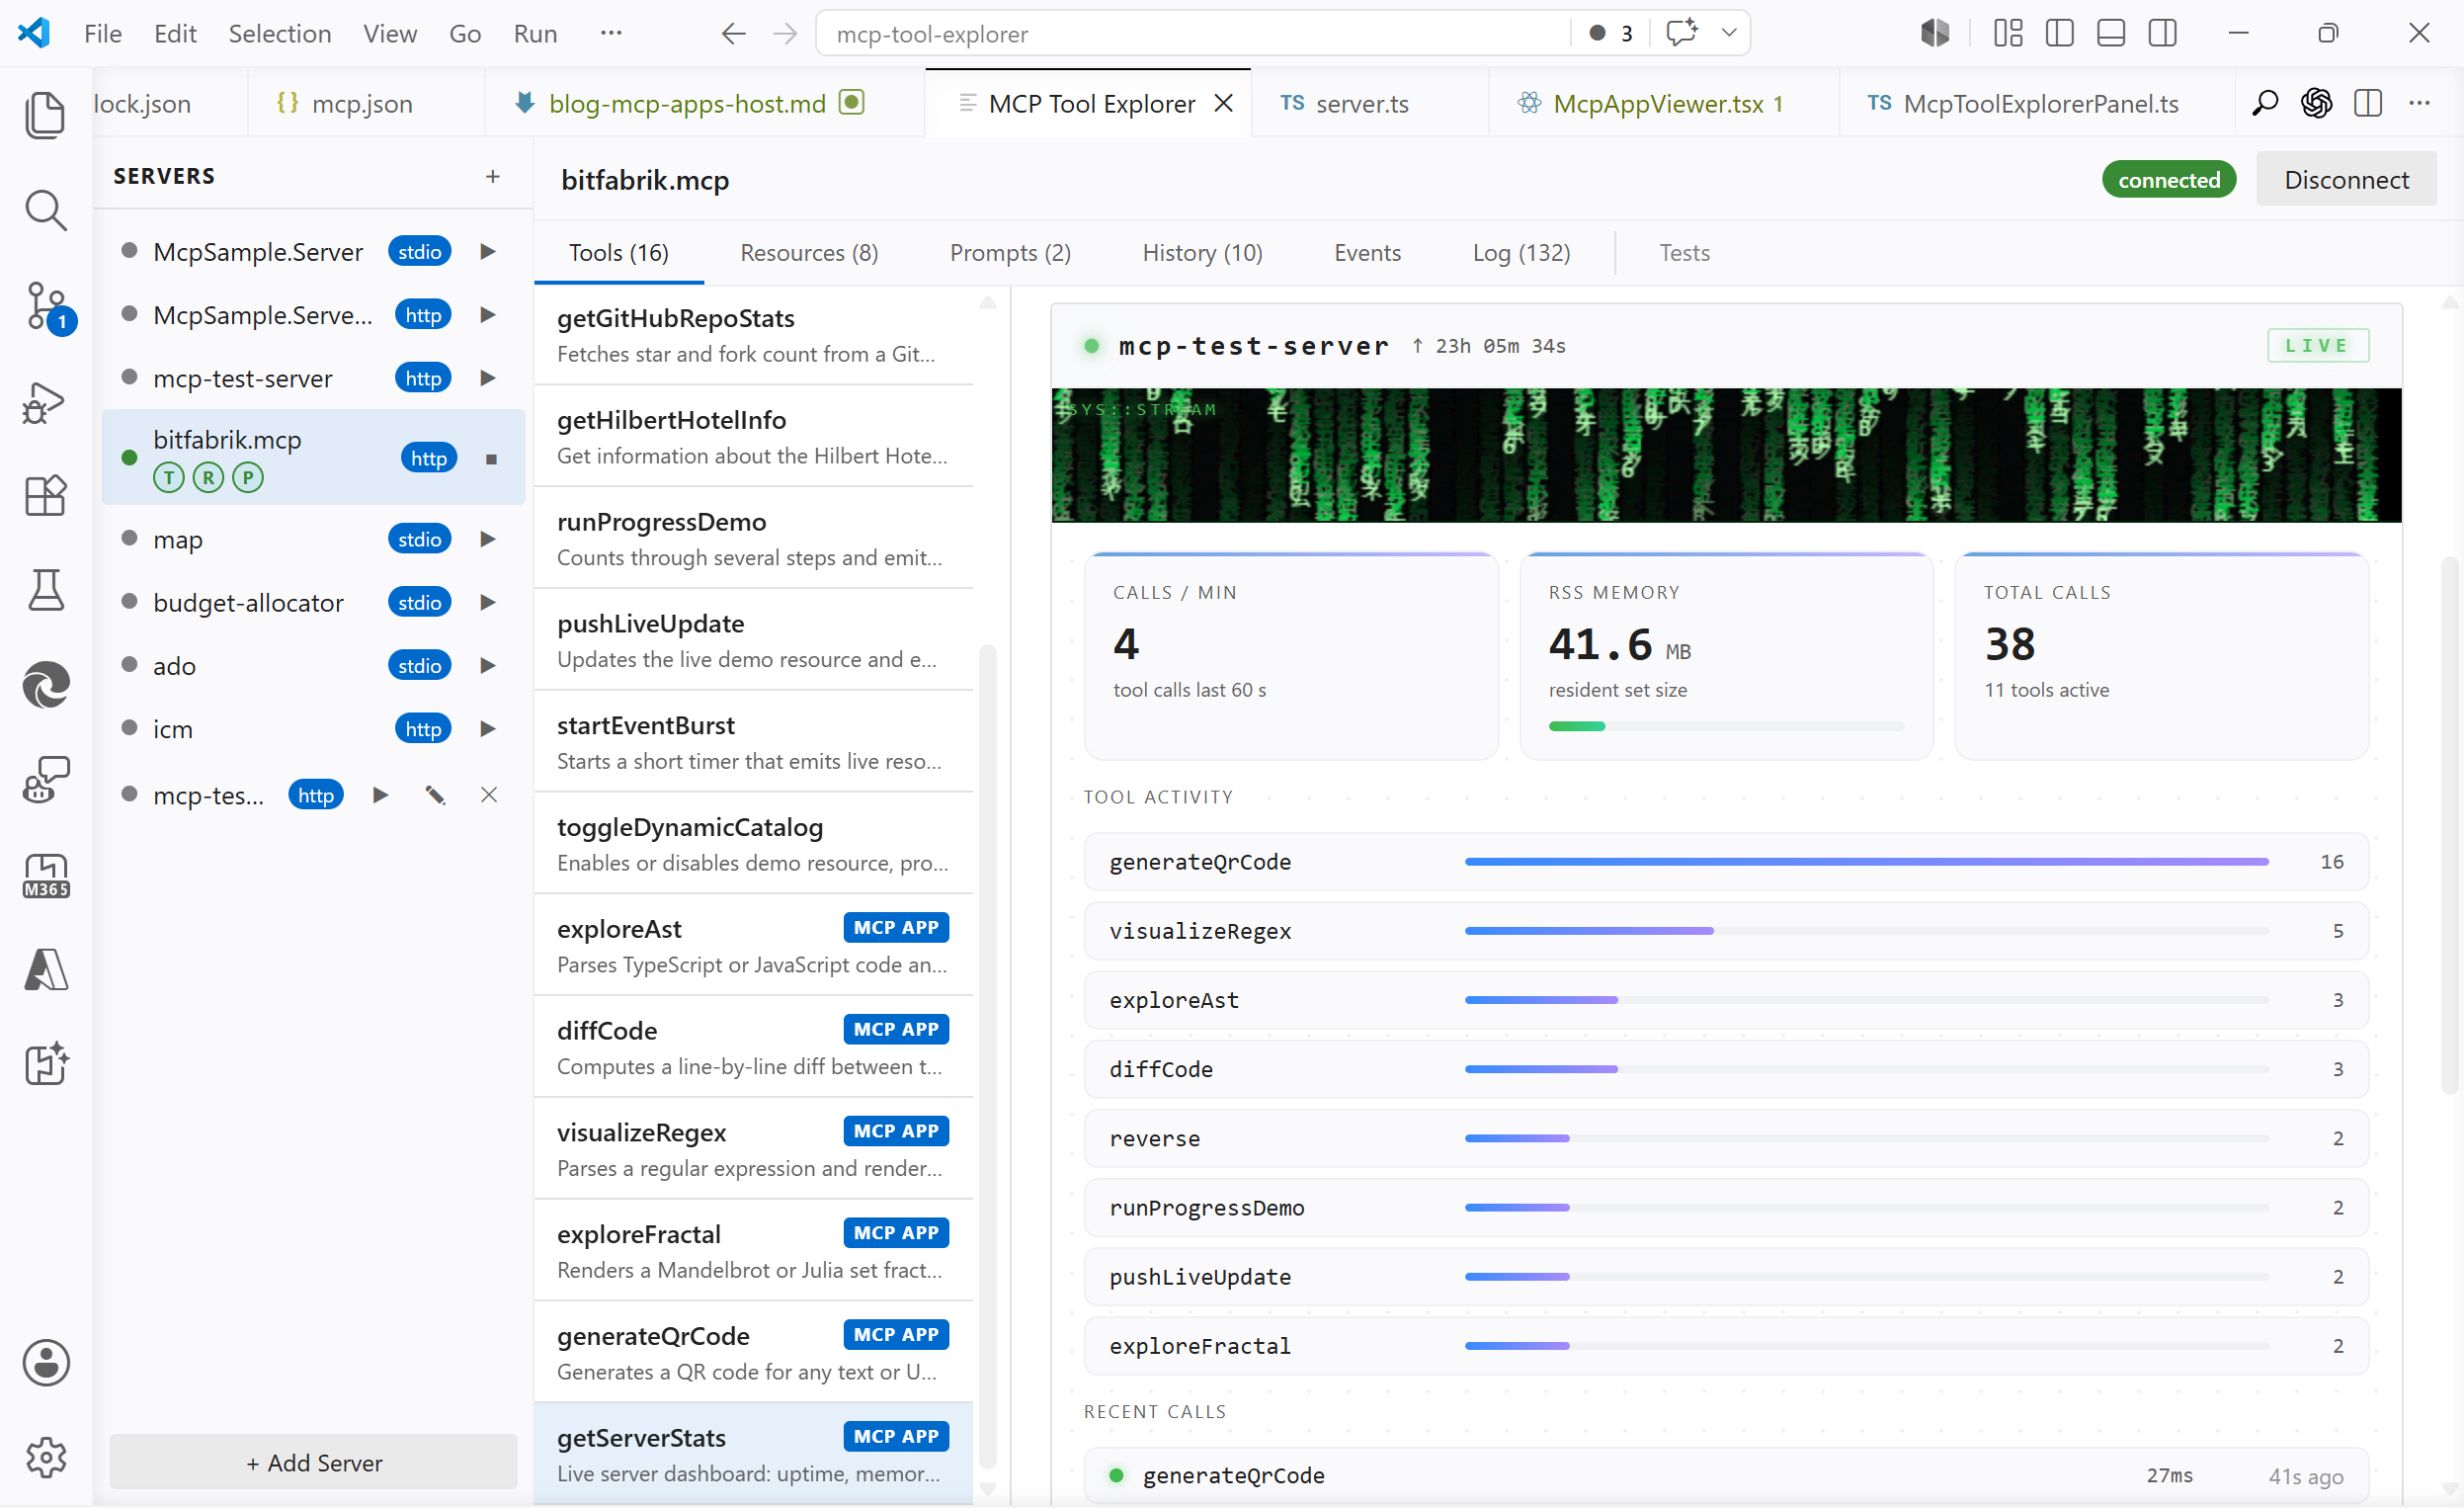
The screenshots show MCP Tool Explorer connected to the MCP SDK example server
@modelcontextprotocol/server-budget-allocator.
Tools Are Commands
A tool is a command exposed by an MCP server.
It might calculate something, start a build, create an issue, query a database, send a message, rotate an image, or trigger a deployment. A tool has input, behavior, and a result. Sometimes it also has side effects.
That is why tool calls are the easy part of MCP to explain. They look familiar. The model asks for an operation, the host calls the server, the server replies.
tools/call run_tests
  input:  { "suite": "unit" }
  output: { "passed": 128, "failed": 0 }
Good tools should be explicit. They should have clear names, clear schemas, and clear errors. If a tool changes the world, that should not be hidden behind a vague description.
So far, so normal.
Resources Are Named Reads
A resource is different.
A resource is not a command. It is a URI the client can read from the server.
resources/list
  build://latest/log
  build://latest/summary
  config://current
  trace://last-run
  device://temperature
The server owns those names. It decides what exists, what each URI means, and what content is returned when the client calls
resources/read.That content may come from a file. It may come from memory. It may be assembled from an API call, a database row, a device sensor, a log tail, or a generated summary. The important part is not where the bytes come from. The important part is that the operation is a read.
Client -> Server: resources/read build://latest/log
Server -> Client: text/plain content
A resource can be dynamic and still be a resource.
metrics://nowmight be different every time it is read.build://latest/logmight point to whatever the latest build produced.device://temperaturemight be sampled live.Dynamic does not mean action. It means the read is resolved at request time.
For example, a test server might expose a
live-statusresource. Reading it can return the server's current uptime, request counters, active configuration, or last activity. The values may change every few seconds, but the protocol shape stays the same: the client reads named state from the server.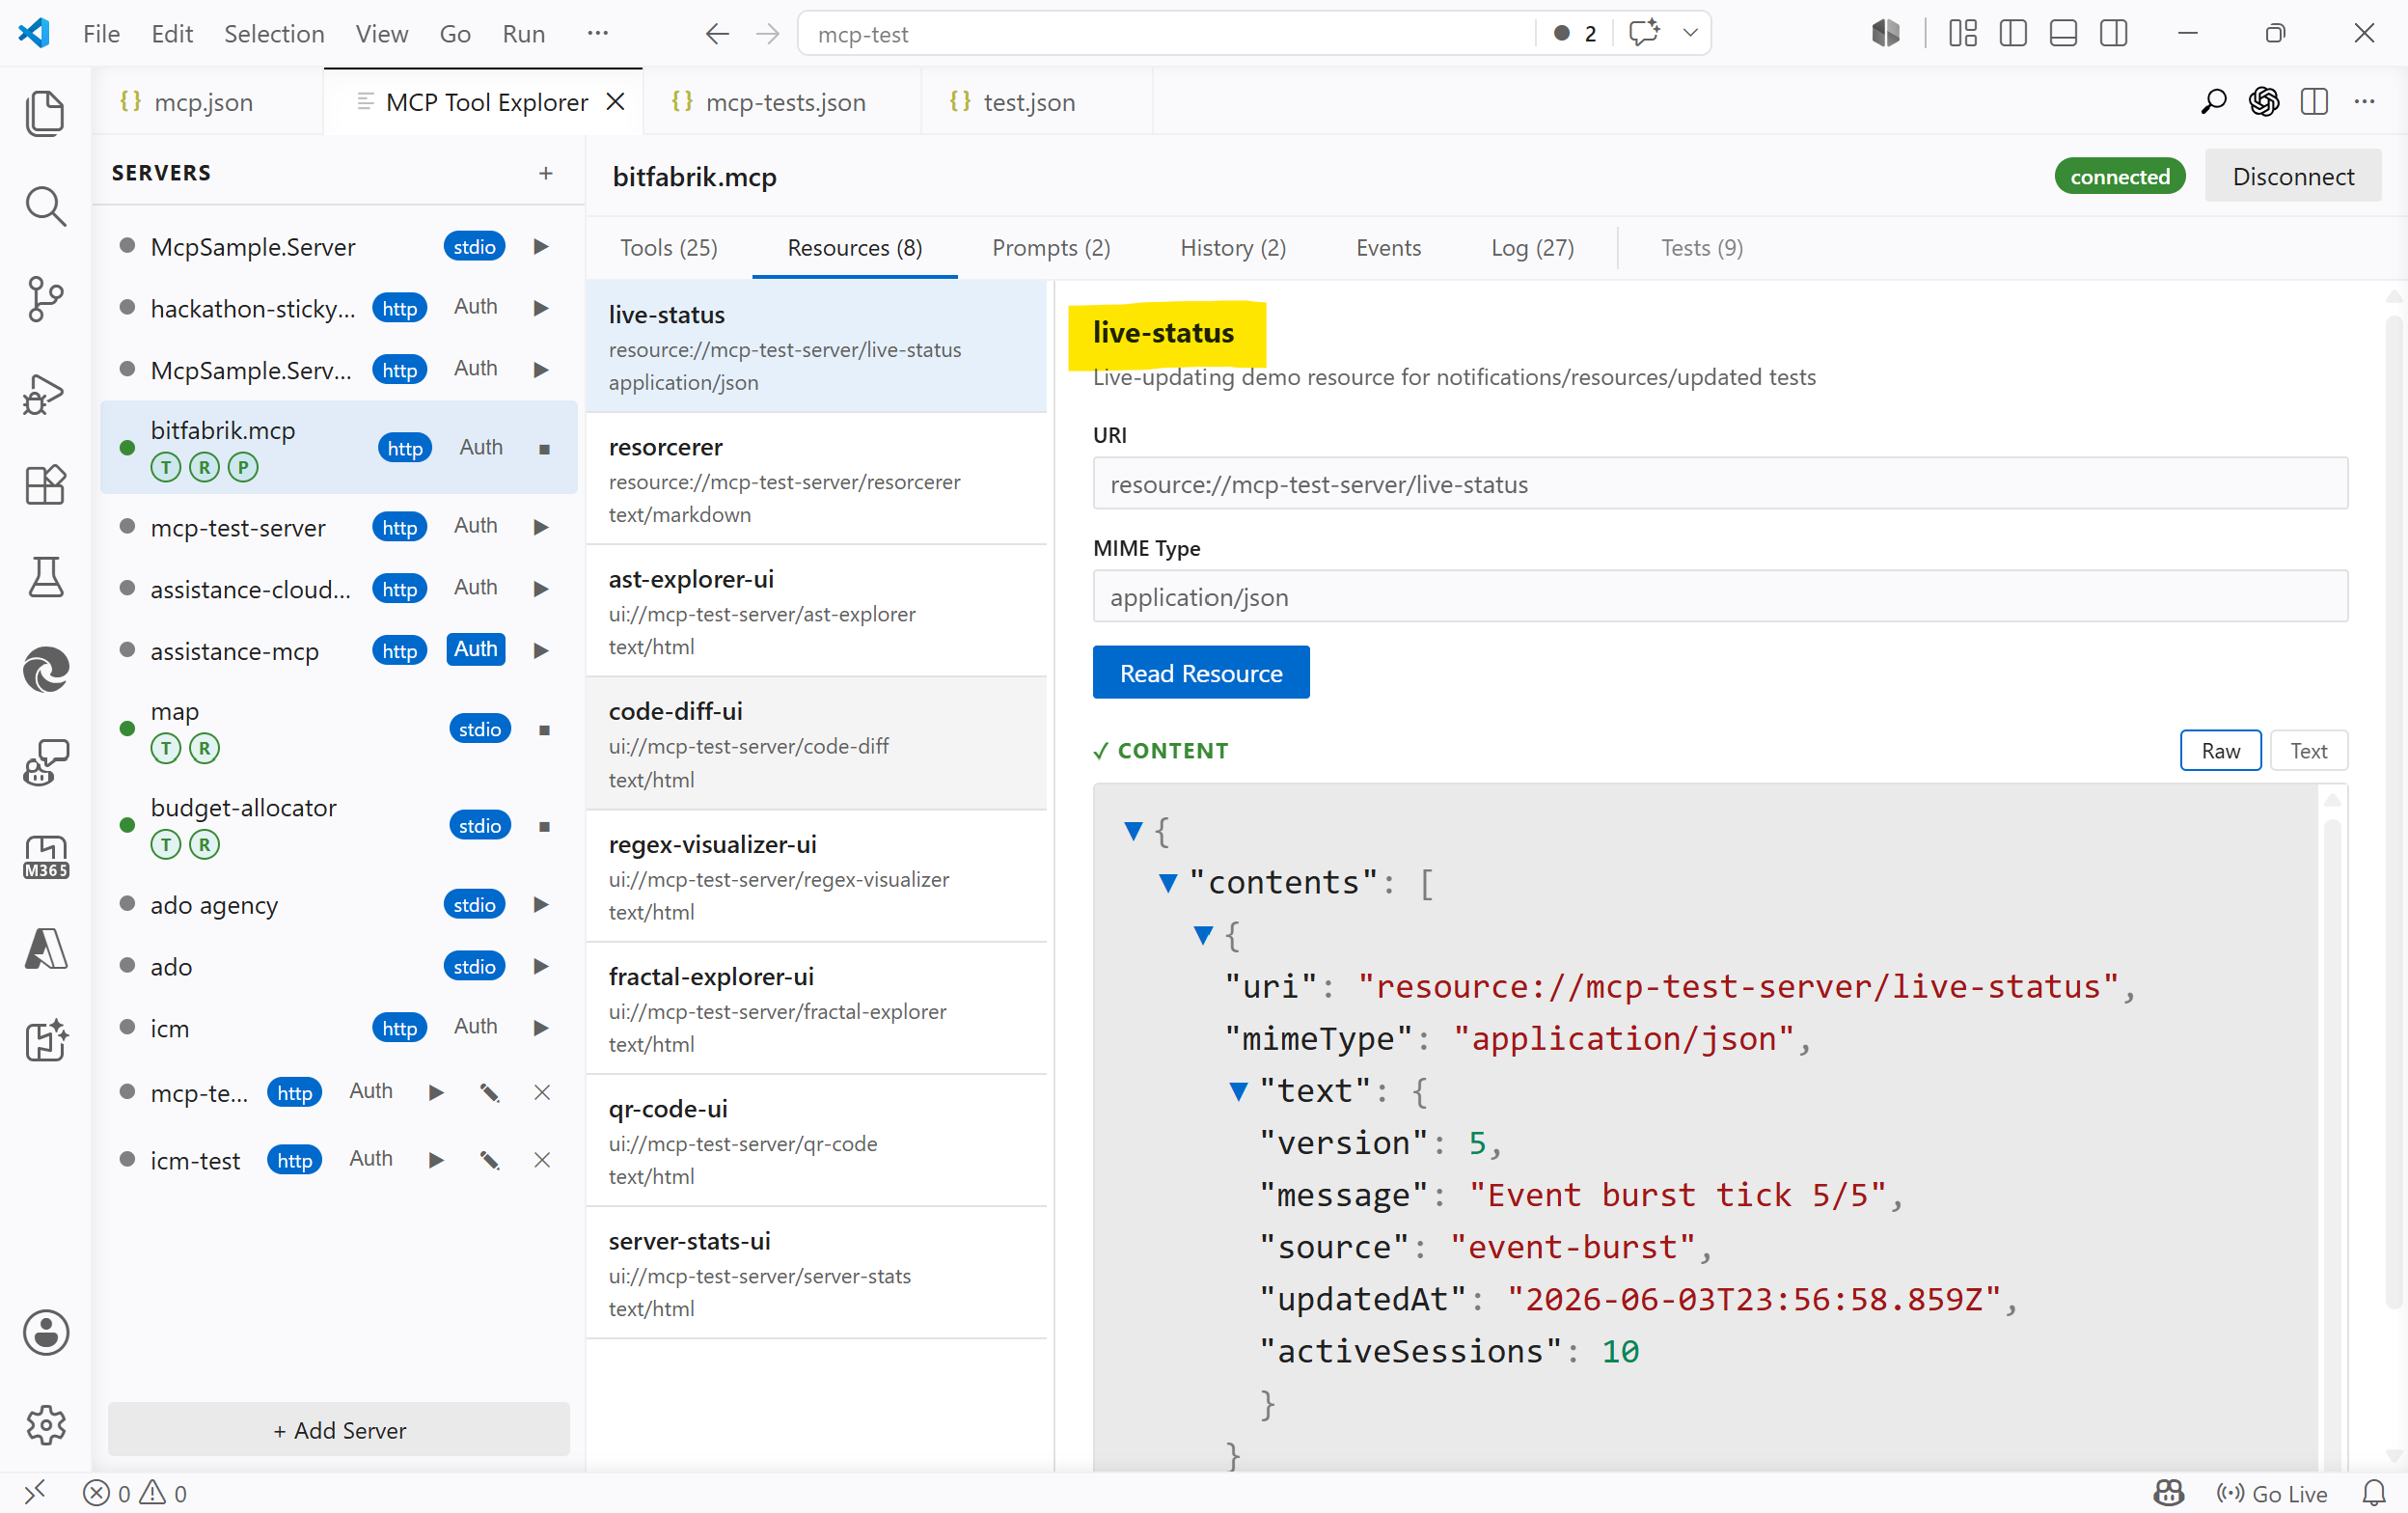
Another good example is MCP Apps. In that case, a tool can point at a
ui://resource. The client reads that resource, receives an HTML document, and renders it as the app UI. The resource is not just metadata around the tool; it is the thing that implements the interactive surface.That still follows the same rule: the app HTML is fetched through
resources/read. The tool may trigger the experience, but the UI itself is loaded as a named read from the server.I wrote about the full app mechanism, sandboxing, protocol flow, and host implementation in MCP Tool Explorer Supports MCP Apps: Protocol, Code, and the Fine Print.
The Model Does Not See Resources Automatically
This is the part that is easy to get subtly wrong.
Resources are not hidden context that the model magically knows about. They are server-side readable state with names.
The client can list resources and read them from the server. It does not need to know where the data lives or how it is collected. For a log resource, the client does not know the logs. The server does. The client only knows that a named read is available.
After reading a resource, the client can show the returned content to the user, cache it, use it internally, or include selected contents in a model request. But the model only sees the resource if the client deliberately includes that returned content.
Until then, the resource is available to the client, not present in the model context.
That is why the resource boundary matters. The server exposes knowledge the client does not otherwise have: logs, status, snapshots, generated reports, files, device state, or app HTML. A resource has an owner, a URI, a MIME type, a lifecycle, and a read boundary. The server says what can be read; the client asks for it by name.
That explicit boundary is what makes the system easier to inspect and reason about.
A Small Example
A server could expose a build system like this:
resources/list
  build://latest/summary
  build://latest/log
  build://latest/artifacts

tools/list
  run_build
  run_tests
  deploy_preview
The resources describe current state. The tools perform operations.
A client might first read
build://latest/summaryand show it to the user. If the model needs more detail, the client can readbuild://latest/logand pass only the relevant part into the next request. If the user asks for a new build, the client callsrun_build.After that, the server may update what
build://latest/summaryreturns. It may also notify the client that the resource list or resource contents changed, depending on the server and host behavior.The important thing is that reading the log and starting the build are separate protocol concepts.
One observes state. The other asks for work.
Resource Design Is API Design
The hard part is not implementing
resources/read. The hard part is deciding what deserves a URI.A good resource should be specific enough to be useful, but not so tiny that the client has to stitch together a hundred fragments. It should be stable enough to reference, but not so broad that every read becomes a data dump.
There are practical questions:
- How current does the data need to be?
- Can the client cache it?
- Who is allowed to read it?
- Does it contain secrets?
- Should large content be summarized or paged?
- Is this really a read, or is it a tool pretending to be harmless?
That last one matters.
Reading
build://latest/logis a resource. Starting a build is a tool.Reading
config://currentis a resource. Changing the config is a tool.Reading
device://temperatureis a resource. Turning on a relay is a tool.The names are not decoration. They define where the read boundary is.
Why This Matters
MCP is often described as a way to give models tools. That is true, but incomplete.
Tools expose commands. Resources expose readable state.
That separation gives MCP clients a cleaner way to work with systems that have more going on than one request and one response. Logs can be read without starting anything. Current configuration can be inspected without changing it. A server can expose status without turning every status check into a tool call.
It also helps humans. A resource list is inspectable. A resource URI can be logged. A resource read can be replayed. Permissions can be reasoned about at the boundary between "may read this" and "may do this".
That is less spectacular than a flashy agent demo.
It is also closer to how real software survives contact with Tuesday.
The Short Version
A tool is a command.
A resource is a named read.
The model does not automatically have either one. The MCP client connects to the server, discovers what the server exposes, and can then call tools or read resources by name.
That may sound like a small protocol detail. It is not.
It is the difference between assuming the client already knows the state and giving it a clean way to ask the server what the server knows.
-
MCP Tool Explorer Supports MCP Apps: Protocol, Code, and the Fine Print
MCP Apps adds interactive HTML UIs to MCP tools. This post covers the protocol, the host implementation, and the sandbox constraints that only show up when you actually build it.
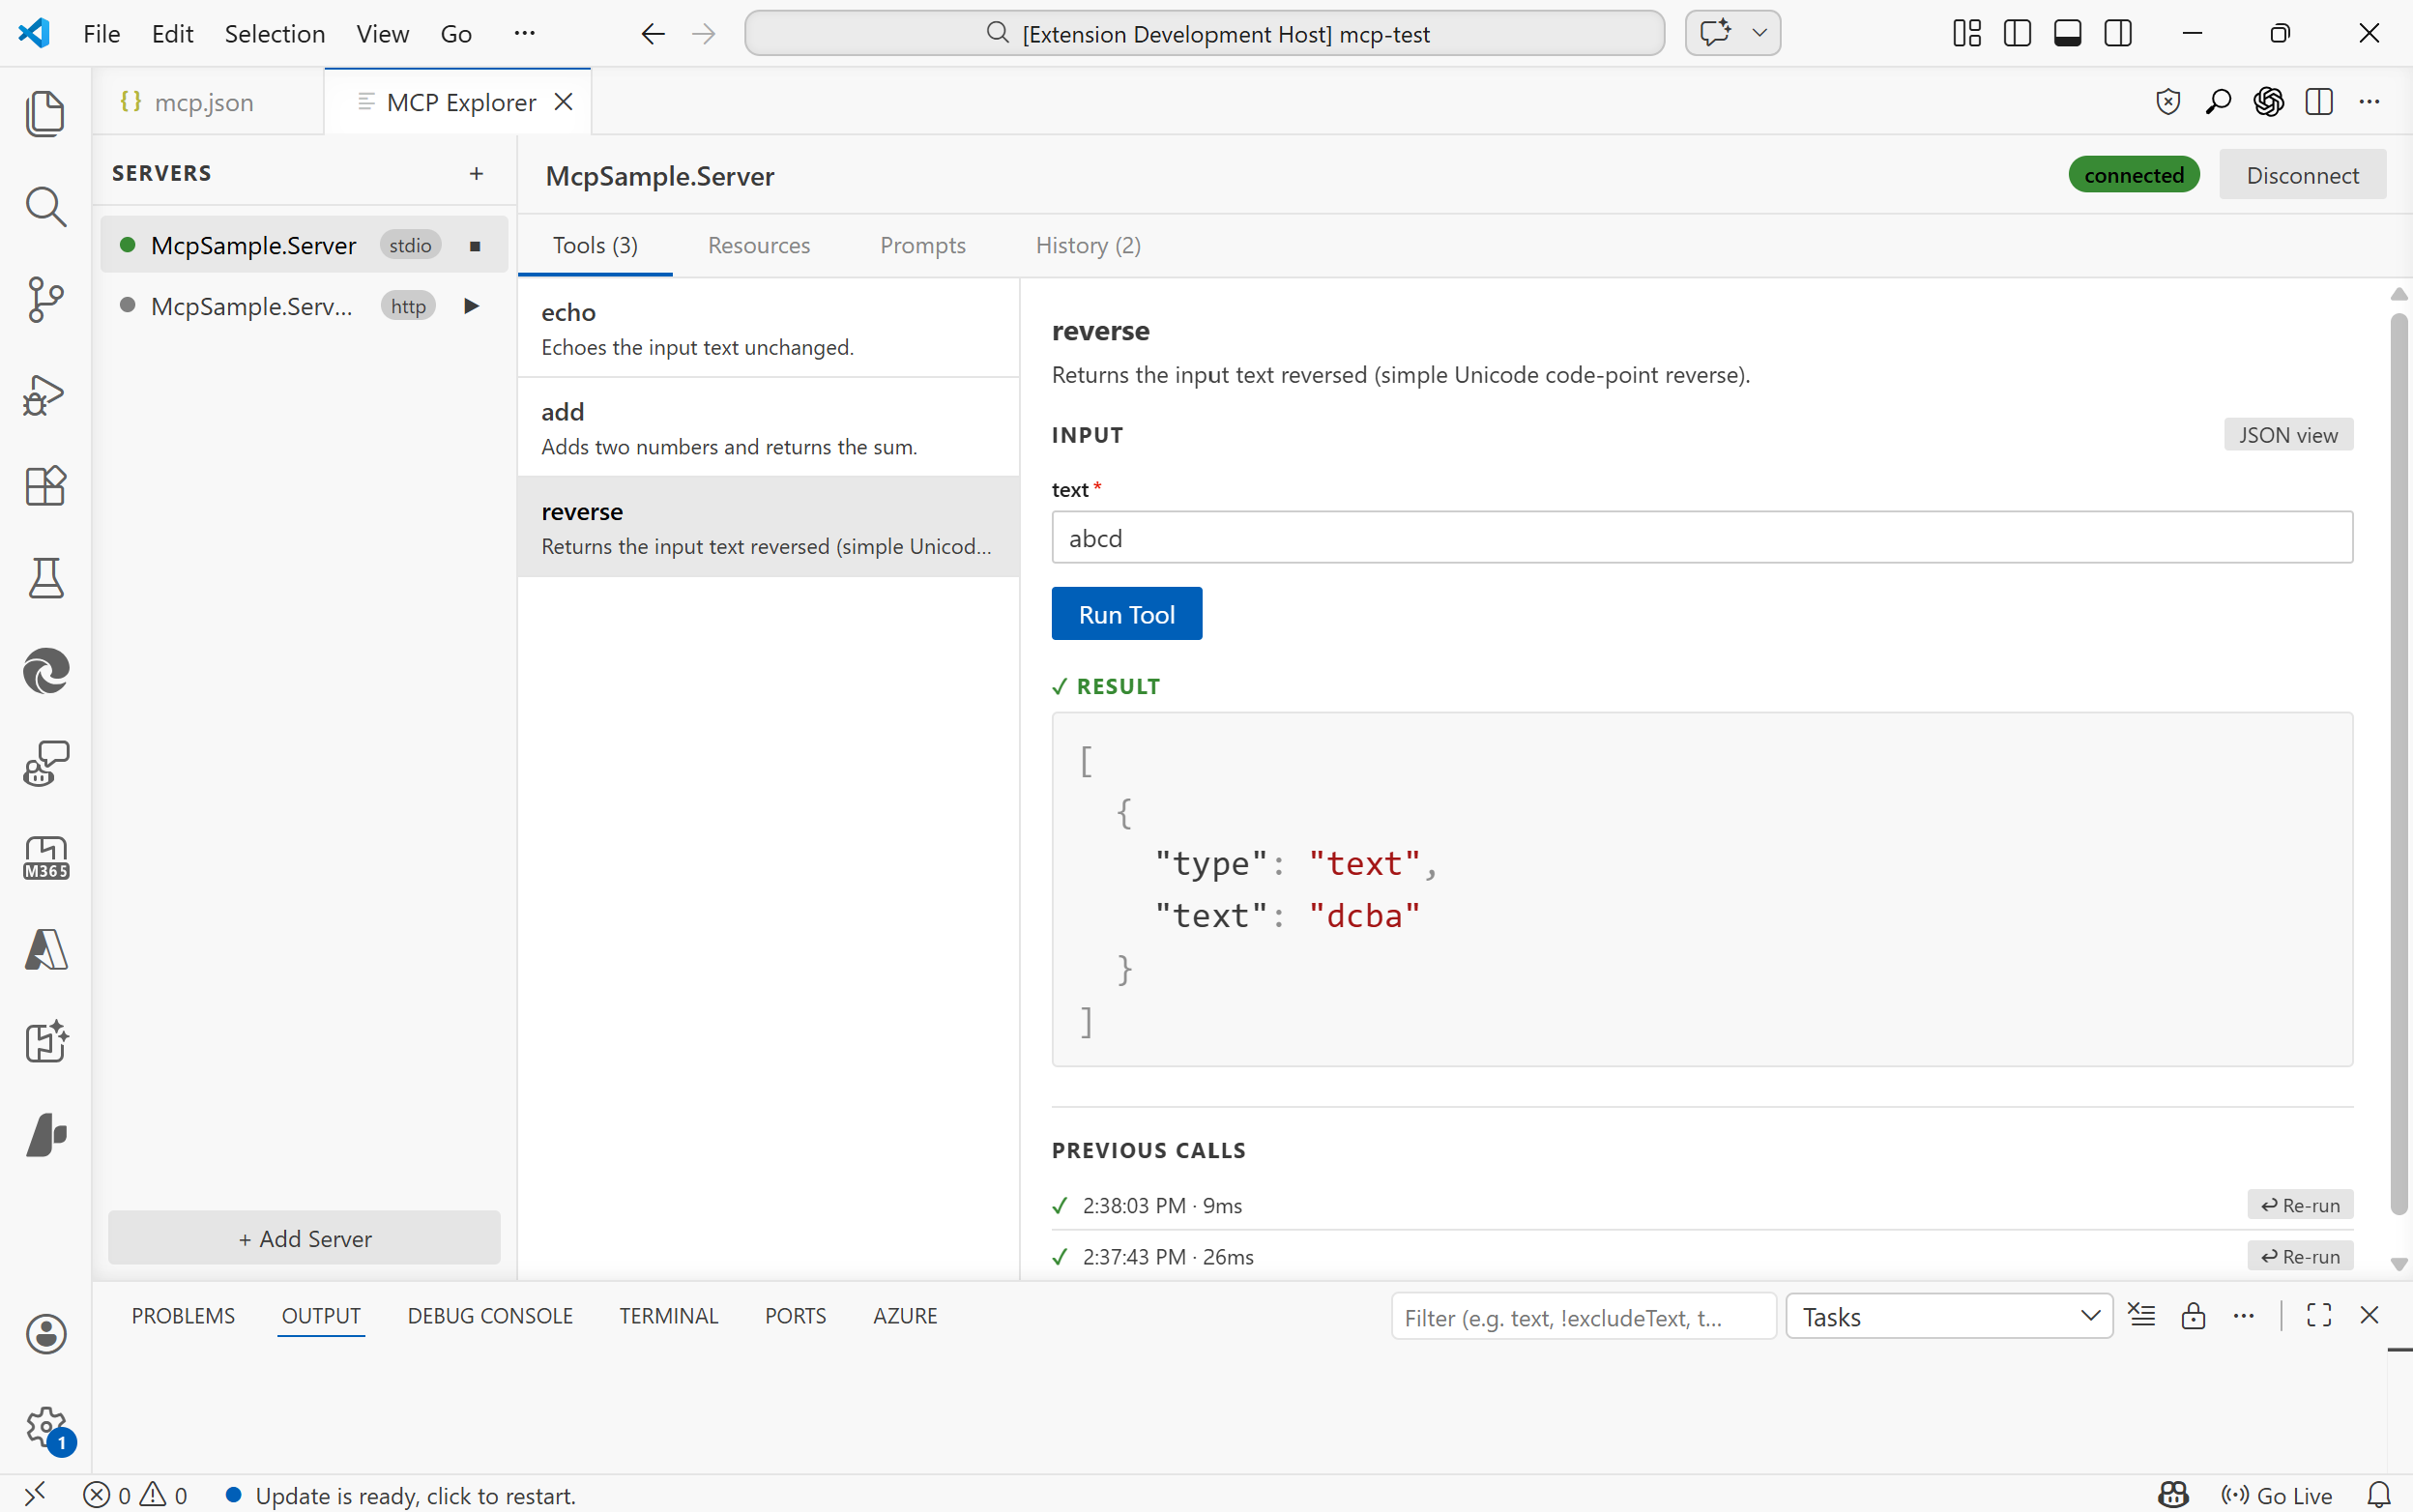
MCP Tool Explorer is a VS Code extension for exploring MCP servers: browsing tools, resources, and prompts, calling them, and inspecting results. With this update it also renders MCP App UIs inline, next to the regular result view.
A few examples running inside the extension: one from the official SDK sample, five built as test cases.
budget-allocator (official SDK sample)
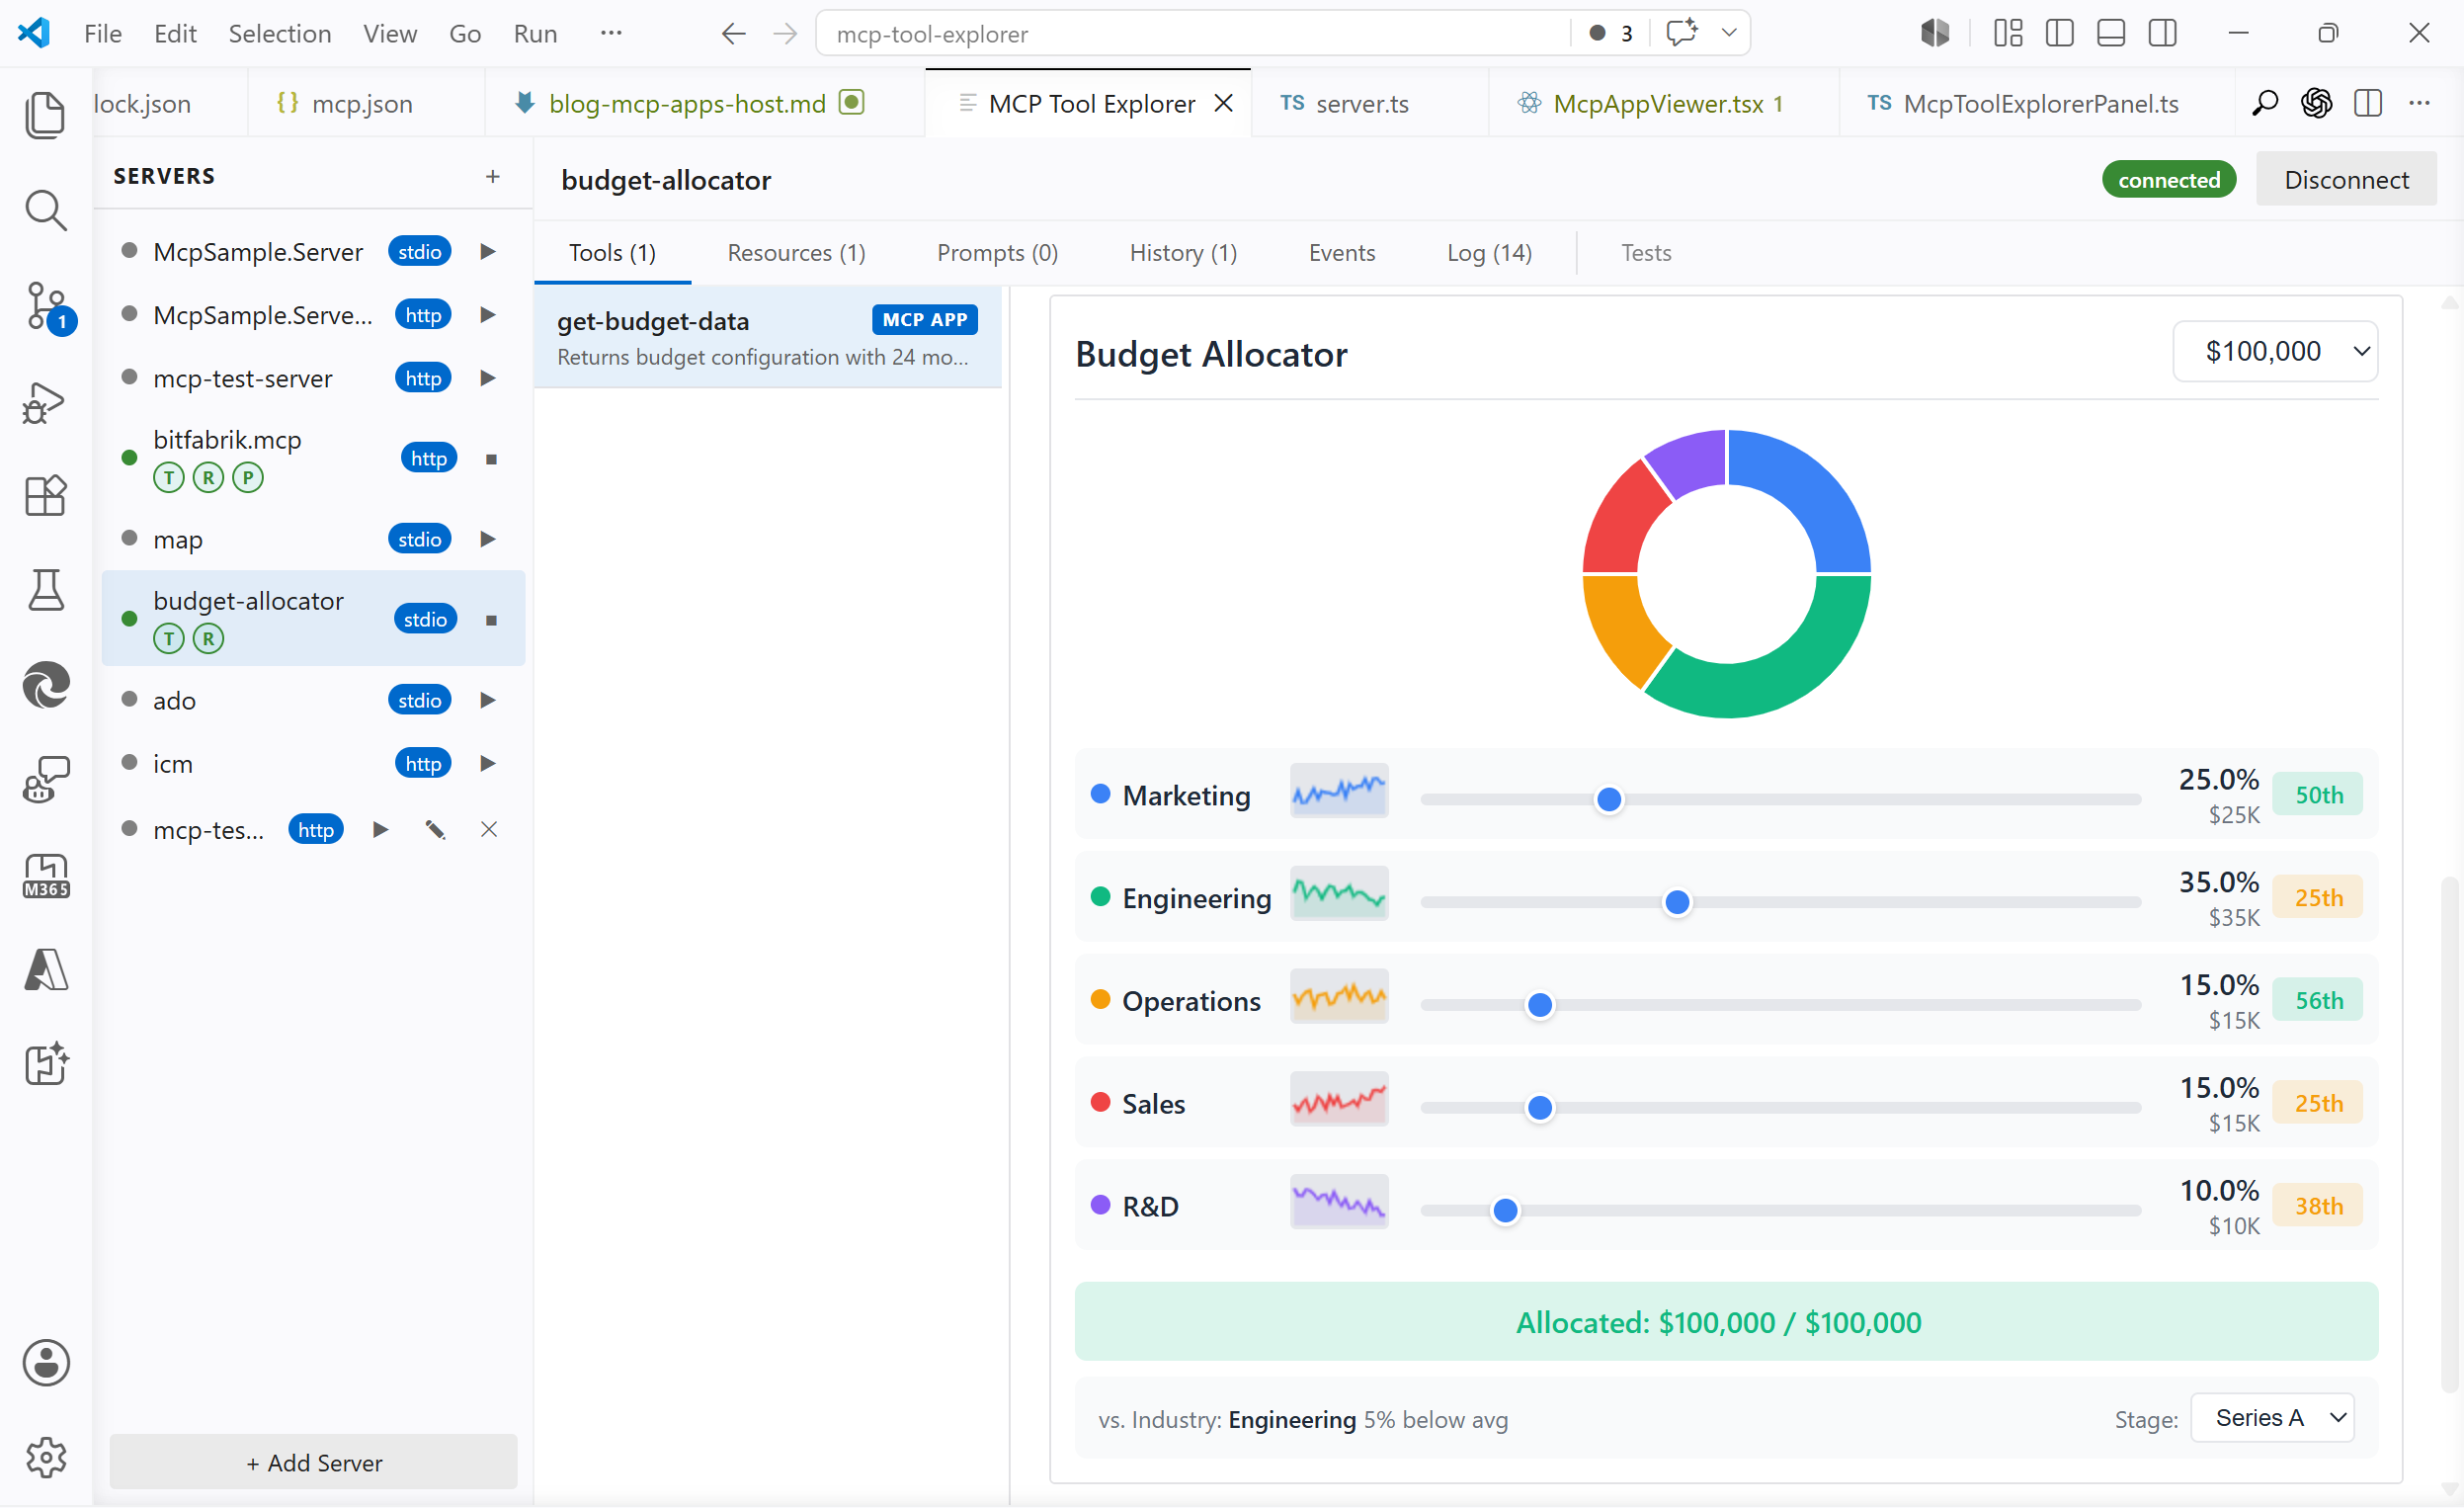
mcp.json"budget-allocator": { "command": "npx", "args": ["-y", "@modelcontextprotocol/server-budget-allocator", "--stdio"] },Regex visualizer: parses a regex and renders an interactive token breakdown with optional match highlighting
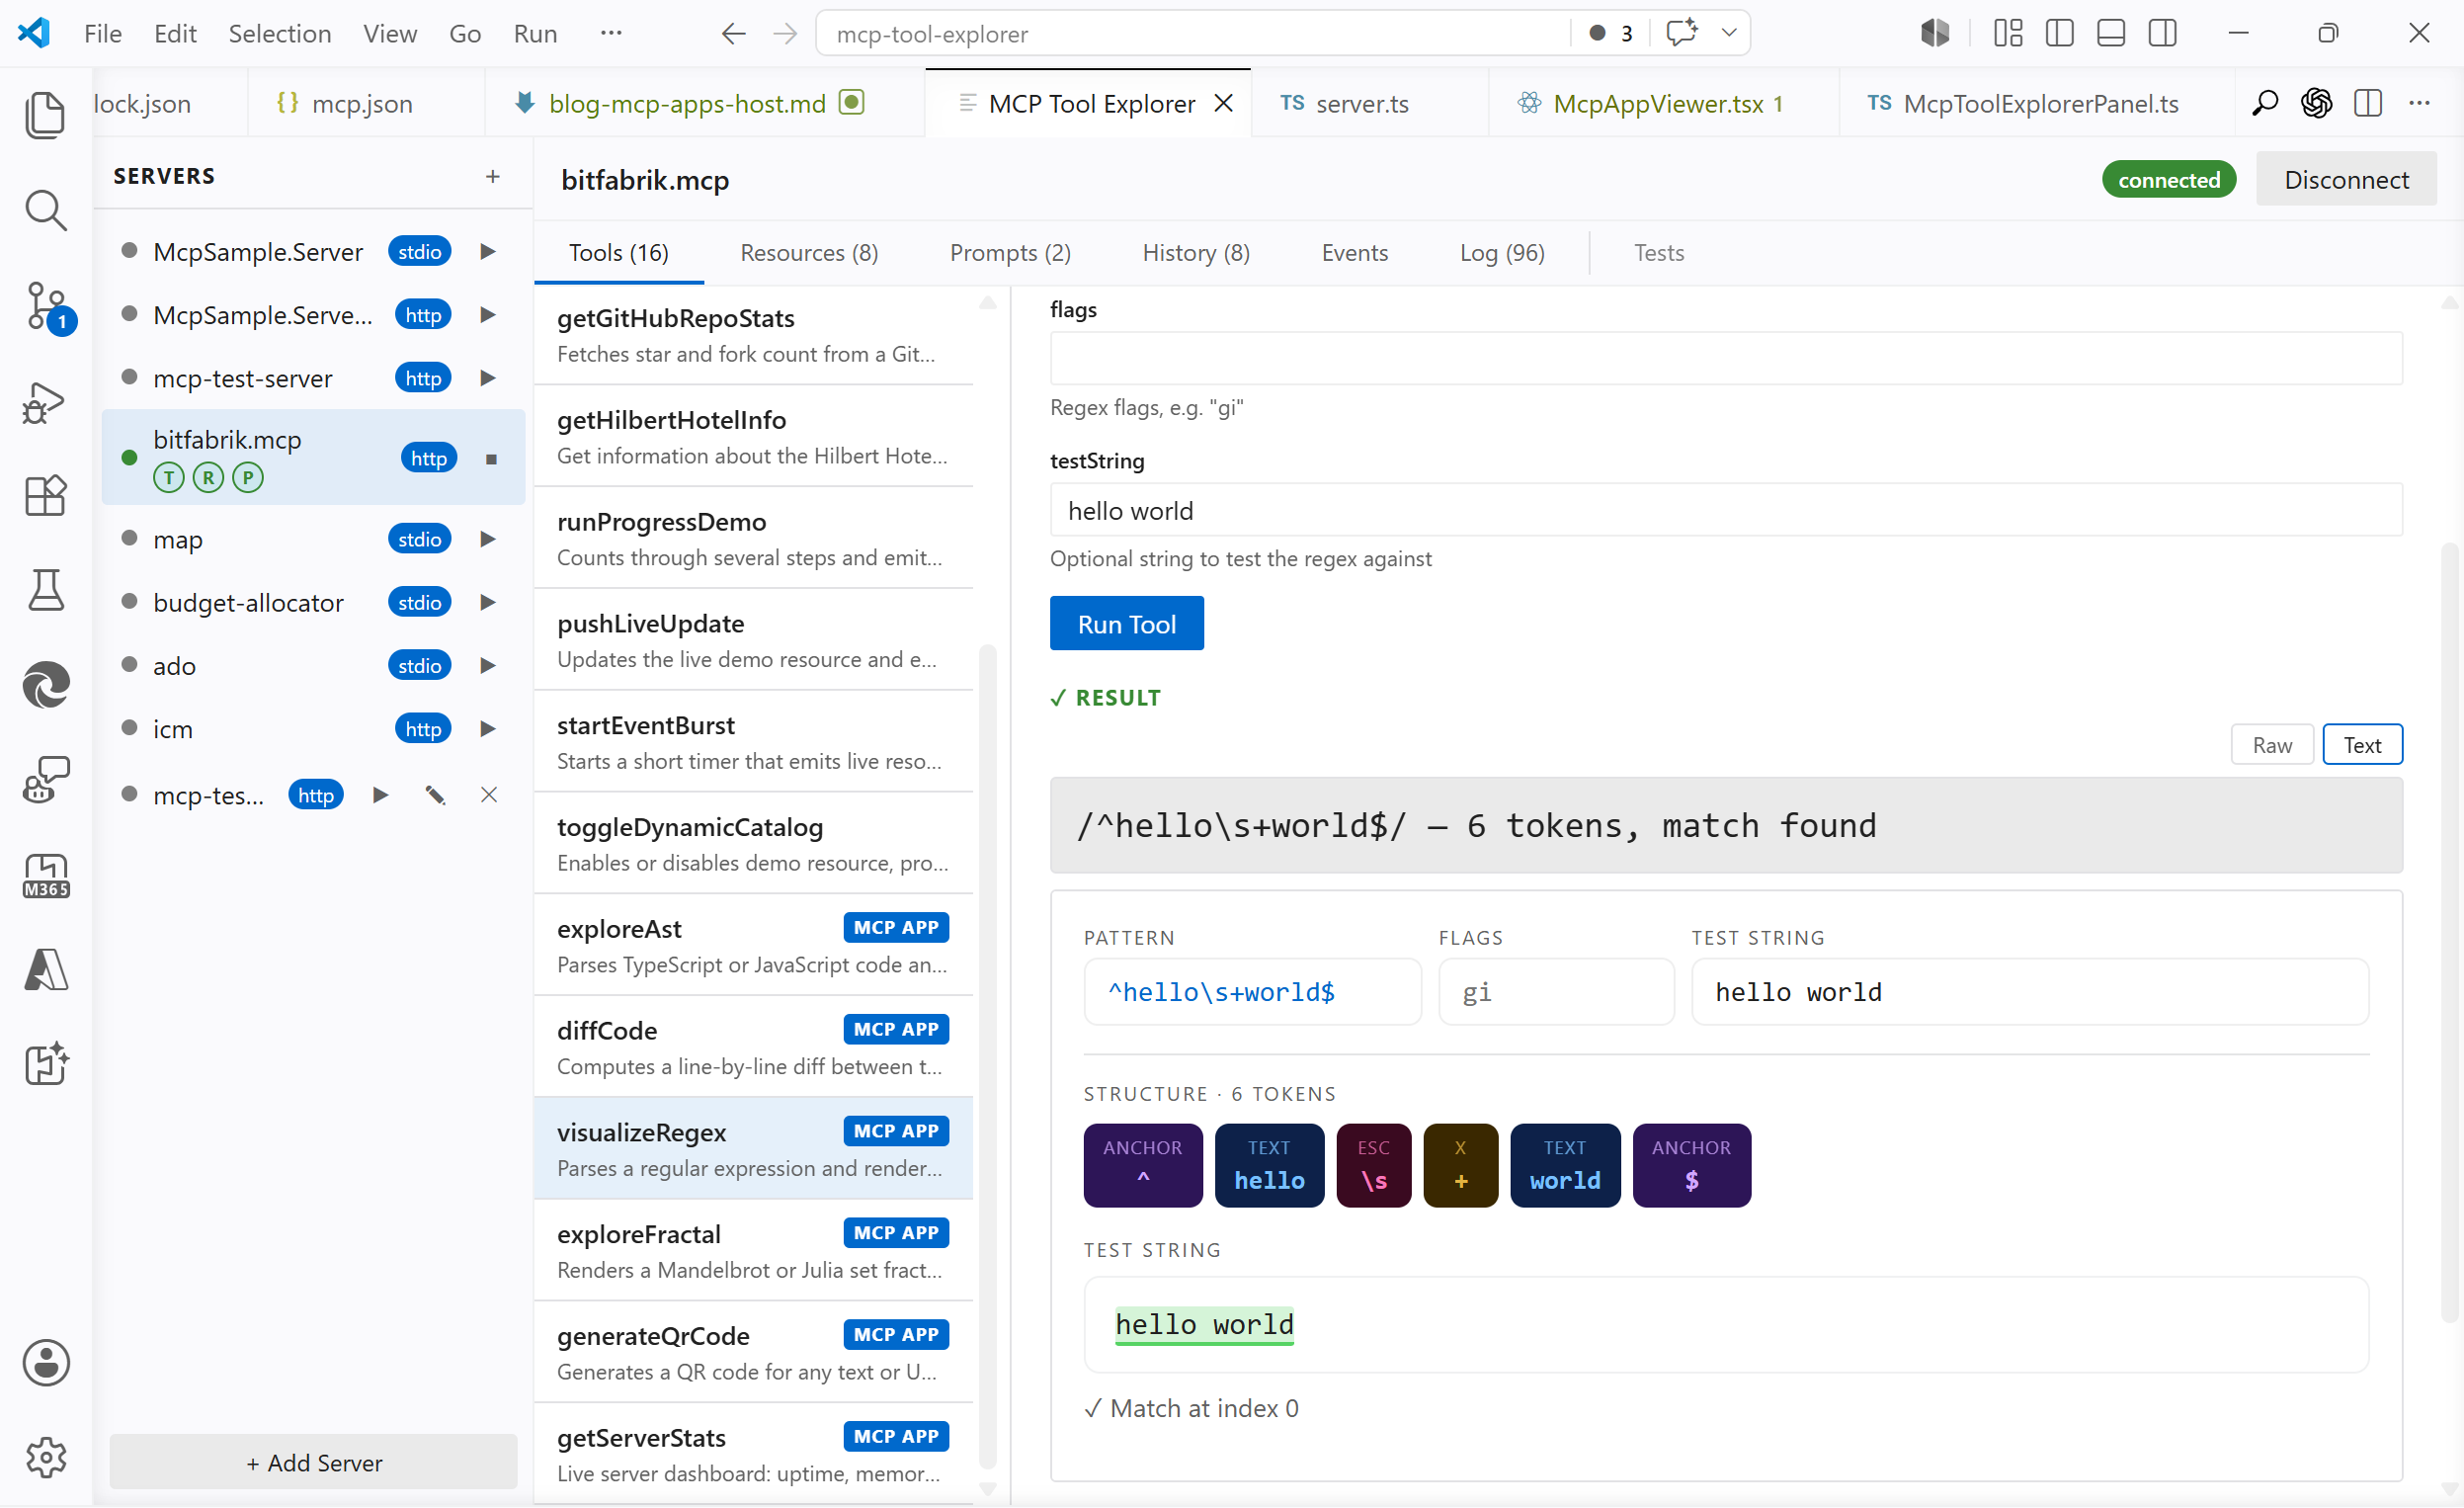 on
on https://bitfabrik.io/mcpQR code generator: generates a QR code for any text or URL, live-updating as you type
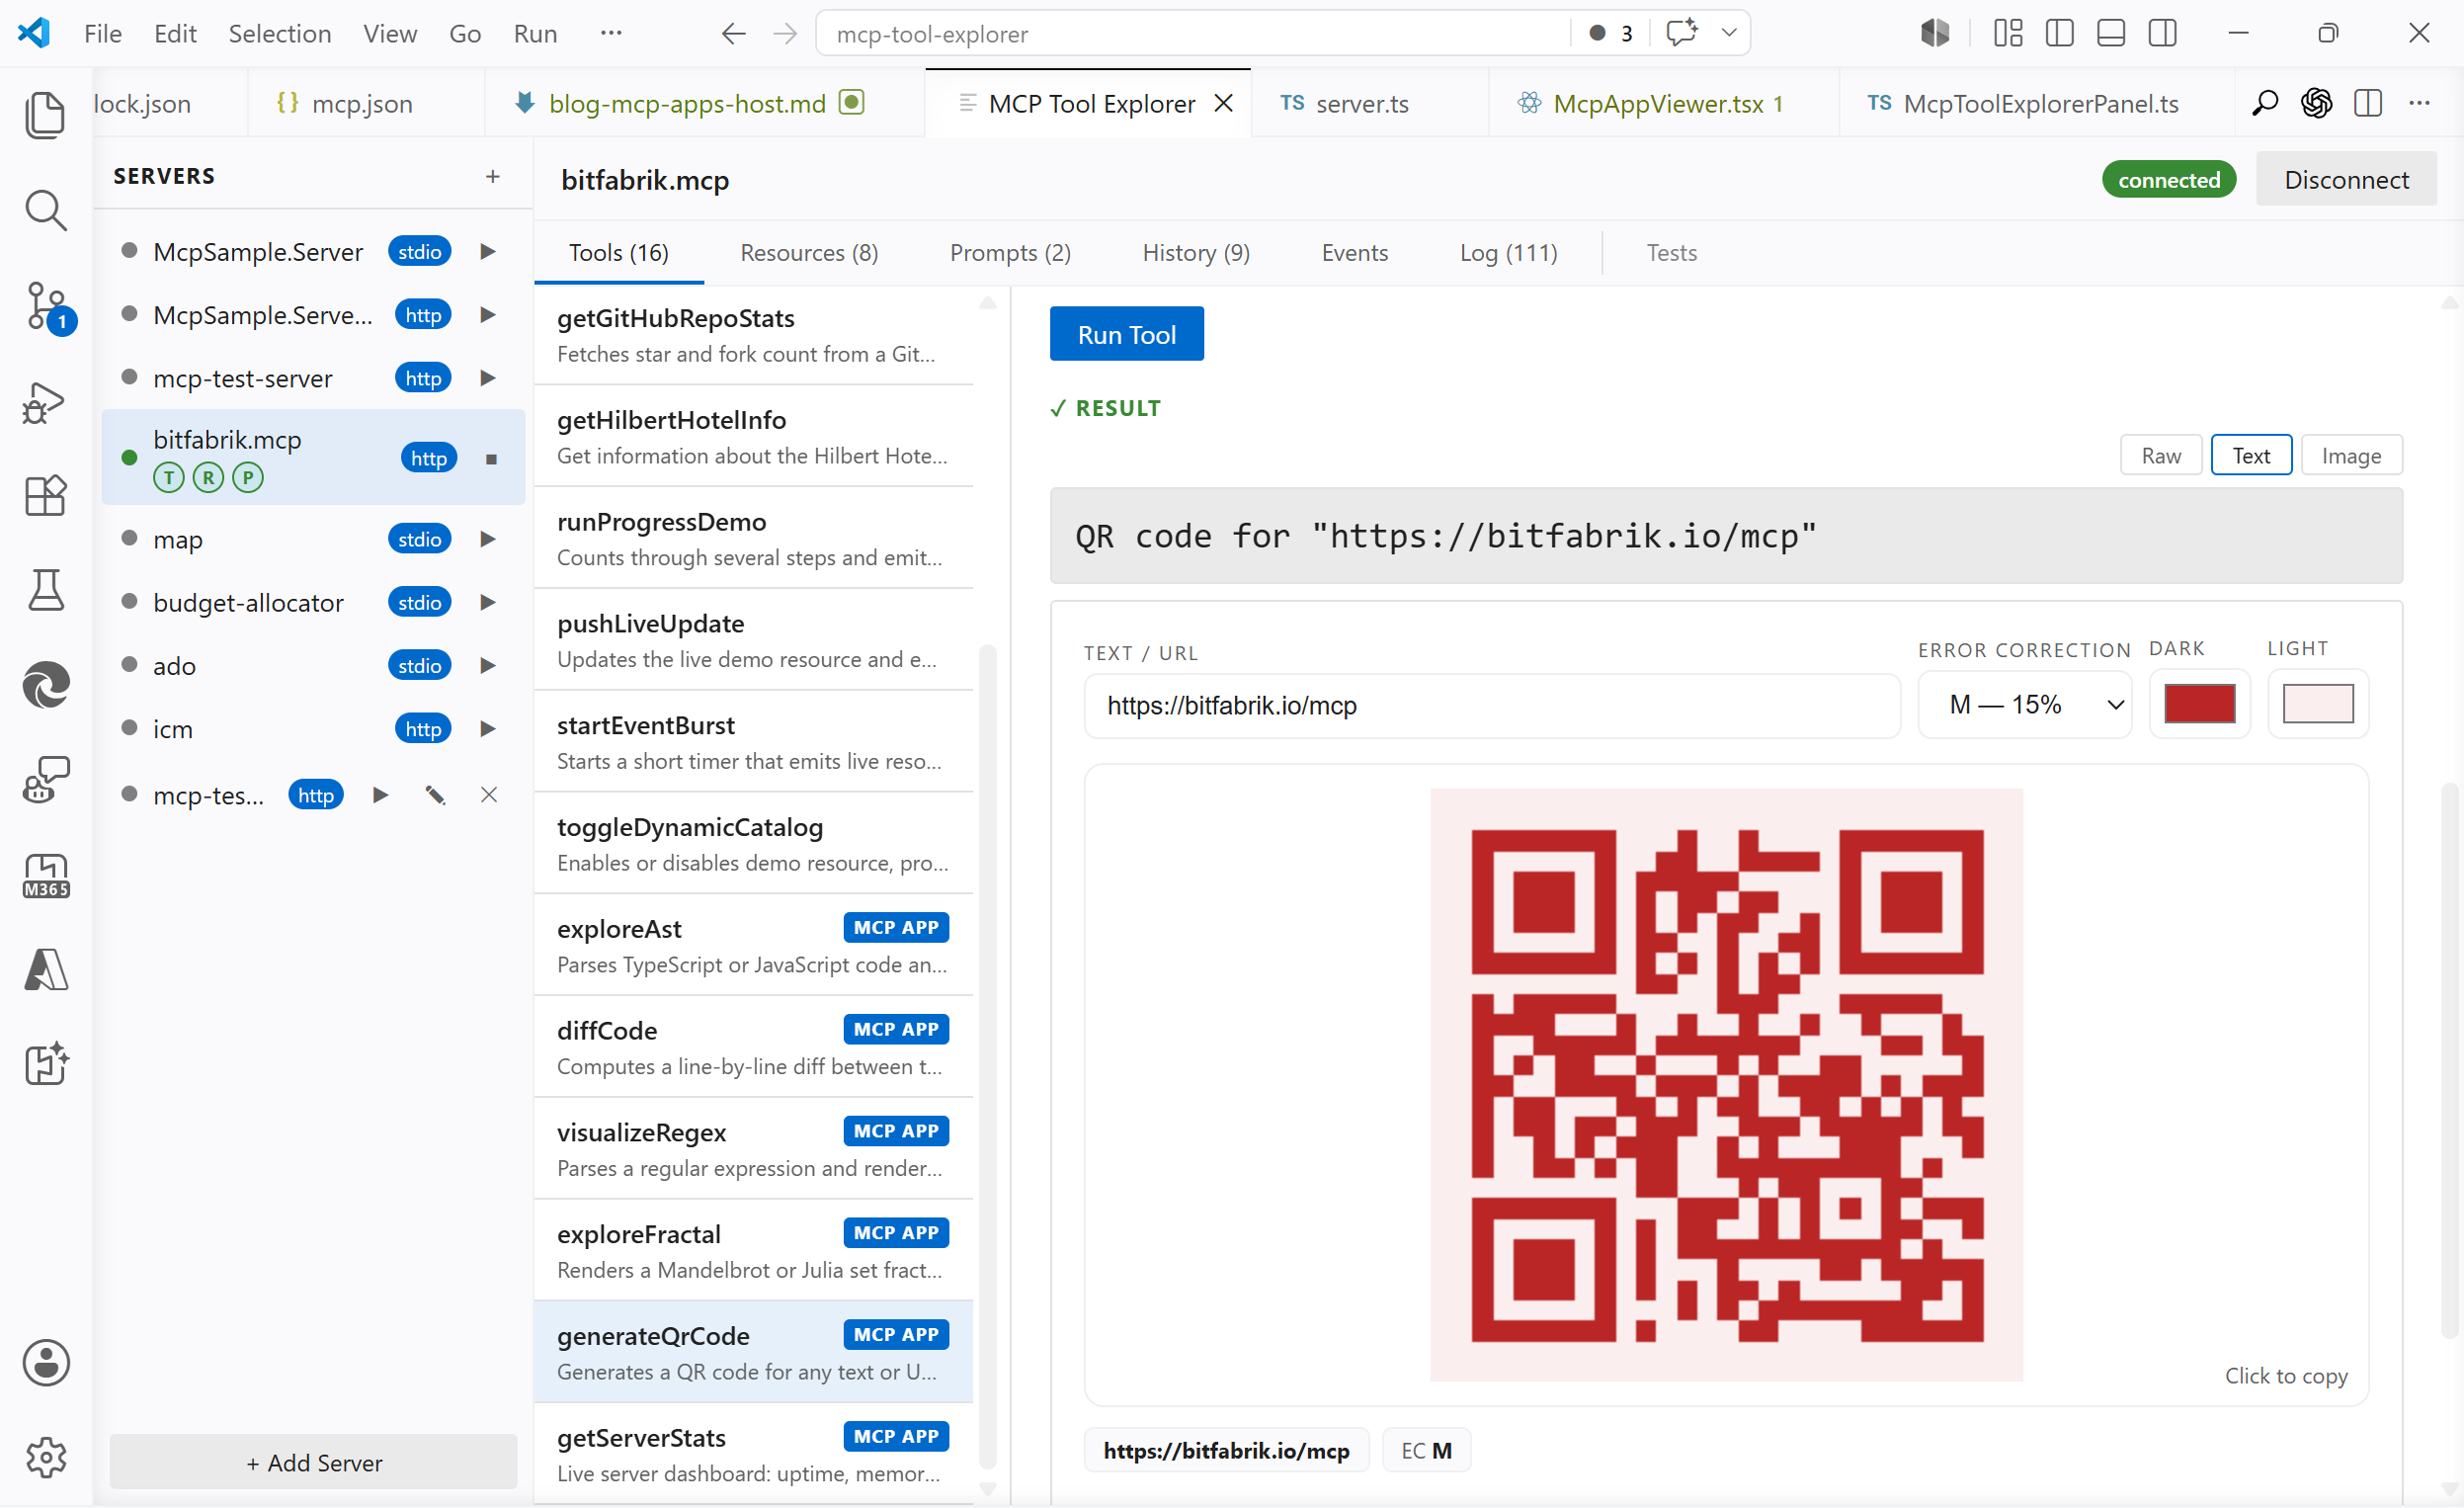 on
on https://bitfabrik.io/mcpCode diff viewer: computes a line-by-line diff and renders a visual unified diff with syntax highlighting
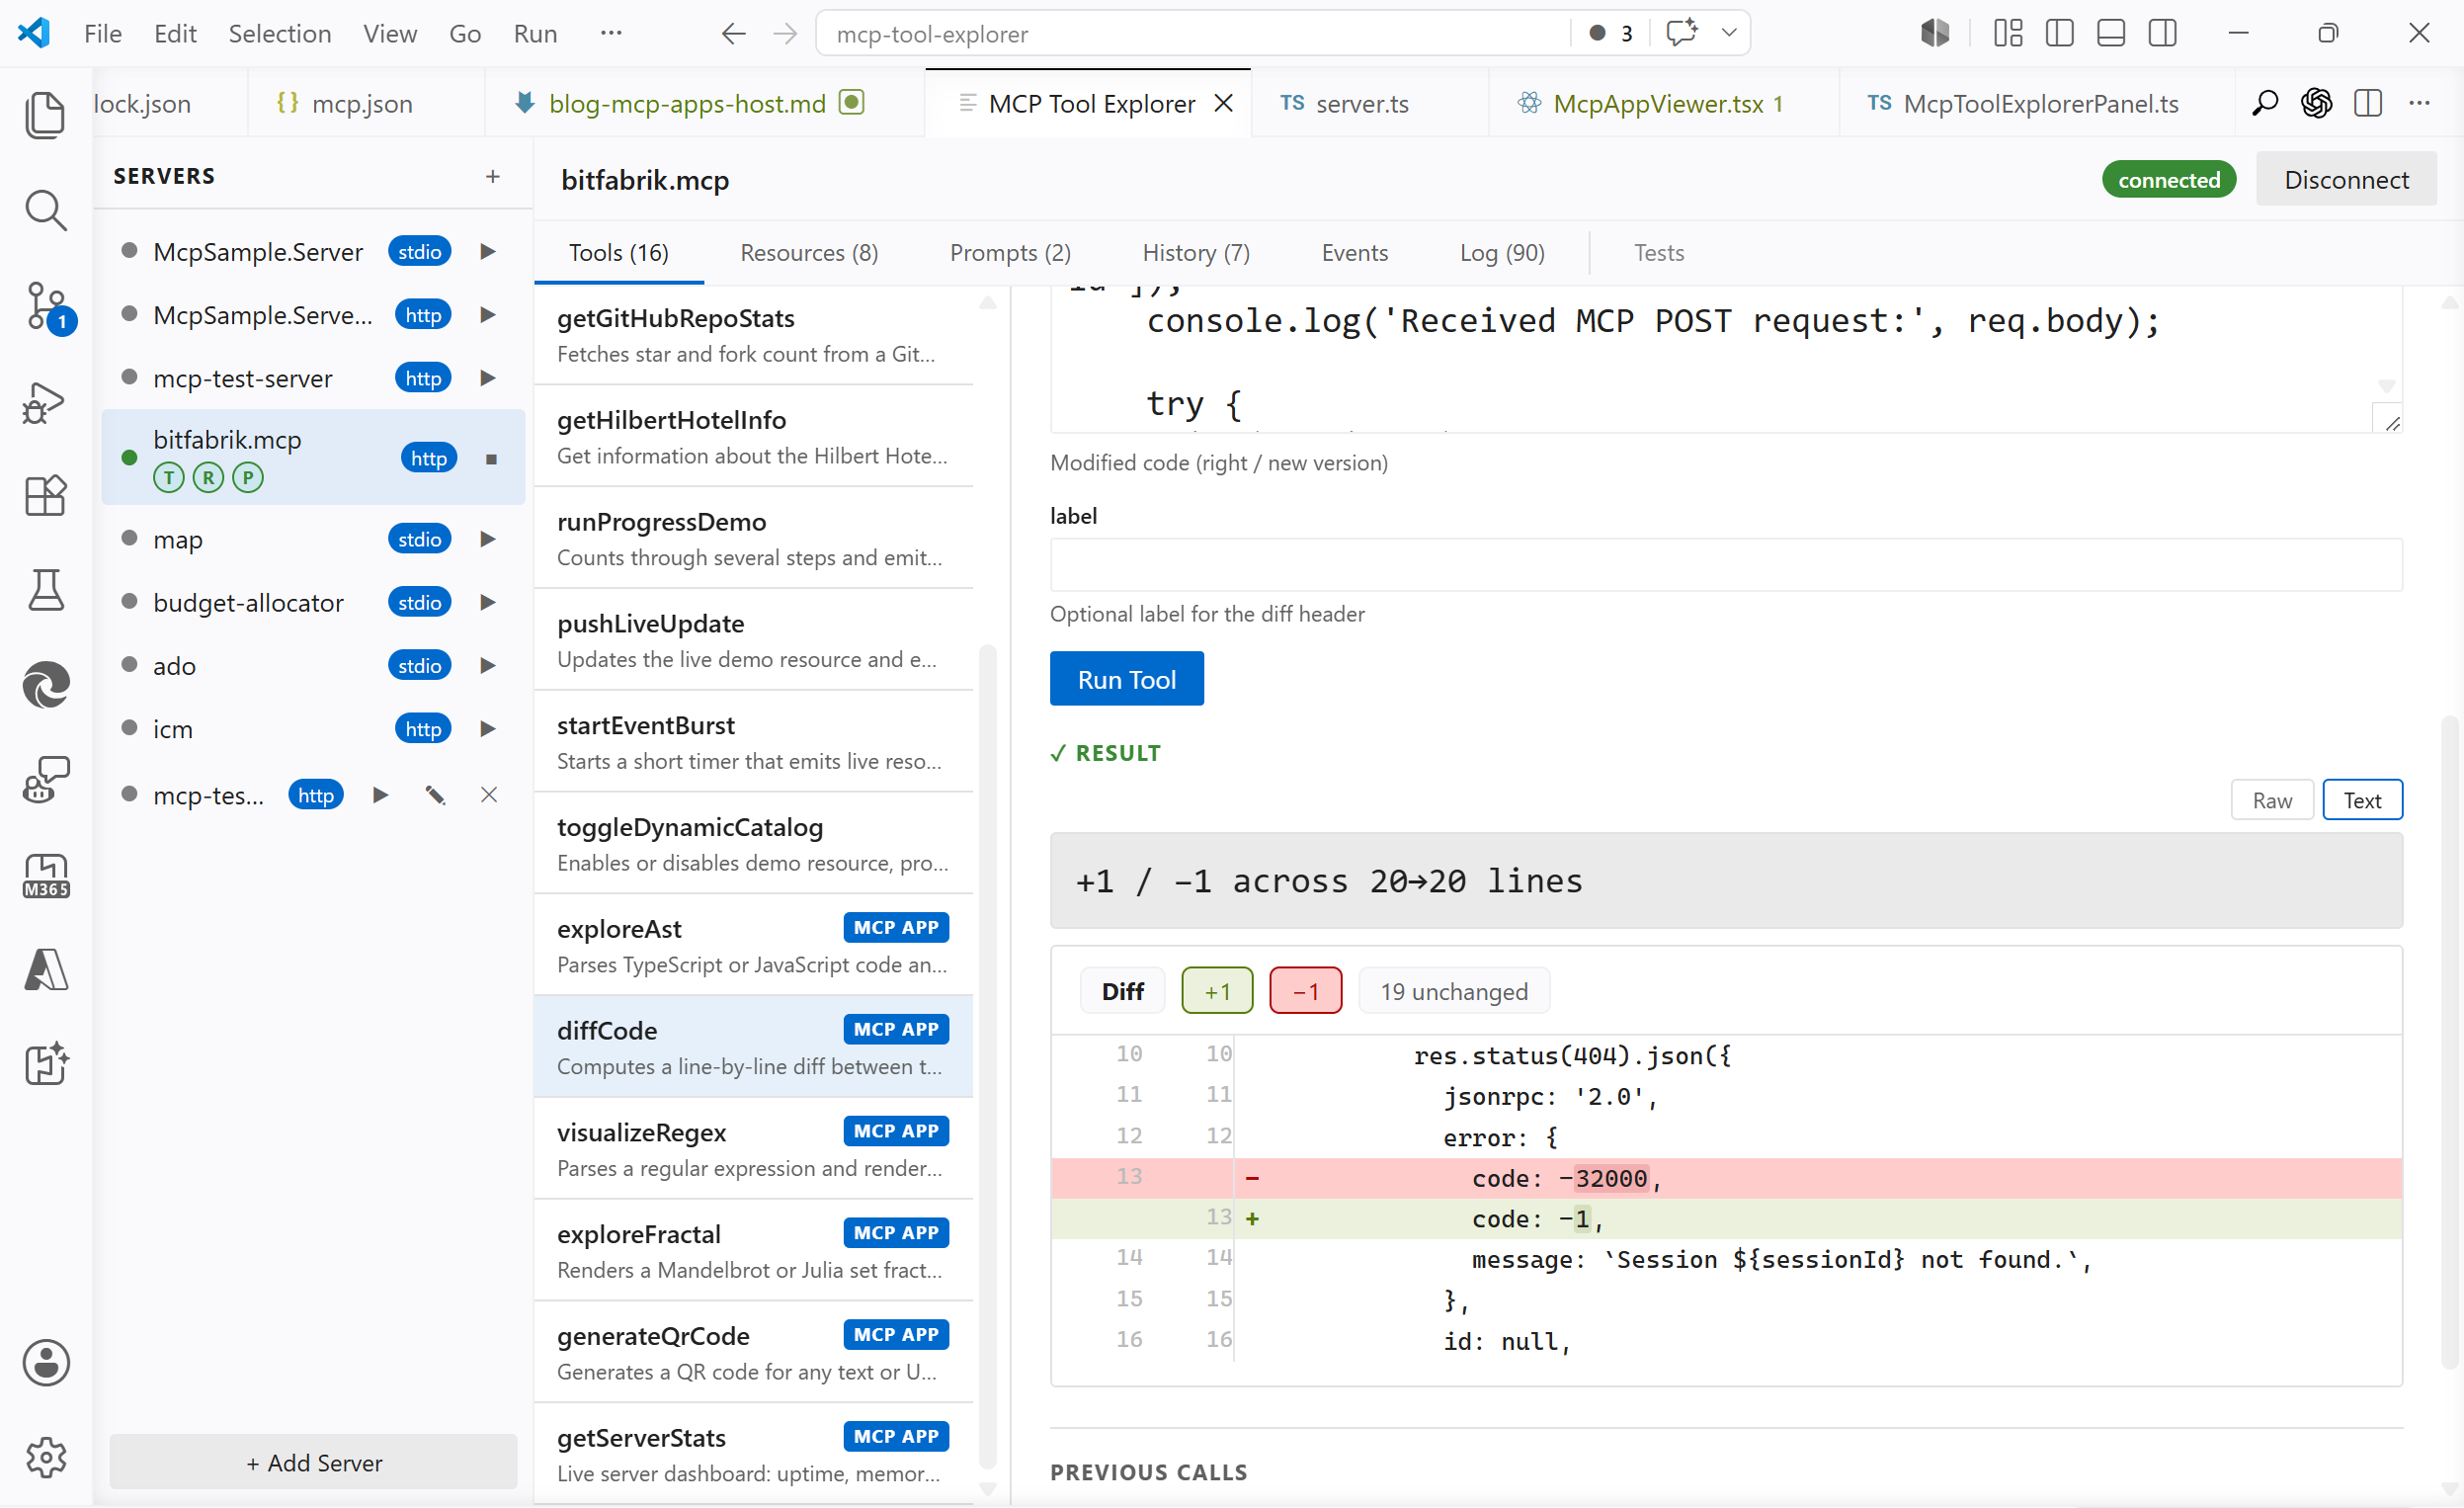 on
on https://bitfabrik.io/mcpFractal explorer: renders a Mandelbrot or Julia set; click to zoom
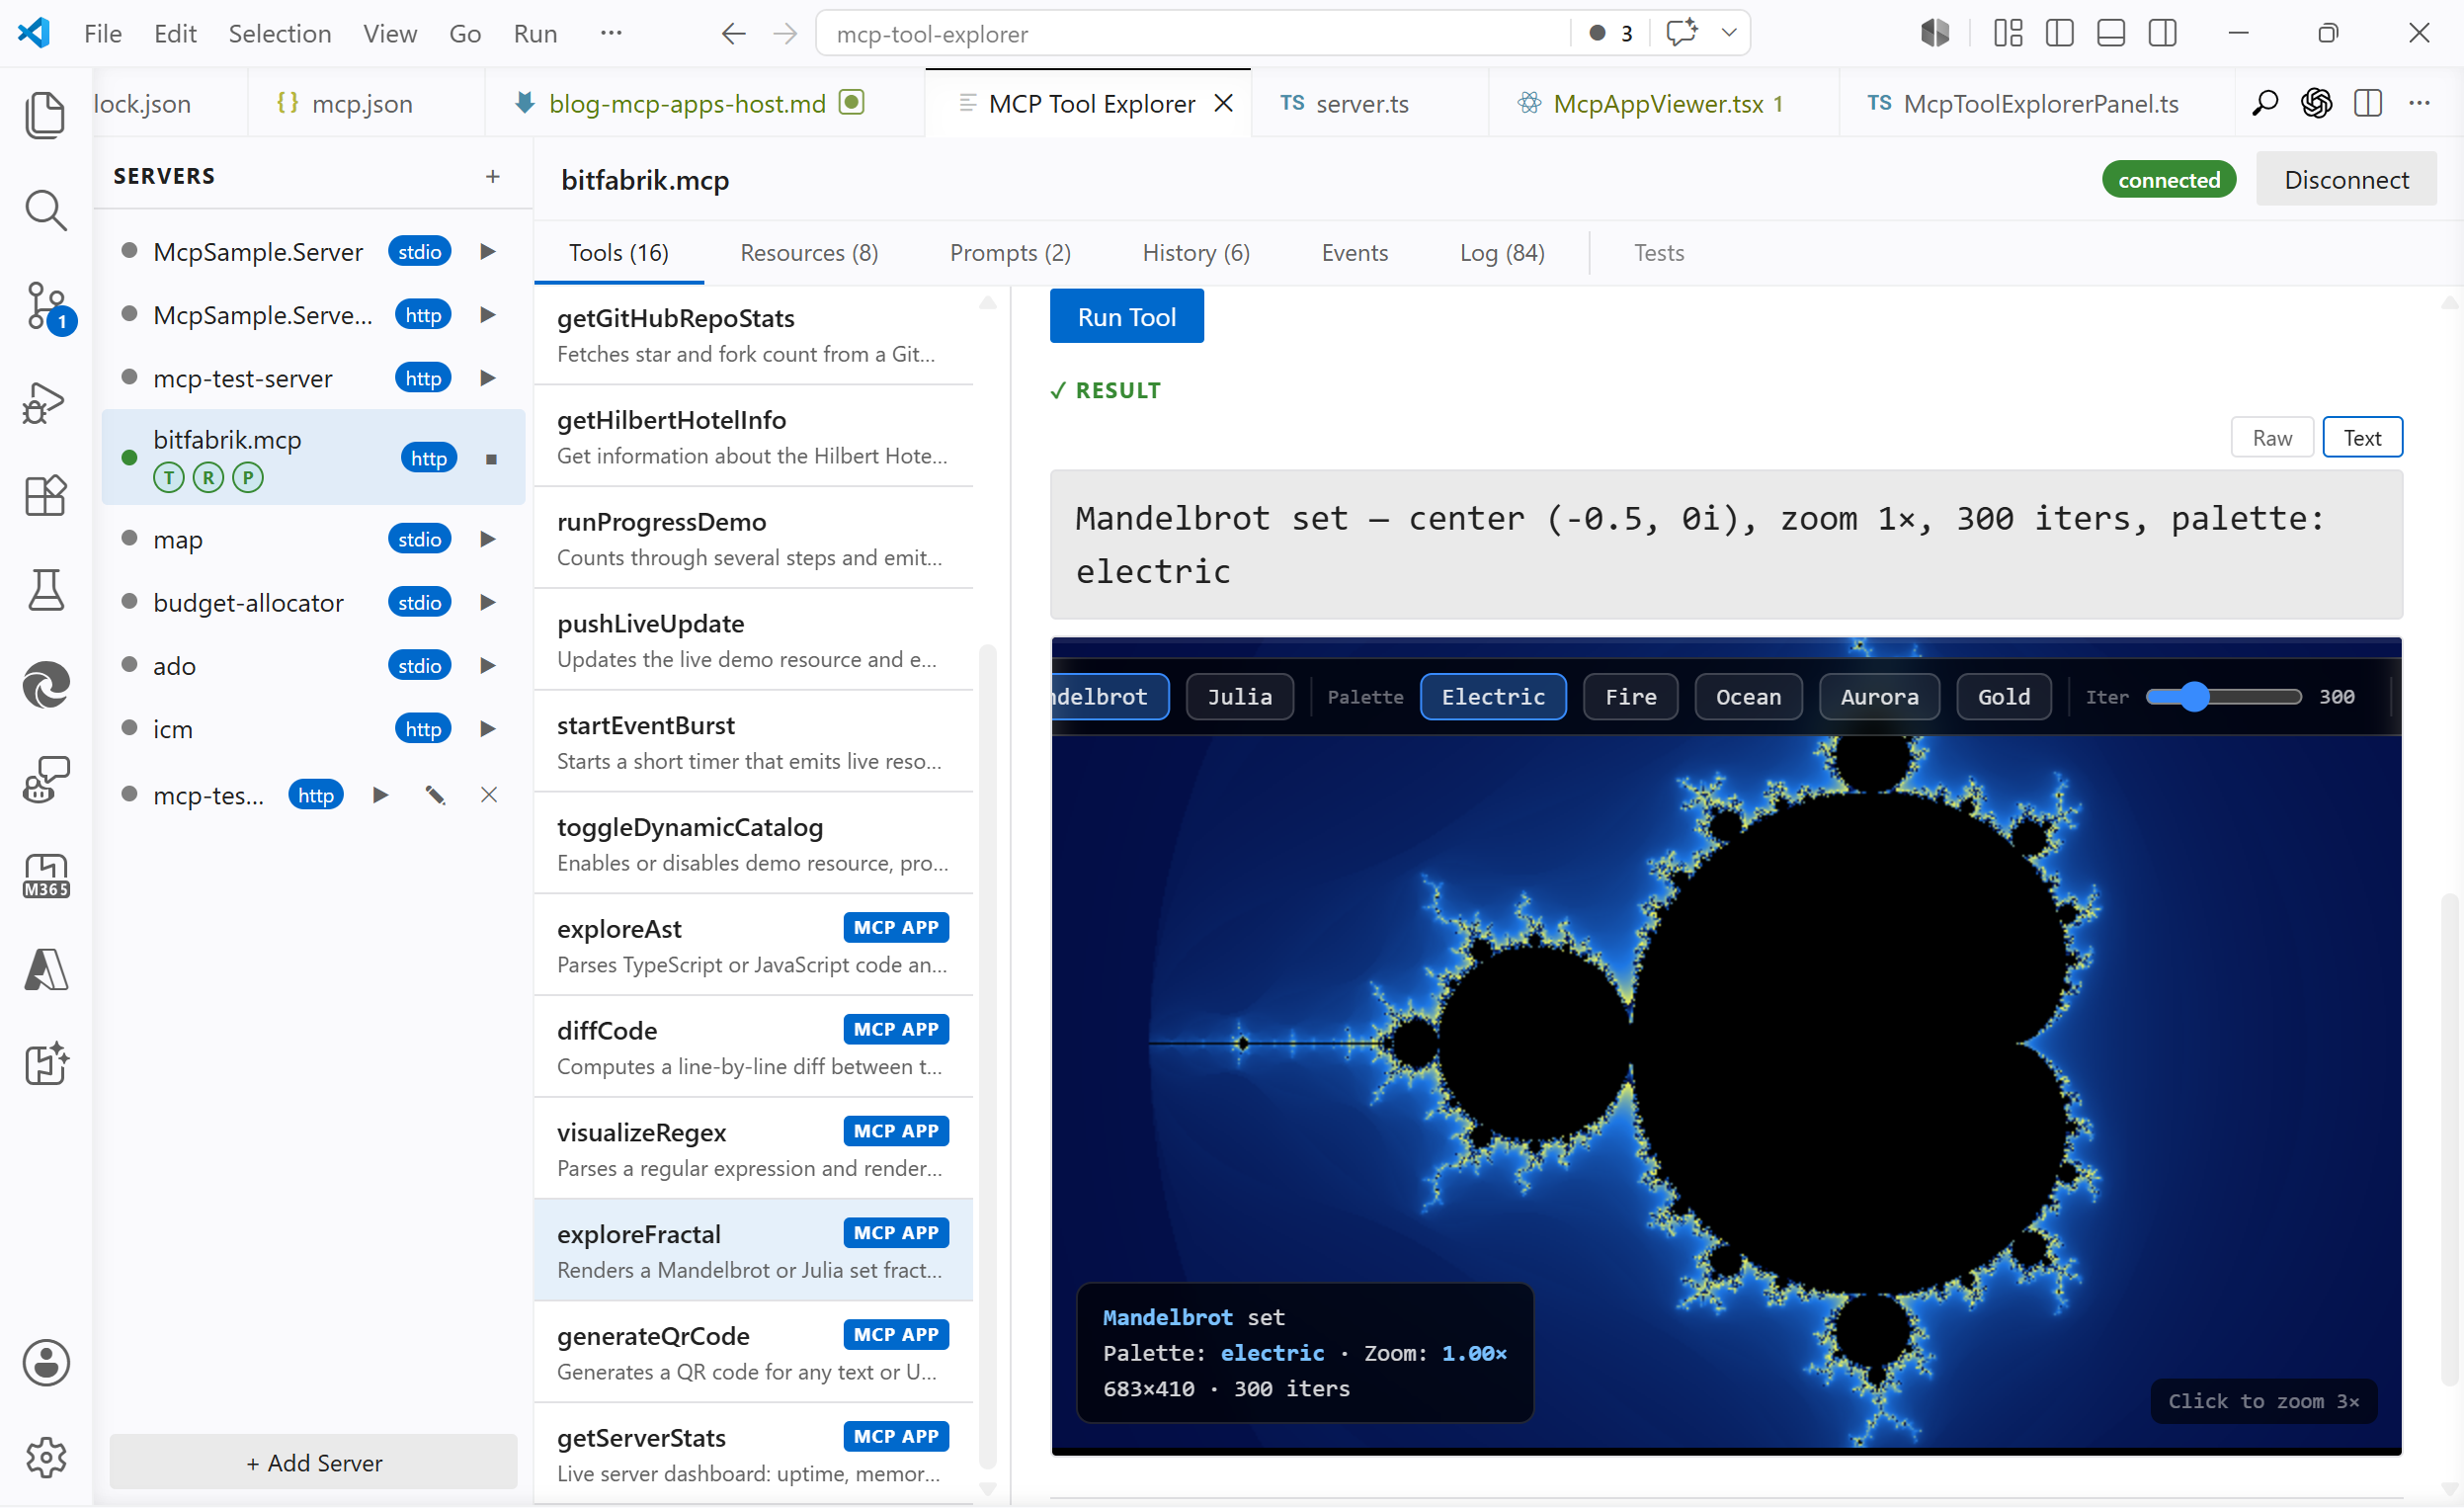 on
on https://bitfabrik.io/mcpServer stats dashboard: live view of uptime, call counts, and recent requests
 on
on https://bitfabrik.io/mcpWhat MCP Apps Actually Is
MCP tools normally return text or JSON. MCP Apps extends MCP: a tool can include a
ui://resource URI in its_metafield. The host fetches that URI, gets back a full HTML document, renders it in a sandboxed iframe, and proxies JSON-RPC 2.0 messages between the iframe and the MCP server viapostMessage.That is the whole mechanism. The protocol is not exotic; it reuses the existing MCP
resources/readcall for the HTML fetch and standard JSON-RPC 2.0 for the iframe bridge. The spec explicitly notes that you do not need an SDK to implement it.Supported hosts as of today: Claude, ChatGPT, VS Code, Goose, Postman, MCPJam.
The Architecture
The moving parts:
+------------------------------------------------------------+
|  VS Code                                                   |
|                                                            |
|  +------------------------------+                          |
|  |  Extension Host (Node.js)    |                          |
|  |  McpToolExplorerPanel.ts     |---------- HTTP ----------> MCP Server
|  |  McpClientManager.ts         |      (localhost:3000)    | (server.ts)
|  +------------------------------+                          |
|              |  postMessage                                |
|  +-----------v------------------+                          |
|  |  Webview (Chromium)          |                          |
|  |  McpAppViewer.tsx (React)    |                          |
|  |  +--------------------------+|                          |
|  |  | iframe (sandboxed)       ||                          |
|  |  | MCP App HTML             ||                          |
|  |  | (postMessage only,       ||                          |
|  |  |  no network access)      ||                          |
|  |  +--------------------------+|                          |
|  +------------------------------+                          |
+------------------------------------------------------------+
The iframe has
sandbox="allow-scripts"and nothing else: noallow-same-origin, no network access, no cookies, nolocalStorage.McpAppVieweris the sole intermediary: it catchespostMessagefrom the iframe and routes everything through the extension host to the real MCP server over HTTP.One thing that is not obvious from the spec: the bridge lives in the webview, not inside the iframe. The app sends messages to
window.parent; the host catches them from the outside. Nothing is injected into the iframe.The Protocol
A tool advertises its UI in
_meta:{ "name": "generateQrCode", "_meta": { "ui": { "resourceUri": "ui://mcp-test-server/qr-code" } } }The host signals support during
initialize:new Client( { name: 'my-host', version: '1.0.0' }, { capabilities: { extensions: { 'io.modelcontextprotocol/ui': { mimeTypes: ['text/html;profile=mcp-app'] }, }, }, } )After a tool call, if the result's tool definition has
_meta.ui.resourceUri, the host callsresources/readon that URI, gets HTML back incontent[0].text, and hands it to the webview. The iframe then runs the full MCP handshake sequence overpostMessage:iframe → Host: initialize Host → iframe: initialize result iframe → Host: notifications/initialized iframe → Host: ui/initialize (MCP Apps extension handshake) Host → iframe: ui/initialize result (includes hostContext: theme, platform, displayMode) iframe → Host: ui/notifications/initialized ← "I am ready" Host → iframe: ui/notifications/tool-input { arguments: { ... } } Host → iframe: ui/notifications/tool-result { content: [...], structuredContent: { ... } }After that, the iframe can call
tools/callandresources/readinteractively, and sendsui/notifications/size-changedto drive iframe resizing.Implementing the Host
Advertising capability and fetching the HTML
The capability is declared in the
Clientconstructor (shown above). On the server side, attaching_meta.uito a tool registration requires a// @ts-ignorefor now: the field is protocol-level but not yet in the SDK TypeScript types:Without SDK:
// @ts-ignore — _meta is not yet typed in @modelcontextprotocol/sdk
server.registerTool('generateQrCode', {
  title: 'QR Code Generator',
  description: 'Generates a QR code for any text or URL',
  inputSchema: { text: z.string().describe('Text or URL to encode') },
  _meta: { ui: { resourceUri: 'ui://mcp-test-server/qr-code' } },
}, handler);
With SDK (
@modelcontextprotocol/ext-apps/server),getUiCapabilitychecks whether the connecting host supports UI before_metais attached:import { getUiCapability, RESOURCE_MIME_TYPE } from "@modelcontextprotocol/ext-apps/server"; const uiCap = getUiCapability(clientCapabilities); if (uiCap?.mimeTypes?.includes(RESOURCE_MIME_TYPE)) { tool._meta = { ui: { resourceUri: 'ui://mcp-test-server/qr-code' } }; }When a tool result arrives, the host reads the HTML and builds the CSP before handing it to the webview:
case 'fetchUiResource': {
  const result = await this._clientManager.readResource(message.serverId, message.uri);
  const content = result.contents?.[0];
  const html = content && 'text' in content && typeof content.text === 'string'
    ? content.text : undefined;
  if (!html) { /* send error */ break; }
  const uiMeta = (content as any)?._meta?.ui;
  this._post({ type: 'uiResourceContent', requestId: message.requestId, html, csp: uiMeta?.csp });
  break;
}
The
_meta.ui.cspfield is optional. If the server declares external domains there (CDN hosts for scripts, API endpoints), the host adds them to the iframe's CSP. Without it,default-src 'none'applies and all external fetches are blocked. That is by design.function buildCsp(csp: CspMeta | undefined): string { const connect = csp?.connectDomains?.join(' ') ?? ''; const resources = csp?.resourceDomains?.join(' ') ?? ''; return [ "default-src 'none'", `script-src 'self' 'unsafe-inline' ${resources}`.trimEnd(), `connect-src 'self' ${connect}`.trimEnd(), // … ].join('; '); }The CSP is injected as a
tag prepended to the HTML before writing it toiframe.srcdoc. The iframe is shown immediately when the HTML arrives, not after the MCP handshake inside the iframe completes. Gating on that internal handshake would leave the host stuck on "Loading…" if the app is slow or broken.The JSON-RPC bridge
The
@modelcontextprotocol/ext-apps/app-bridgepackage wraps the whole handshake in a few lines:import { AppBridge } from '@modelcontextprotocol/ext-apps/app-bridge'; const bridge = new AppBridge(iframeElement, mcpClient); bridge.onReady(() => { bridge.sendToolInput({ arguments: toolArgs }); bridge.sendToolResult(result); });For a VS Code webview with its own React architecture, a vanilla implementation was the more practical choice: the webview already has its own message bus between extension host and UI, and adding a second one creates more complexity than it removes. The whole bridge is around 150 lines. It handles
initialize,ui/initialize,tools/call,resources/read,ui/open-link,ui/notifications/size-changed, andping. Each message type is explicit, which is useful while the protocol is still maturing.One detail that the sequence diagram makes clear:
structuredContentmust survive the entire round-trip. It is a first-class field added in MCP spec 2026-01-26; it sits alongside the plaincontentarray and carries the machine-readable data that drives the app's UI. If any layer in the pipeline silently drops it, the iframe renders its empty state:// host → webview → McpAppViewer props → ui/notifications/tool-result if (m.type === 'toolResult') { sendToIframe({ jsonrpc: '2.0', id, result: { content: m.result, isError: m.isError, ...(m.structuredContent !== undefined ? { structuredContent: m.structuredContent } : {}), }}); }Dynamic height
The iframe cannot read its own
scrollHeightwithoutallow-same-origin. Instead, the app sendsui/notifications/size-changedwith its rendered height and the host resizes the iframe element accordingly:<iframe ref={iframeRef} sandbox="allow-scripts" srcdoc={preparedHtml} style={{ height: iframeHeight }} title="MCP App" />Startup Sequence
User clicks "Run"
       |
       v
ToolsPanel calls Extension
Extension calls MCP Server ──────────────────────────── HTTP POST
                            <────────── structuredContent ───────

McpAppViewer mounts, sends fetchUiResource
Extension calls resources/read("ui://…") ──────────── HTTP GET
                                          <──── HTML ────────────
iframe.srcdoc = html   ←── iframe starts

iframe                     McpAppViewer
  |── initialize ─────────────────────>|
  |<── result (ok) ────────────────────|
  |── ui/initialize ──────────────────>|
  |<── result (theme, platform, …) ────|
  |── ui/notifications/initialized ───>|
  |<── tool-input  { arguments }  ─────|   ← original args
  |<── tool-result { structuredContent}|   ← original result
  |
  renders initial state
Interactive tool calls afterward go through the same proxy path:
iframe → postMessage → McpAppViewer → extension host → HTTP → MCP server → back.Building an App: The QR Code Example
The QR code generator was built without a framework: plain JavaScript, JSON-RPC 2.0 over
postMessage. It exposed two sandbox constraints immediately.SVG data URIs are blocked.
QRCode.toString(text, { type: 'svg' })returns an SVG string. Putting it in an
// ✗ blocked img.src = 'data:image/svg+xml,' + encodeURIComponent(svg); // ✓ works fine in sandboxed iframes const pngDataUrl = await QRCode.toDataURL(text, { width: 300 }); img.src = pngDataUrl;navigator.clipboardis silently unavailable. The null origin has no clipboard permission. The fallback that still works:// ✗ silently fails await navigator.clipboard.writeText(text); // ✓ works even in sandboxed null origin const ta = document.createElement('textarea'); ta.value = text; document.body.appendChild(ta); ta.select(); document.execCommand('copy'); document.body.removeChild(ta);The app-side handshake is straightforward. The SDK's React binding handles it automatically; without it:
async function init() {
  await request('initialize', {
    protocolVersion: '2026-01-26',
    capabilities: {},
    clientInfo: { name: 'qr-code-app', version: '1.0.0' },
  });
  notify('notifications/initialized');

  const uiRes = await request('ui/initialize', {
    protocolVersion: '2026-01-26',
    clientInfo: { name: 'qr-code-app', version: '1.0.0' },
  });
  // uiRes.hostContext.theme → 'dark' | 'light'

  notify('ui/notifications/initialized');
  // host now sends tool-input and tool-result
}
Host Implementation Reference
Capability Advertise extensions['io.modelcontextprotocol/ui']ininitializeHTML fetch Standard resources/readon theui://URISandbox allow-scriptsonly, noallow-same-origin, noallow-top-navigationCSP Build from _meta.ui.csp;default-src 'none'as baselineBridge Handle postMessagefrom the webview side; nothing injected into the iframestructuredContentMCP spec 2026-01-26; thread it through every layer of the pipeline Timing Show the iframe when HTML arrives, not when the SDK handshake completes Resize Handle ui/notifications/size-changedto drive iframe heightTheme Pass hostContext.themeinui/initializeresultCDN scripts Only if server declares the domain in _meta.ui.csp.resourceDomainsObservations
The protocol is simpler than it first appears. Once the architecture is clear (iframe sends to
window.parent, webview catches from outside, extension host proxies over HTTP), the rest is just message routing. The non-obvious parts are the sandbox constraints (eval, SVG data URIs, clipboard all blocked withoutallow-same-origin) and the requirement to carrystructuredContentthrough every layer. Both are easy to miss until something silently fails.The SDK and the vanilla path produce the same result. The SDK is more concise on the app side; the vanilla implementation makes every protocol message explicit, which is useful when the spec is still evolving.
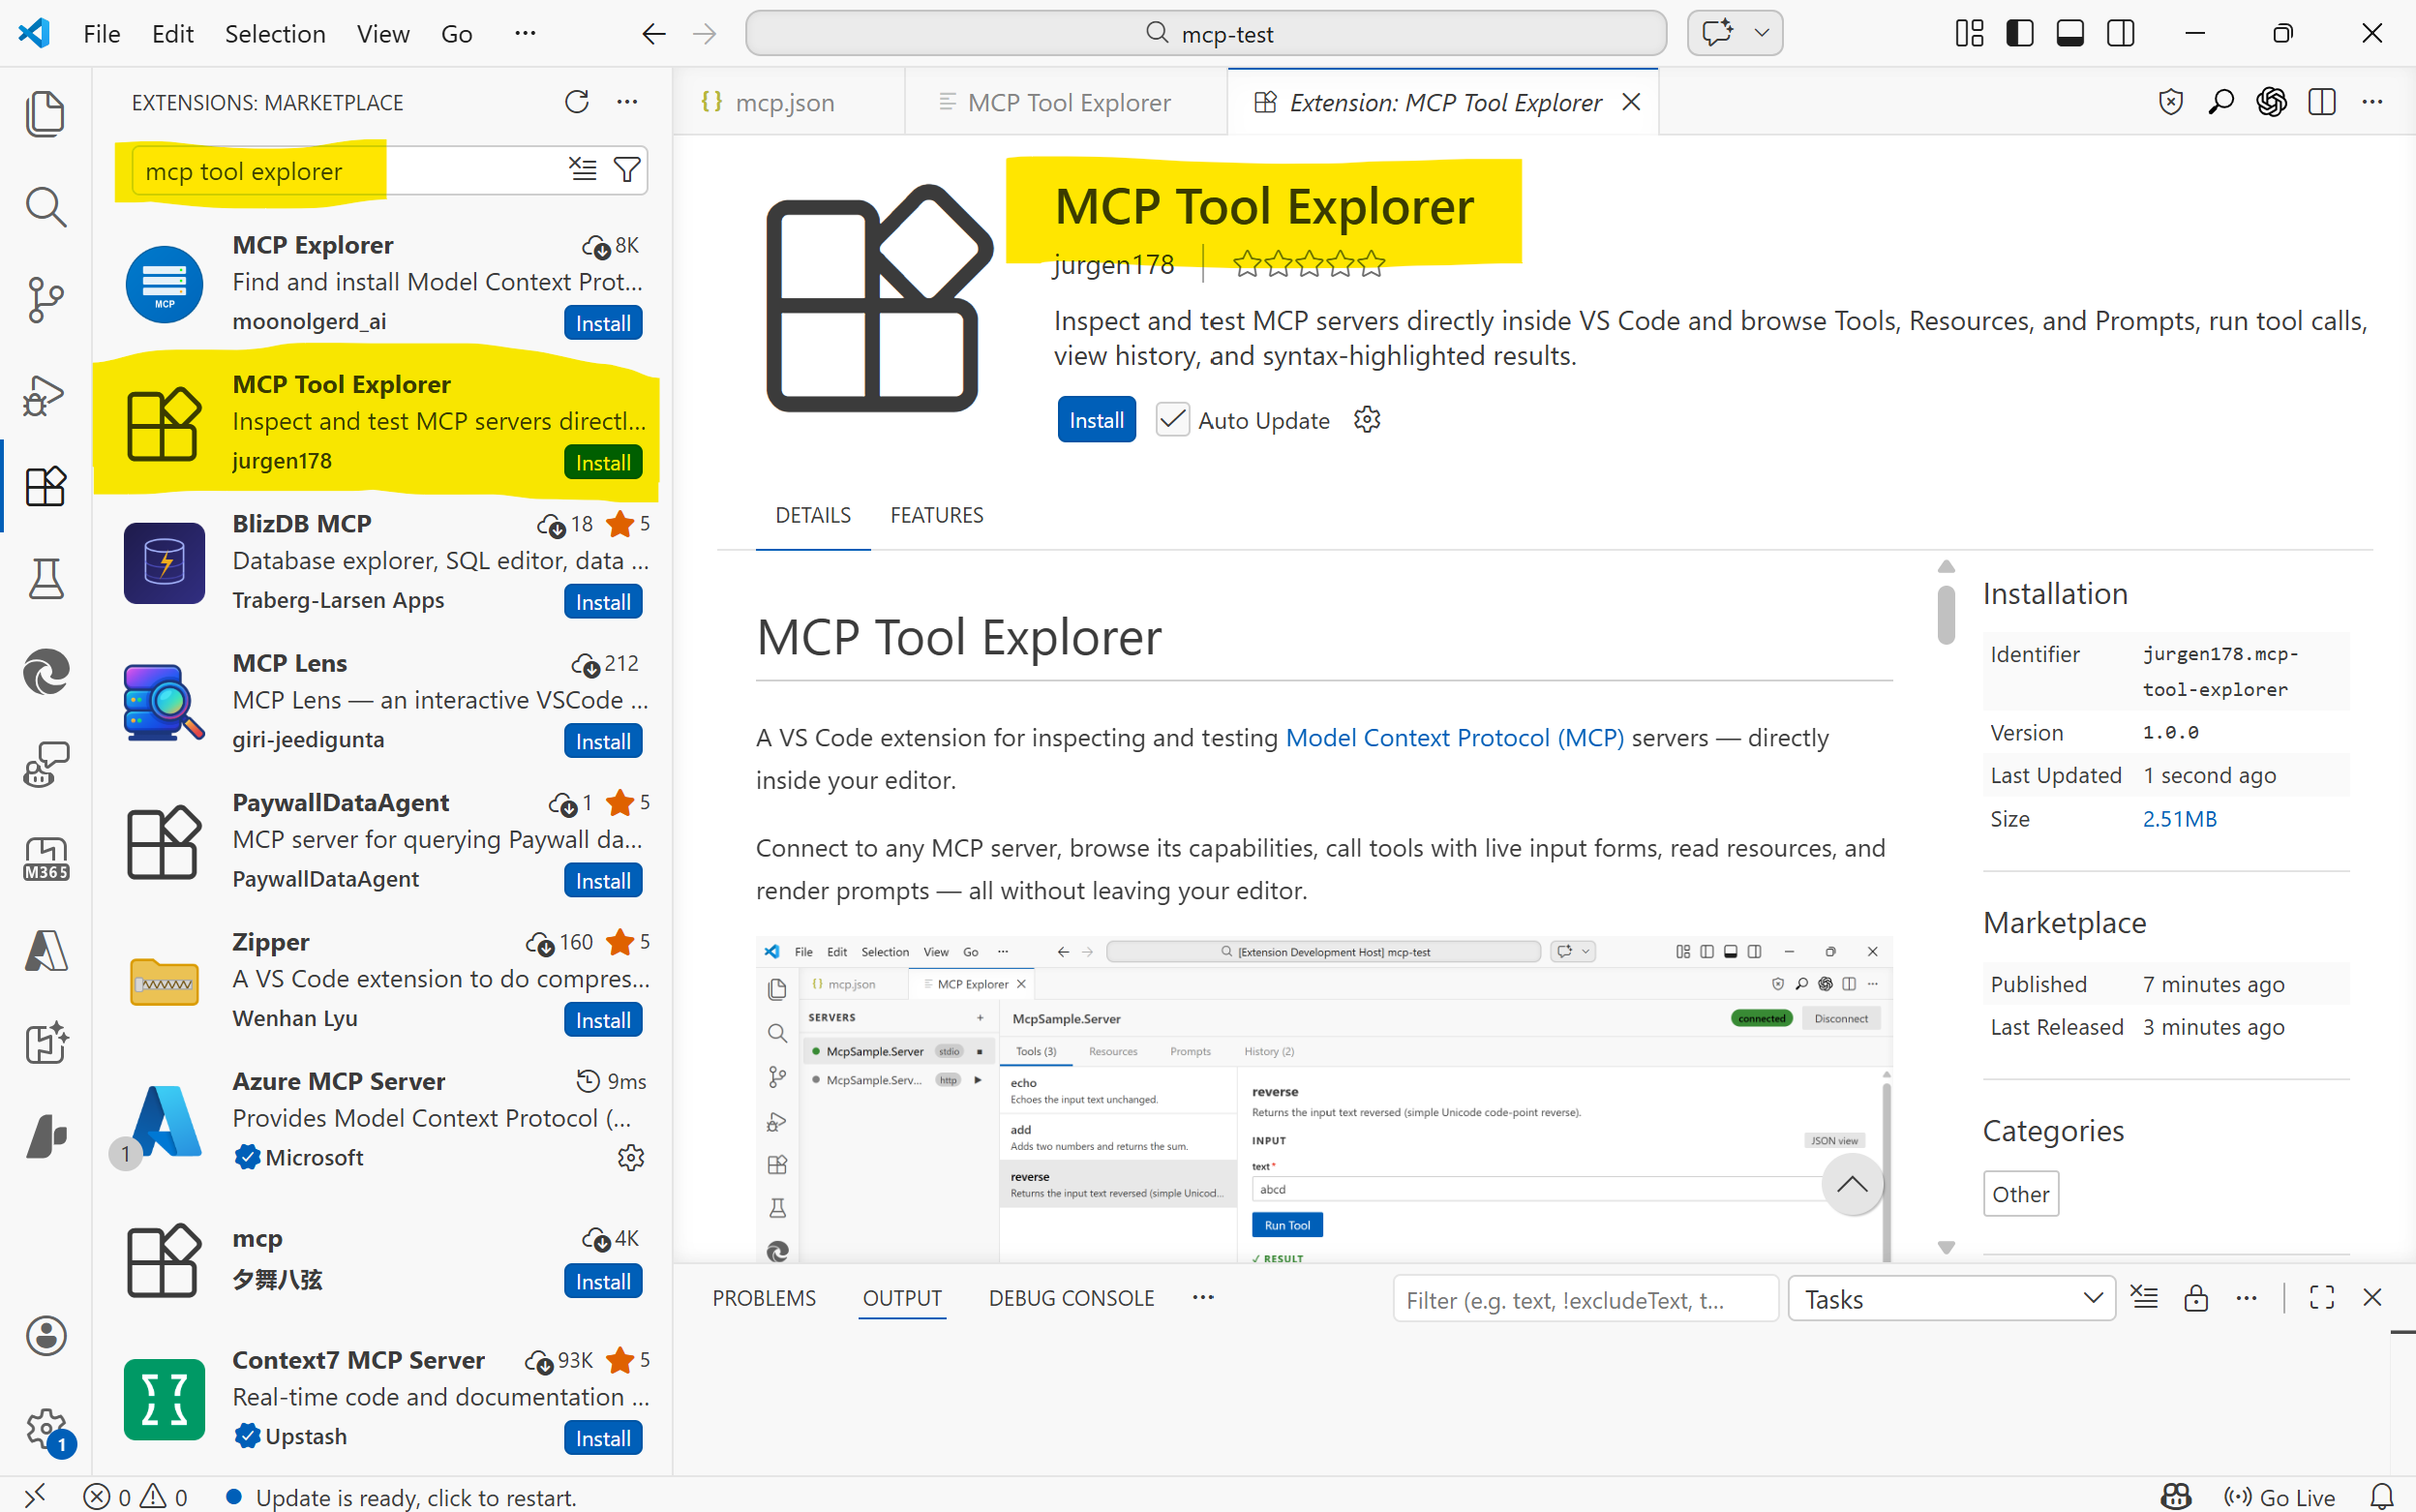
MCP Tool Explorer is available in the VS Code Marketplace. Point it at any MCP server that implements the spec; the UI appears automatically alongside the regular result view.
-
MCP Tool Explorer
To work with Model Context Protocol (MCP) servers, I created a VS Code extension for inspecting and testing.
This extension connects to any MCP server, browse its capabilities, call tools with live input forms, read resources, render prompts, inspect notifications, and review connection traffic. All without leaving your editor.
Supports MCP Apps: tools that ship an interactive UI rendered directly inside the explorer.
https://github.com/jurgen178/mcp-tool-explorer
Features
Server Management
- Auto-discovery: automatically finds servers defined in
.vscode/mcp.jsonor themcp.serversworkspace setting - Manual registration: add any server on the fly via the Add Server dialog
- All three transports:
stdio,SSE, andStreamable HTTP - Capability indicators: each connected server shows T / R / P badges: green = items available, dimmed = declared but empty, hidden = not supported
Tools
- Browse all tools exposed by a server with their descriptions and parameter schemas
- Form view: auto-generated input form with type-aware fields (text, number, boolean toggle, enum select), including nested object fields
- JSON view: write raw JSON arguments with live validation hints (missing required fields, unknown properties)
- Run tools and see syntax-highlighted results; press Ctrl+Enter to run without leaving the keyboard
- Filter: a search bar appears above the tool list when a server exposes 10 or more tools
- Previous calls: the last 6 calls per tool are shown inline with one-click re-run
- The first available tool is automatically selected when a server connects
MCP Apps
Tools can declare a
ui://resource URI in their_meta.ui.resourceUrifield (MCP spec 2026-01-26). When such a tool is called, the explorer loads its HTML UI in a sandboxed iframe directly below the result, with no browser, no external window.The iframe communicates with the MCP server through the explorer's built-in JSON-RPC 2.0 bridge: it can call
tools/callandresources/readback against the server in real time, enabling fully interactive experiences like live regex visualizers, fractal renderers, or code diff viewers.Tools with an MCP App UI are marked with an MCP App badge in the tool list.
Resources
- List all resources and read their contents
- Results rendered with syntax highlighting
- Filter: a search bar appears when a server exposes 10 or more resources
- Resource list updates can be refreshed automatically when the server emits
notifications/resources/list_changed
Prompts
- Browse and render prompts with argument input support
- Filter: a search bar appears when a server exposes 10 or more prompts
- Prompt list updates can be refreshed automatically when the server emits
notifications/prompts/list_changed
Notifications & Events
- A dedicated Events tab shows incoming server notifications such as logging messages, progress updates, resource updates, and list-change notifications
- Related notifications can be visually grouped when they originate from the same server-side activity
- Streamable HTTP servers can surface server-initiated events, including out-of-band notifications over the standalone SSE stream
Saved Tests
- A dedicated Tests tab lets you save and replay tool calls as named test cases
- Organise tests into named groups
- Run individual tests or all tests in a group at once and see pass / fail results inline
- Tests are saved to
mcp-tests.jsonin the workspace root and automatically reloaded when the file changes - Supports both Form view and JSON view for test arguments; press Ctrl+Enter to run
Request History
- A dedicated History tab records every tool call, resource read, and prompt render
- See timestamp, duration, status (success / error), and expand to inspect the request arguments and response
- Re-run any past tool call directly from the timeline
Connection Diagnostics
- A dedicated Log tab records MCP transport activity for troubleshooting
- For HTTP-based servers, request and response details are captured to help diagnose initialization, fallback, auth, and notification-delivery issues
- Actionable hints are shown for common errors (host not found, connection refused, TLS issues, HTTP 4xx/5xx, invalid URL scheme)
- HTML error pages (e.g. IIS error responses) are automatically stripped to show only the relevant title
- In-progress connections can be cancelled at any time with the Cancel button
JSON Viewer
- Syntax-highlighted JSON output (keys, strings, numbers, booleans, nulls each in distinct colours)
- Copy to clipboard button appears on hover over any result
Getting Started
Installation
Install from the VS Code Marketplace, or build from source (see Building).
Test Server
If you want to try the extension against a ready-made MCP server, see mcp-test-server. It is useful for quickly validating tool calls, resources, and prompts while testing the explorer. A publicly reachable test endpoint is also available at https://bitfabrik.io/mcp.
Opening the Explorer
- Run
MCP: Open MCP Tool Explorerfrom the Command Palette (Ctrl+Shift+P)
Auto-discovery
If your workspace has a
.vscode/mcp.jsonfile, servers are discovered automatically when the extension activates. Example:{ "servers": { "my-stdio-server": { "type": "stdio", "command": "node", "args": ["./server/index.js"] }, "my-http-server": { "type": "http", "url": "http://localhost:3000/mcp" } } }Adding a Server Manually
Click + Add Server in the sidebar and fill in the connection details:
- stdio servers support
command,args(quote arguments that contain spaces),env, and an optional working directory (cwd) - HTTP / SSE servers support a
urland optional requestheaders
Manually added servers persist for the lifetime of the VS Code window.
Transports
Type Config key Description stdiocommand,args,env,cwdSpawns a local process httpurl,headersStreamable HTTP (MCP 2025-03 spec) sseurl,headersServer-Sent Events (legacy) For
stdioservers, the working directory defaults to the workspace root so relative paths incommandresolve correctly.
Building
# Install dependencies
npm install

# Build (webview + extension)
npm run build
The webview is a Vite + React app located in
webview-ui/. Runningnpm run buildat the root builds both the webview and the extension host automatically.
Project Structure
src/
  extension.ts              # Extension entry point
  types.ts                  # Extension-side types
  mcp/
    McpClientManager.ts     # MCP client connections (all transports)
    McpConfigDiscovery.ts   # Server auto-discovery
  panels/
    McpToolExplorerPanel.ts # WebView panel & message bridge
webview-ui/
  src/
    App.tsx                 # Root component & state management
    components/
      Sidebar.tsx           # Server list & connection controls
      ToolsPanel.tsx        # Tools tab
      ResourcesPanel.tsx    # Resources tab
      PromptsPanel.tsx      # Prompts tab
      EventsPanel.tsx       # Notifications and events tab
      HistoryPanel.tsx      # History timeline tab
      ConnectionLogPanel.tsx # Transport and connection log tab
      JsonViewer.tsx        # Syntax-highlighted JSON renderer
      AddServerModal.tsx    # Add Server dialog
Requirements
- VS Code 1.85 or later
- Node.js 18+ (for building from source)
- Auto-discovery: automatically finds servers defined in
-
Lossless Exposure & Contrast Adjustment in JPEG10
Lossless Tonal Adjustments in JPEG's DCT Domain: Exposure Compensation and Multi-Band Contrast
Most JPEG workflows treat exposure (brightness) and contrast as inherently "lossy": decode pixels, apply curves, then re-encode. That approach works, but it always introduces an additional step of quantization error.
In this github fork of the IJG JPEG-10 code, I added two options to
jpegtranthat operate directly on quantized DCT coefficients:-exposure-comp EV-contrast DC LOW MID HIGH
Both are applied during transcoding, so they combine naturally with existing
jpegtranoperations such as rotation, flipping, cropping, marker copying, and progressive conversion.https://github.com/jurgen178/jpeg10
Download Windows x64 binary: jpegtran.zip
Quick Usage
jpegtran [standard options] [-exposure-comp EV] [-contrast DC LOW MID HIGH] input.jpg output.jpgExamples:
# Brighten by 1 stop
jpegtran -copy all -exposure-comp 1 input.jpg output.jpg

# Darken by 0.5 stops
jpegtran -copy all -exposure-comp -0.5 input.jpg output.jpg

# Contrast (uniform: DC=LOW=MID=HIGH)
jpegtran -copy all -contrast -1   -1   -1   -1   input.jpg out-contrast-u-1.jpg
jpegtran -copy all -contrast -0.5 -0.5 -0.5 -0.5 input.jpg out-contrast-u-0.5.jpg
jpegtran -copy all -contrast  0.5  0.5  0.5  0.5 input.jpg out-contrast-u+0.5.jpg
jpegtran -copy all -contrast  1    1    1    1   input.jpg out-contrast-u+1.jpg

# Contrast (band-specific examples)
jpegtran -copy all -contrast 0 0 0.6 0   input.jpg out-contrast-mid+0.6.jpg
jpegtran -copy all -contrast 0 0 0 0.4   input.jpg out-contrast-high+0.4.jpg
jpegtran -copy all -contrast 0 0.4 0 0   input.jpg out-contrast-low+0.4.jpg

# Combine: rotate 90°, brighten 0.5 EV, and add uniform contrast +0.5
jpegtran -copy all -rot 90 -exposure-comp 0.5 -contrast 0.5 0.5 0.5 0.5 input.jpg output.jpg
Both switches accept fractional values. Practical ranges:
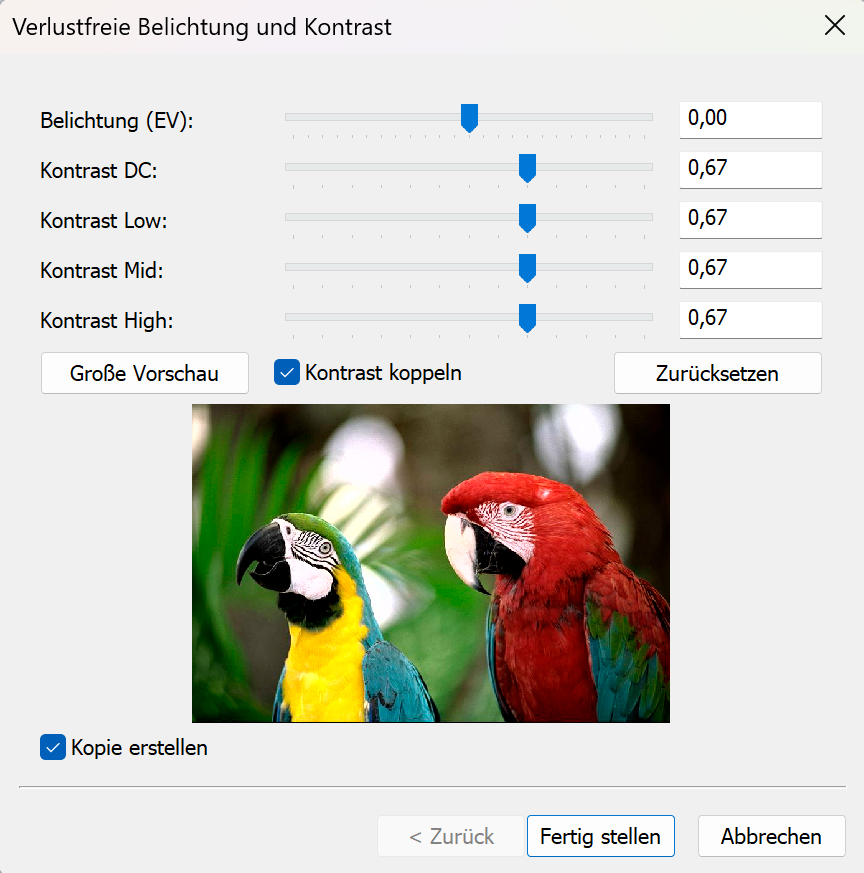
Option Practical range Neutral -exposure-comp EV-3 … +3 0 -contrast DC LOW MID HIGH-2 … +2 0 Integrated into cPicture with live preview:
Background: DCT Coefficient Basics
A JPEG image is encoded as a grid of DCT blocks (with 8×8 Elements in size). Each block has one DC coefficient and 63 AC coefficients. But each MCU might have more than one block depending on the color subsampling.
-
DC[0] represents the (level-shifted) average sample value of the block. The relationship to pixel mean is:
$$\mu = \frac{DC_\text{unquant}}{N} + \text{center}$$
where $N$ is the DCT block size of 8 and $\text{center} = 2^{\text{precision}-1}$ (e.g. 128 for 8‑bit).
-
AC[1..N²−1] represent spatial frequency components (texture, edges, contrast).
Both DC and AC are stored quantized: the actual stored integer is $\text{round}(\text{value} / Q_k)$, where $Q_k$ is the quantization step for coefficient $k$.
-exposure-comp EV— Exposure CompensationExposure compensation from -2EV to +2EV:

Concept
A photographic EV step corresponds to doubling (or halving) the amount of light. Applied in linear light:
$$\text{gain} = 2^{EV}$$
Because JPEG samples are gamma-coded (sRGB), pixel values cannot be multiplied directly. Instead:
- Estimate a representative level from the DC blocks.
- Compute the equivalent additive pixel-domain offset by applying the gain in linear light at that reference level.
- Translate the offset into a quantized DC delta.
- Add the delta to every DC coefficient.
Only DC is modified. AC coefficients are not modified, so local contrast and texture are preserved.
Reference Level — Log-Average
A geometric mean (log-average) of all block mean levels is used as the exposure reference:
$$\bar{L} = \exp\!\left(\frac{1}{B}\sum_{i=1}^{B} \ln(L_i + 1)\right) - 1$$
where $L_i$ is the intensity mean of block $i$ (clamped to $[0, \text{MAX}]$) and $B$ is the total number of blocks.
sRGB Linearisation
The gain is applied in linear light:
$$u_\text{ref} = \frac{\bar{L}}{\text{MAX}}$$
$$u_\text{ref,lin} = f_\text{lin}(u_\text{ref})$$
$$u_\text{new,lin} = \min(u_\text{ref,lin} \cdot \text{gain},\; 1.0)$$
$$u_\text{new} = f_\text{sRGB}(u_\text{new,lin})$$
The sRGB transfer functions used:
$$f_\text{lin}(u) = \begin{cases} u / 12.92 & u \le 0.04045 \\ \left(\dfrac{u + 0.055}{1.055}\right)^{2.4} & u > 0.04045 \end{cases}$$
$$f_\text{sRGB}(u) = \begin{cases} 12.92\,u & u \le 0.0031308 \\ 1.055\,u^{1/2.4} - 0.055 & u > 0.0031308 \end{cases}$$
Pixel-Domain Offset → Quantized DC Delta
$$\Delta_\text{samples} = (u_\text{new} - u_\text{ref}) \cdot \text{MAX}$$
Clamped to available headroom/shadow room to limit clipping, then converted to a quantized DC delta:
$$\Delta_{DC} = \text{round}\!\left(\frac{\Delta_\text{samples} \cdot N}{Q_0}\right)$$
where $N$ is the DCT block size and $Q_0$ is the DC quantization step.
Component Policy
Color space Components adjusted YCbCr, BG_YCC, YCCK Luma only (component 0) RGB/BG_RGB + subtract-green transform Green/base only (component 1) CMYK, all others All components For CMYK and YCCK the delta is computed in an inverted intensity domain ($I = \text{MAX} - \text{sample}$) so that +EV brightens and −EV darkens.
-contrast DC LOW MID HIGH— Contrast AdjustmentContrast from -1CV to +1CV:

Concept
This option provides four separate controls (all in stops):
DCcontrols the DC coefficient (block mean)LOW,MID,HIGHcontrol the AC coefficients in frequency order
All controls are interpreted as log2 gains (stops). For a value $x$, the gain is:
$$g(x) = 2^{x}$$
So +1 doubles, -1 halves.
DC
DC is scaled by:
$$g_\mathrm{DC} = 2^{DC}$$
and applied as:
$$DC' = \mathrm{clamp}(\mathrm{round}(g_\mathrm{DC} \cdot DC))$$
AC (low/mid/high weighting)
AC coefficients are processed in zigzag order (the JPEG natural order). Let $z$ be the AC position with $z = 1 \ldots A$, where $A$ is the number of AC coefficients.
Define a normalized position:
$$t = \begin{cases} \dfrac{z-1}{A-1} & A > 1 \\ 0 & A = 1 \end{cases}$$
Triangular weights:
- low weight fades out from low frequencies
$$w_\mathrm{low} = \max(0, 1 - 2t)$$
- mid weight peaks in the middle
$$w_\mathrm{mid} = 1 - |2t - 1|$$
- high weight fades in toward high frequencies
$$w_\mathrm{high} = \max(0, 2t - 1)$$
Per-coefficient exponent and gain:
$$v(z) = LOW\cdot w_\mathrm{low} + MID\cdot w_\mathrm{mid} + HIGH\cdot w_\mathrm{high}$$
$$g(z) = 2^{v(z)}$$
Applied to each AC coefficient:
$$AC'[z] = \mathrm{clamp}(\mathrm{round}(g(z)\cdot AC[z]))$$
If
DC = LOW = MID = HIGH = X, then all coefficients are scaled by the same gain $2^X$ (uniform contrast adjustment).Component Policy
Same as
-exposure-comp:- YCbCr/BG_YCC/YCCK: luma only
- RGB subtract-green: base/green only
- otherwise: all components
Ordering and Composition
Both
-exposure-compand-contrastare applied as a post step after any geometric transform (-rot,-flip,-crop, …). The tonal operations work on the final output coefficient arrays, so the order of switches on the command line does not matter.
Implementation notes
- Core implementation:
transupp.c:do_exposure_comp()anddo_contrast()transupp.h: adds new fields tojpeg_transform_info
- CLI parsing:
jpegtran.c
- Feature flags and parameters are stored in
jpeg_transform_infointransupp.h
Summary
-exposure-comp EVshifts brightness by changing only DC coefficients, with EV evaluated in linear light (sRGB transfer) at a log-average reference.-contrast DC LOW MID HIGHscales DC and AC coefficients, with AC gains varying smoothly over frequency order using low/mid/high controls.- Both run in the DCT domain and integrate naturally into the lossless-transformation workflow of
jpegtran.
Example pictures
-
Sommerzeit-EXIF automatisch korrigieren mit PowerShell
Ein häufiges Problem bei Digitalkameras: Die Sommerzeit ist noch in der Kamera aktiviert, obwohl bereits Winterzeit ist. Die Zeitstempel in den Fotos sind dadurch eine Stunde falsch und das fällt oft erst später auf, wenn man die Bilder sortiert oder mit anderen Fotos abgleicht.
Viele Kameras speichern die Sommerzeit-Einstellung in den EXIF-Daten. Bei Nikon-Kameras findet sich das "Daylight Savings"-Flag in den MakerNotes. Solange dieses auf "Yes" steht, sind die Zeitstempel um eine Stunde vorgestellt.
Das PowerShell-Script durchsucht alle Bilddateien (z.B. NEF bei Nikon), prüft ob das Sommerzeit-Flag noch aktiv ist, und korrigiert dann:
Die EXIF-Zeitstempel werden um 1 Stunde zurückgestellt Das Sommerzeit-Flag wird deaktiviert Die Windows-Datei-Zeitstempel (Erstellt/Geändert) werden angepasst.
Das Script nutzt das kostenlose Tool exiftool und zeigt für jede Datei übersichtlich an, was geändert wurde. Dateien mit bereits korrekter Zeit werden einfach übersprungen.Der exiftool-Pfad ist oben im Script konfigurierbar. Einfach das Script im Foto-Ordner ausführen. Unterordner werden automatisch durchsucht.
Das Ergebnis: Konsistente, korrekte Zeitstempel in allen Fotos, ohne manuelle Arbeit.
# PowerShell Script zur Korrektur der Sommerzeit in NEF-Dateien
# Stellt die EXIF-Zeit um eine Stunde vor für Dateien, die Sommerzeit in Nikon MakerNotes haben

# Testaufruf um DaylightSavings auszulesen:
# C:\tools\exiftool -DaylightSavings DSC_1234.NEF
# Daylight Savings                : No

# ===== KONFIGURATION =====
$exiftoolPath = "C:\tools\exiftool"
# =========================

# Pfad zum aktuellen Verzeichnis
$baseDir = $PSScriptRoot

# Alle NEF-Dateien finden
$nefFiles = Get-ChildItem -Path $baseDir -Recurse -Filter "*.NEF"

Write-Host "Gefundene NEF-Dateien: $($nefFiles.Count)" -ForegroundColor Cyan

$correctedCount = 0
$skippedCount = 0

foreach ($file in $nefFiles) {
    Write-Host "`nPrüfe: $($file.FullName)" -ForegroundColor Yellow

    try {
        # Lese Nikon Daylight Savings Flag aus MakerNotes
        $daylightSavings = & $exiftoolPath -s -s -s -DaylightSavings $file.FullName 2>&1

        if ($LASTEXITCODE -ne 0) {
            Write-Host "⚠ Konnte MakerNotes nicht lesen" -ForegroundColor DarkYellow
            $skippedCount++
            continue
        }

        Write-Host "Daylight Savings: $daylightSavings" -ForegroundColor Cyan

        # Prüfe, ob Sommerzeit aktiviert ist (Yes oder On)
        if ($daylightSavings -match "Yes|On") {
            Write-Host "→ Sommerzeit ist aktiviert - Korrektur erforderlich" -ForegroundColor Magenta

            # Zeige aktuelle Zeit
            $currentTime = & $exiftoolPath -s -s -s -DateTimeOriginal $file.FullName
            Write-Host "Aktuelle Zeit: $currentTime" -ForegroundColor White

            # Stellt die Zeit um 1 Stunde zurück (-1 Stunde)
            # -AllDates betrifft DateTimeOriginal, CreateDate und ModifyDate
            Write-Host "Stelle Zeit um 1 Stunde zurück und setze Sommerzeit zurück..." -ForegroundColor Magenta

            & $exiftoolPath -AllDates-=1:0:0 -DaylightSavings=No -overwrite_original $file.FullName 2>&1 | Out-Null

            if ($LASTEXITCODE -eq 0) {
                $newTime = & $exiftoolPath -s -s -s -DateTimeOriginal $file.FullName
                $newDST = & $exiftoolPath -s -s -s -DaylightSavings $file.FullName
                Write-Host "✓ Erfolgreich aktualisiert: $newTime" -ForegroundColor Green
                Write-Host "  Sommerzeit jetzt: $newDST" -ForegroundColor Green

                # Setze Windows-Datei-Zeitstempel auf korrigierte EXIF-Zeit
                try {
                    $exifDateTime = [DateTime]::ParseExact($newTime, "yyyy:MM:dd HH:mm:ss", $null)
                    $file.CreationTime = $exifDateTime
                    $file.LastWriteTime = $exifDateTime
                    Write-Host "  Datei-Zeitstempel aktualisiert" -ForegroundColor Green
                } catch {
                    Write-Host "  ⚠ Konnte Datei-Zeitstempel nicht setzen: $_" -ForegroundColor DarkYellow
                }

                $correctedCount++
            } else {
                Write-Host "✗ Fehler beim Aktualisieren" -ForegroundColor Red
            }
<#
 #>
        } else {
            Write-Host "→ Keine Sommerzeit - wird übersprungen" -ForegroundColor Gray
            $skippedCount++
        }
    }
    catch {
        Write-Host "✗ Fehler: $_" -ForegroundColor Red
        Write-Host "Stelle sicher, dass exiftool installiert ist und im PATH verfügbar ist." -ForegroundColor Yellow
        break
    }
}

Write-Host "`n=== Fertig ===" -ForegroundColor Cyan
Write-Host "Korrigierte Dateien: $correctedCount" -ForegroundColor Green
Write-Host "Übersprungene Dateien: $skippedCount" -ForegroundColor Gray
Write-Host "Gesamt geprüft: $($nefFiles.Count)" -ForegroundColor Cyan
Seite 1 von 7
Ältere Beiträge →